War Sails World Map
Creating or modifying the War Sails world map involves a few additional requirements compared to Bannerlord. They are listed below.
Navmesh
With the War Sails DLC, many bodies of water become navigable, introducing several new navmesh types beyond those used in the base game. When creating or modifying a War Sails world map, you may need to use the following navmesh types:
CoastalSeaOpenSeaRiverNonNavigableRiverUnderBridgeLake
The corresponding navmesh ID values are shown in the image below.
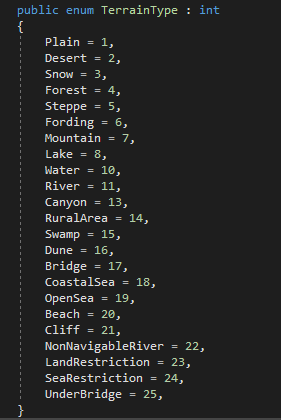
CoastalSea and OpenSea are both navigable water types, but they serve different gameplay purposes. They use different movement speed modifiers and are treated differently by the sea attrition system, so choose the appropriate type based on the intended gameplay.
Use the UnderBridge navmesh type for the faces directly beneath bridges, as well as the adjacent faces leading into and out of the bridge. This navmesh type does not affect movement speed or sea attrition. Instead, it controls bridge-specific behavior:
- Ships will automatically fold and unfold their sails when passing underneath the bridge.
- When the player sails under a bridge, the bridge becomes transparent to improve visibility.
Lakes are not navigable in War Sails. The Lake navmesh type functions as impassable terrain and cannot be traversed by ships.
Flowmap
In War Sails, wind and water currents affect movement across navigable water. Strength and direction are defined by the Flowmap, which can be edited directly in the World Map Editor.
To edit the Flowmap:
- Click Paint Flowmap, located between the Paint Flora and Navigation Mesh buttons.
- Also, open the Inspector and select the Flowmap tab in order to correctly edit it.
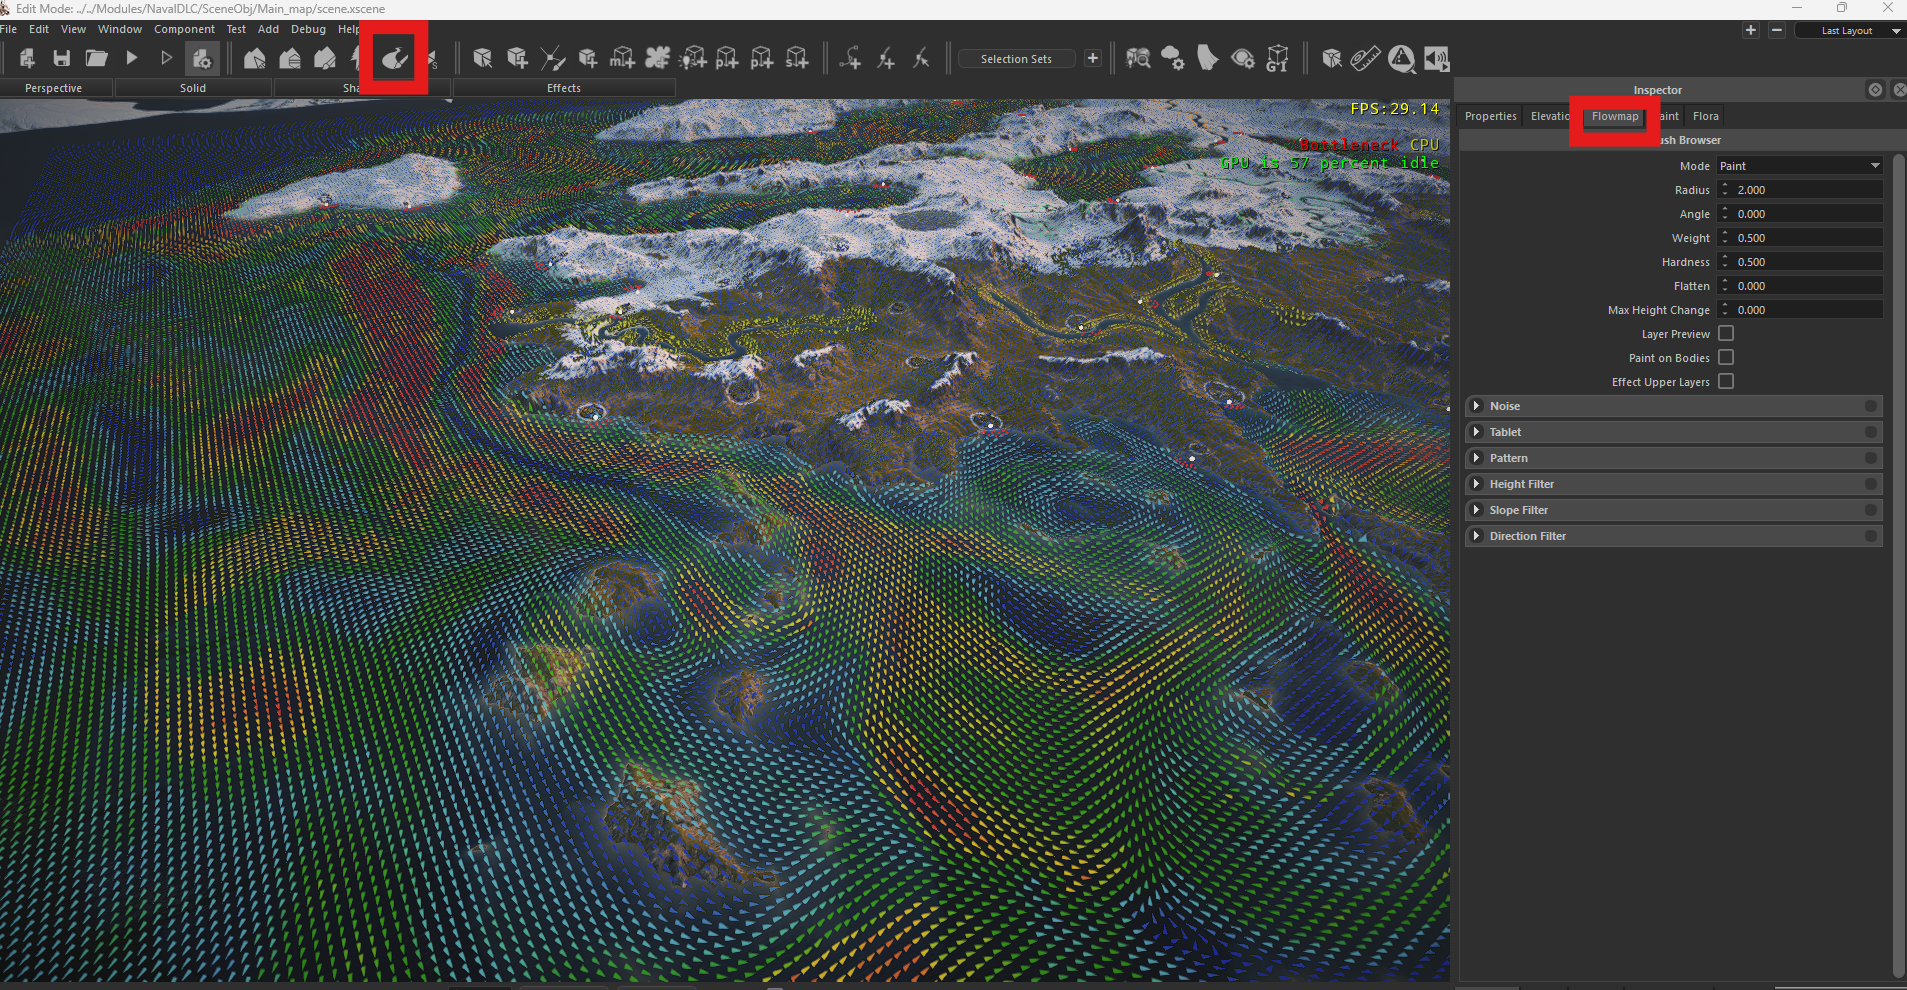
The Flowmap is painted much like terrain textures or the heightmap, but each brush stroke also defines a direction. The editor displays colored arrows to visualize the Flowmap:
- The arrow direction indicates the wind and water current direction.
- The arrow color indicates the wind and water current strength.
- Blue represents the weakest wind and water current.
- Red represents the strongest wind and water current.
- Blue represents the weakest wind and water current.
The Flowmap directly influences the water shader. Because of this, painting neighboring areas with sharply opposing flow directions can cause visible stretching or unrealistic water deformation. If you need adjacent areas with opposite current directions, create a smooth transition between them instead of painting an abrupt change. This produces more natural-looking water while still allowing distinct current patterns.
Settlement Setup
War Sails introduces several additional entities for coastal settlements. These entities enable features such as embarking and disembarking, naval blockades, and village landing points.
Port Points
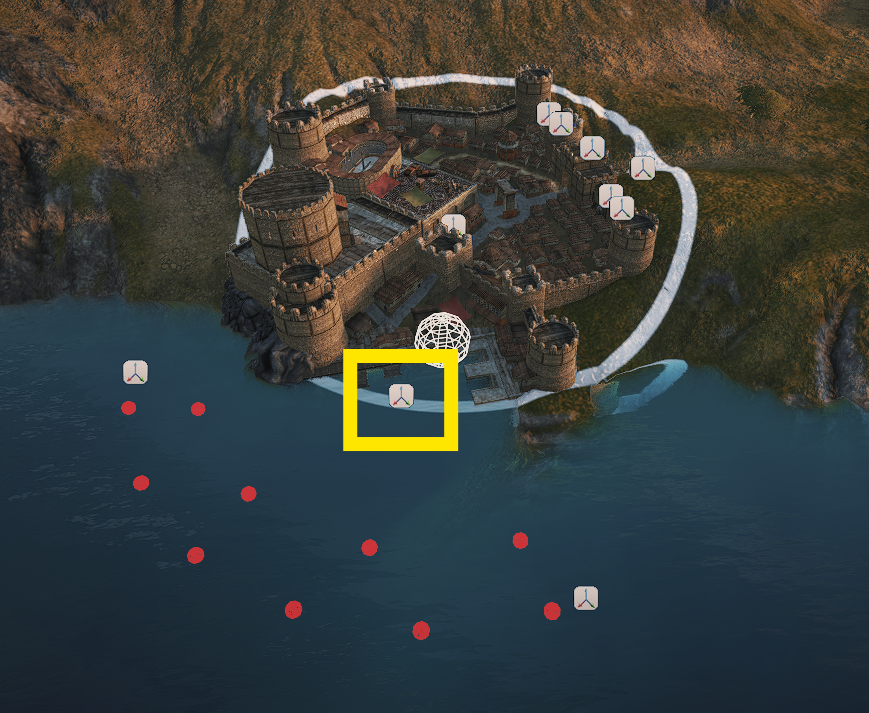
To allow naval parties to embark and disembark at a coastal town, add a child entity named town_port to the settlement.
The entity must:
- Be tagged with
main_map_city_port. - Be placed on a navigable naval navmesh, such as
CoastalSeaorRiver. Not placing it correctly will lead to errors.
Settlement XML Configuration
After adding a town_port entity to a coastal town, you must also update the settlements.xml file.
In the settlement’s Buildings section, add the Shipyard building:
<Building
    id="building_shipyard"
    level="1" />
And for the shipyard scene, you should add the shipyard location in the settlement’s Locations section, like this:
<Location
    id="port"
    scene_name="aserai_shipyard" />
Blockade Points
When a coastal town is under siege, War Sails displays a naval blockade around the settlement. To define the blockade area and ship positions, add the following:
town_blockade_startentity with theBlockade_Arc_Starttag as a child entitytown_blockade_endentity with theBlockade_Arc_Endtag as a child entityBlockadePositionScriptto the town entity
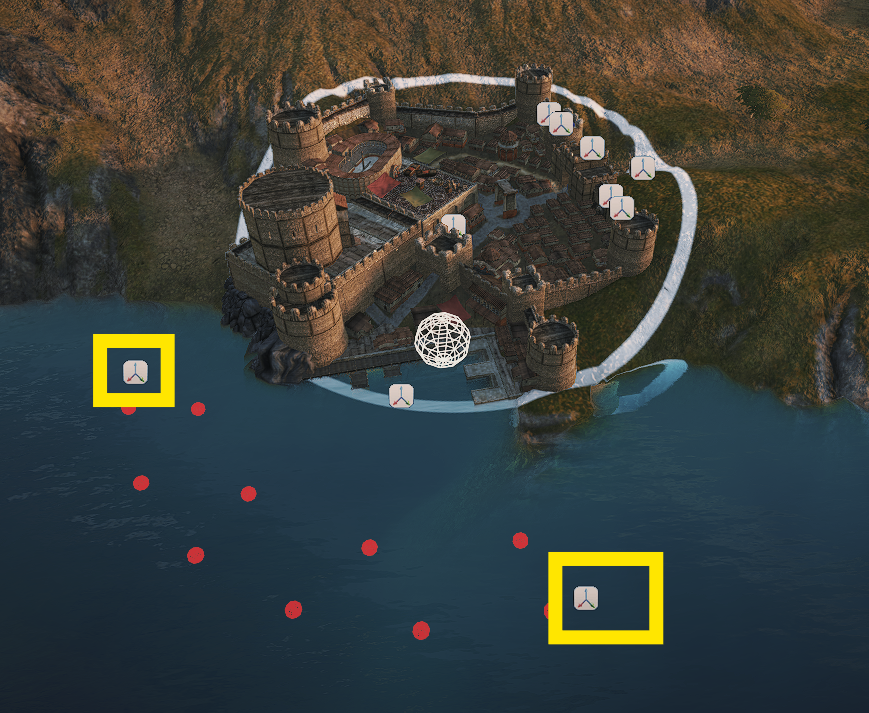
Once these have been added, the editor will display:
- Red markers representing the individual blockade ship positions.
- A sphere indicating the center of the blockade arc.
Moving the start and end points changes the extent of the blockade arc, allowing you to adjust the visual placement of the blockade fleet.
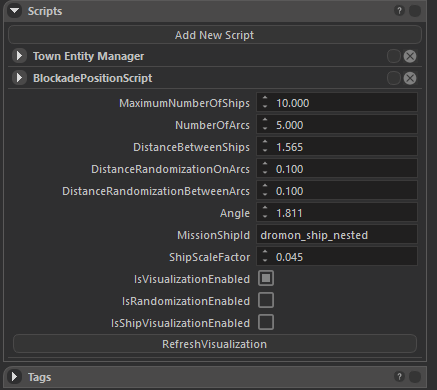
The BlockadePositionScript also exposes several parameters that control the appearance of the blockade, including:
- The number of ships.
- The number of blockade arcs.
- The spacing between ships.
- Other blockade layout settings.
Adjust these values to achieve the desired visual result.
Drop Off Points
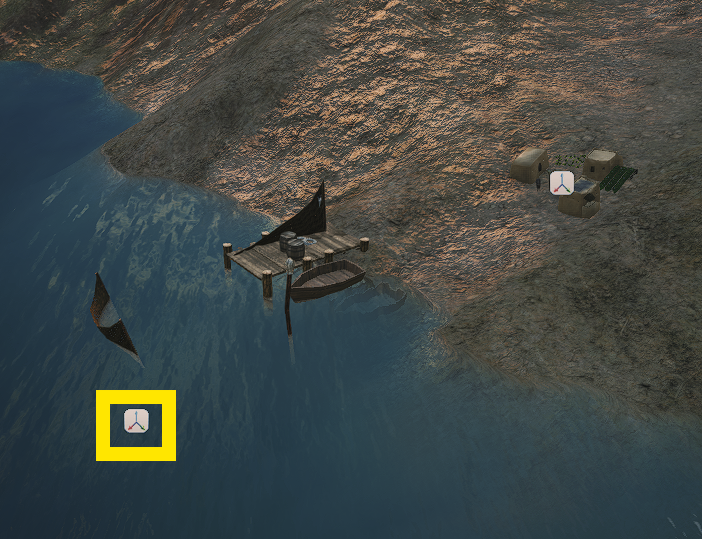
Coastal villages use drop-off points instead of ports to support embarking and disembarking.
To add a drop-off point, create a child entity named drop_point and assign it the main_map_village_dropoff tag.
As with town ports, the drop-off point must be placed on a navigable naval navmesh (such as CoastalSea or River) for it to function correctly.
Transition
In addition to transitions between naval travel and coastal settlements, War Sails also supports direct transitions between navigable water and land.
The only requirement is that both the source and destination navmesh types must be navigable.
For example:
- A party can transition from
CoastalSeatoPlainorForest. - A party cannot transition to an impassable terrain type, such as
Mountain.
This allows you to define embarkation and disembarkation points at any suitable navigable shoreline, not just at settlements.
Scripts
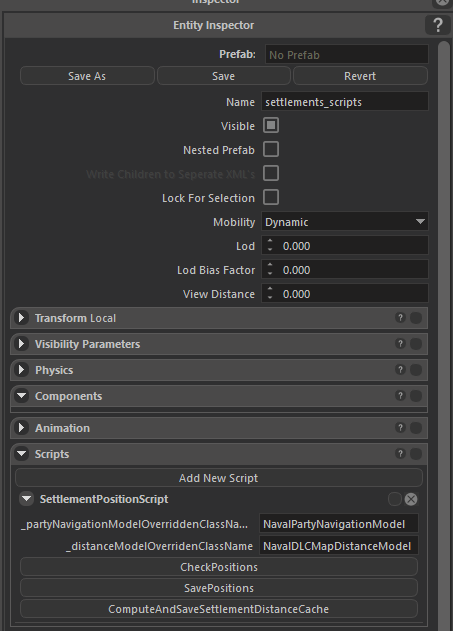
One of the most important components in the world map scene is the SettlementPositionScript, located under the settlement_scripts entity.
Whenever you make changes that affect navigation or settlement locations, the Settlement Distance Cache must be regenerated. This includes changes such as editing the navmesh or moving a settlement, including town_gate, town_port, or drop_point.
To safely regenerate the cache, perform the following steps in order:
- Before rebuilding the Settlement Distance Cache, verify that the following are selected:
_partyNavigationModelOverridenClassName→NavalPartyNavigationModel_distanceModelOverridenClassName→NavalDLCMapDistanceModel
- Check Positions
- Validates settlement-related positions and moves the camera to any problematic locations, making them easier to identify and fix.
- Validates settlement-related positions and moves the camera to any problematic locations, making them easier to identify and fix.
- Save Positions
- Saves the current settlement positions and all associated data.
- Saves the current settlement positions and all associated data.
ComputeAndSaveSettlementDistanceCache
- Rebuilds the Settlement Distance Cache. This final step can take a significant amount of time, depending on your hardware. During the process, the editor computes pathfinding routes between every settlement and every other settlement, then stores the results in the cache.
Water Plane and Material
War Sails does not use the engine’s automatically generated scene water. Instead, it uses custom planar meshes with water materials.
The built-in scene water is designed for mission scenes and has fixed scaling and behavior, making it unsuitable for the flexibility required by the campaign world map. Custom water planes allow you to precisely control the size, placement, and appearance of navigable water.
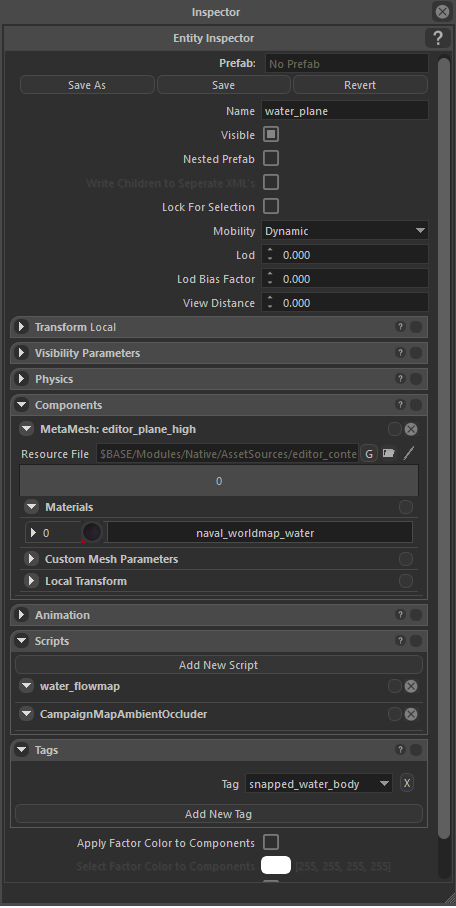
A standard War Sails water plane uses the following configuration:
- Material:
naval_worldmap_water - Scripts:
water_flowmapCampaignMapAmbientOccluder
- Tag:
snapped_water_body
The image below shows the required components and parameters for the main world map water plane.
Note: The world map scene also contains additional water_plane entities used for lakes. Before making any changes, make sure you have selected the correct water plane.
Creating a New Water Plane
To create a new water plane:
- Add the
water_planeprefab to the scene. - Position, rotate, and scale it as needed.
- In the Inspector, open the Materials tab and assign the desired water material (typically
naval_worldmap_water). - Ensure the required scripts and tag are present if the water plane is intended to function as navigable world map water.
Once configured, the water plane will integrate with the War Sails water rendering and Flowmap systems.
Storm System
War Sails features a dynamic storm system that generates storms over open water.
The world map is divided into a grid of 32 × 32 unit cells. For each cell whose center lies on an OpenSea navmesh, the game periodically checks whether a storm should spawn.
Three storm types are available:
StormThunderStormHurricane
The type of storm generated depends on the Flowmap data at the selected location. Each storm type has its own movement speed, radius, and damage characteristics.
Configuring Storms
Storm behavior can be customized by overriding the StormModel (through code, not in the editor). This allows you to adjust parameters such as:
- Hourly spawn chance
- Maximum number of active storms
- Storm type configuration
- Storm lifetime
Storm Movement
Storms do not follow predefined paths. Instead, they are driven by the Flowmap.
As a storm moves across the world map, it continuously follows the flow direction defined by the Flowmap at its current location. This allows storm movement to naturally match the current patterns you’ve painted into the map.
Flowmap Considerations
Storms gradually weaken and eventually dissipate when they remain over land navmesh.
For this reason, when painting the Flowmap near coastlines, it is recommended to direct the flow away from land and toward open water. This helps keep storms at sea and prevents them from immediately dissipating after spawning or drifting near the coast.
Pirate Spawn Points
War Sails uses dedicated pirate spawn points to control where pirate parties appear and the regions they patrol over time.
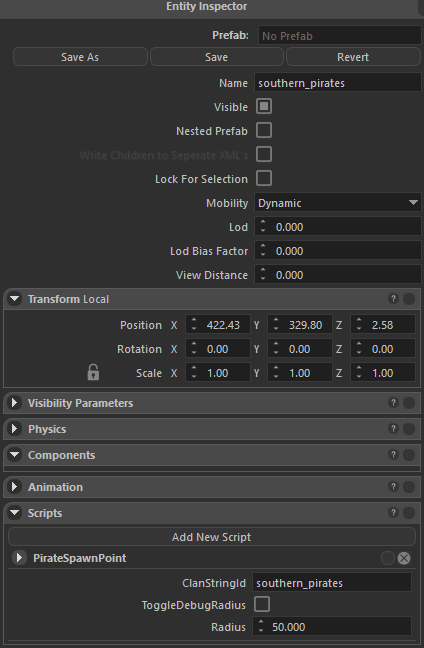
Each pirate spawn point must have a PirateSpawnPoint script attached. In the script, set the Clan String ID to the appropriate pirate clan. War Sails has two clans available:
northern_piratessouthern_pirates
If you wish to add new clans, you should define them in the clans.xml, and then proceed to add them to the world map.