
Ship Creation
1. Introduction
1.1. Purpose of the Documentation
This documentation is a comprehensive, end-to-end guide for creating and integrating custom ships into the game. It is written for mod authors who want to add fully functional ships to Bannerlord’s naval system. You do not need to be a programmer to follow this guide, but you should be comfortable working inside the Bannerlord editor and understand the basic concepts of entities, prefabs, and scripts.
The goal is to walk you through the entire technical pipeline — from setting up the initial Nested Prefab hierarchy all the way to final in-game implementation. By following the workflows outlined here, you will produce a ship that is fully compatible with the game’s physics, AI navigation, boarding, crew interaction, and upgrade systems.
1.2. Overview of the Ship Creation Pipeline
The ship creation process follows a structured, layered workflow. Each layer depends on the one before it, so it is important not to skip steps. The pipeline begins with establishing the correct Nested Prefab hierarchy — this is the backbone that every other system relies on.
The workflow is divided into three main stages:
- Core Setup (Essential): Establishing the root entity, importing hull meshes, and configuring physics volumes (collision and buoyancy) to ensure the ship exists and floats correctly in the physics engine. Nothing else will work until this stage is complete.
- Gameplay Integration (Upgrades): Implementing navigation systems (rudders, sails, oars), boarding mechanics, ballistas, and interaction points required for player control and combat. These components define how players and AI interact with the ship.
- Detailing & Polish (Cosmetic): Finalizing the ship with visual upgrades, particle effects, water interactions, and decorative elements to enhance the atmosphere. These components are purely visual — removing them will not break the ship’s functionality.
2. Ship Hierarchy & Component Breakdown
In this section, ship components are categorized into three main groups: Essential (Critical for gameplay), Upgrades (Gameplay features), and Cosmetics (Visual details).
When building your ship, the full entity hierarchy should follow this general structure:
[ShipName]_ship_nested (Root Entity)
├── mesh_holder
├── floater_volume_holder
├── control_point_holder
├── climbers_holder
├── attachment_machine_holder
├── barrier_holder
├── spawn_point_holder
├── rudders_holder
├── hull_group
├── shields_group
├── oars_holder
├── sail_holder
├── ship_ballista_holder
├── wetness_decals
├── ship_water_effects (visual only)
├── ship_burning_system
└── [other cosmetic holders]
Each of these children is described in detail in the sections below. Keep this hierarchy in mind as you work — placing a component under the wrong parent is one of the most common sources of errors.
2.1. Essential Components (Critical)
The objects in this group represent the bare minimum configuration required for the ship to exist in the game world, for physics to function correctly, and for basic operations to be performed. If any of these components are missing or misconfigured, the ship will either not load, not float, or behave incorrectly in-game.
2.1.1. Root Entity Setup (dromon_ship_nested)
This entity is the parent container for the entire ship prefab. Every other component in this guide is placed as a child or descendant of this entity. Throughout this documentation, we will use the “Dromon” ship as the reference example.
- Naming Convention: We recommend using the format [ShipName]_ship_nested (e.g., dromon_ship_nested). While not strictly enforced by the engine, following this convention ensures your ship is easy to identify and consistent with the existing ship assets in the game.
Required Setup & Attributes:
Prefab Settings:
- Enable Nested Prefab: [Checked]
- Reason: This is critical for pipeline management. Enabling Nested Prefab allows the child prefabs within the hierarchy (sails, boarding machines, oars, etc.) to be opened and edited independently without having to open the entire ship. Without this, editing any sub-component will modify the whole ship file, making iterative work slow and error-prone.
- Enable Write Children to Separate XMLs: [Checked]
- Reason: This ensures each child prefab saves its data into its own XML file rather than embedding everything into a single large file. This is important for version control and for keeping the ship modular — changes to one component do not risk corrupting the rest of the ship’s data.
Transform & Workspace:
- Identity Transform: Ensure the root entity is created at the generic identity coordinates (Pos: 0,0,0 | Rot: 0,0,0 | Scale: 1,1,1).
- Reason: The entire ship is positioned and rotated at runtime by the game’s naval physics system. If the root entity has any offset or rotation baked into it, the ship will appear misaligned in-game and all child components will be offset as well.
- Local Space: For all subsequent child components, perform all positioning and rotation operations using Local Transform.
- Reason: Child entities inherit the world transform of their parent. Working in local space ensures that when the root entity moves (as it will constantly during gameplay), all children move with it correctly. Working in world space will cause children to appear in the correct editor position but drift to incorrect positions in-game.
Physics Configuration:
- Physics Shape: Assign a Convex physics shape that roughly encompasses the entire hull.
- Reason: This convex shape serves two critical purposes. First, it is the primary collision body of the ship — it determines what the ship physically bumps into in the world. Second, and more importantly for ships, it is the primary driver for the buoyancy system. The game engine calculates how much of this convex volume is submerged to determine the upward buoyancy force. If this shape is too large, the ship will float too high. If it is too small, the ship will sit too low or sink. Always use a mesh that closely follows the outer hull below the waterline.
- Note: If the provided mesh is not convex, the engine will attempt to approximate a convex hull automatically, but this approximation may not match the hull well. Providing a proper convex mesh is strongly recommended.
- Material: Assign the wood_ship physics material.
- Reason: The wood_ship material defines how the ship’s physics body responds to collisions — its friction, restitution (bounciness), and damage thresholds. Using the wrong material (or none at all) will cause the ship to behave incorrectly when colliding with terrain, other ships, or projectiles.
- Mass: Input the correct physical weight of the ship.
- Warning: This value directly affects how the ship floats and reacts to water physics. A ship that is too light will bounce erratically on waves. A ship that is too heavy will sit too low in the water or sink entirely. Use the existing ships as reference points for appropriate mass values relative to their size.
- Body Flags: Ensure the following flags are CHECKED:
- ✅ Dynamic — Allows the physics engine to move this body in response to forces.
- ✅ Movable — Required for the kinematic system that synchronizes ship movement with passengers and mounted objects.
- ✅ Use Convex Hull — Tells the physics engine to use the convex shape for collision.
- ✅ Do Not Collide with Camera — Prevents the camera from being blocked by the ship’s physics body.
- ✅ Do Not Collide with Ray Cast — Prevents gameplay raycasts (such as targeting) from being blocked by the hull physics body.
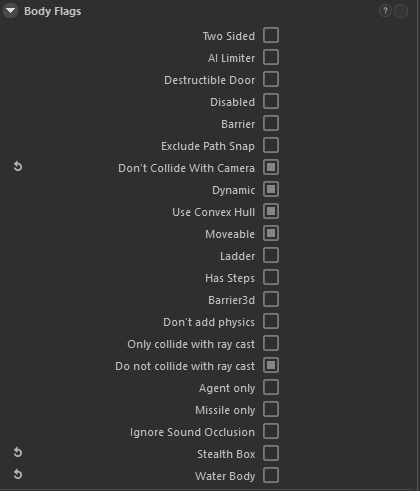
Important: Any physics body added to child entities of this root must also be marked as Movable in its flags. This is required because the root uses a kinematic physics system — child physics bodies that are not marked Movable will not move with the ship and will detach into incorrect world positions.
2.1.2. Scripts
The following scripts must be added directly to the root entity. The order in which you add them does not matter, but all of them must be present for the ship to function correctly.
- MissionShip: The core script that registers this entity as a ship within the game’s mission system. Without this script, the game will not recognize the entity as a ship and none of the naval gameplay systems will activate.
- Important: You must assign the NavMesh name to the NavMeshPrefabName field. The NavMesh is a separate asset that defines where AI agents can walk on your ship’s deck. NavMesh baking is covered in detail in the attachment_machine_holder section (2.1.7).
- Volume_generator: Handles the generation of floating volume objects that the buoyancy system uses to keep the ship upright and stable on the water surface.
- Best Practice: Perform this step after adding the hull mesh in mesh_holder, since the generator needs the mesh to estimate correct volume placement.
- Enable Mock Generation to preview where floaters will be placed before committing.
- Goal: Keep the number of floatable objects to a minimum by adjusting Current Volume Count or Floater Volume Width. More volumes give more stable floating but cost more performance.
- Ensure generated volumes match the ship’s hull shape as closely as possible.
- Click Generate Volumes to create the volume children under floater_volume_holder.
- ShipFloatsamManager: Handles the spawning and behavior of debris and flotsam when the ship is destroyed. Ensures that broken planks, barrels, and other objects appear on the water surface after the ship sinks.
- ShipClothFixer: Manages the cloth simulation systems on the ship (primarily sails and banners). Without this script, cloth objects on the ship may behave erratically or not simulate at all when the ship moves.
- ShipColorAssigner: Controls faction-based color tinting across the ship.
- Factor Color: Applied to Upgrade Pieces such as seats and oars, tinting them to match the owning faction’s colors.
- Ram Debris Color: Applied to collision damage decals that appear when the ship rams another vessel.
- EditorShipPhysics: A utility script used only inside the editor. It lets you simulate and preview the ship’s floating physics without having to launch the game, saving significant iteration time.
- NavalPhysics: Handles the core swimming and buoyancy logic at runtime. This script works in conjunction with the floater volumes to keep the ship correctly oriented and moving on the water surface.
- EditorShipUpgradeViewer: An editor utility that lets you preview how different upgrade pieces (sails, shields, figureheads, etc.) will appear on the ship without launching the game.
- ShipAttachmentMachineConnectionLogic: Handles the connection logic between ships during boarding. It manages the state of boarding bridges — detecting when two ships are close enough, triggering the bridge deployment animation, and linking the two ships’ NavMeshes.
2.1.3. mesh_holder
This entity contains the ship’s main visual mesh and all static physics objects that are part of the ship’s structure — platforms, stairs, interior decoration, and any other geometry that does not change based on upgrades.
- Transform: Must be kept at Identity (0,0,0 | 0,0,0 | 1,1,1). The mesh_holder should never have any offset from the root entity. All positioning of individual meshes should be done on the child entities within this holder.
- Physics: Any physics body added to a child of mesh_holder must have the Movable flag enabled. See the note in section 2.1.1 for the reason.
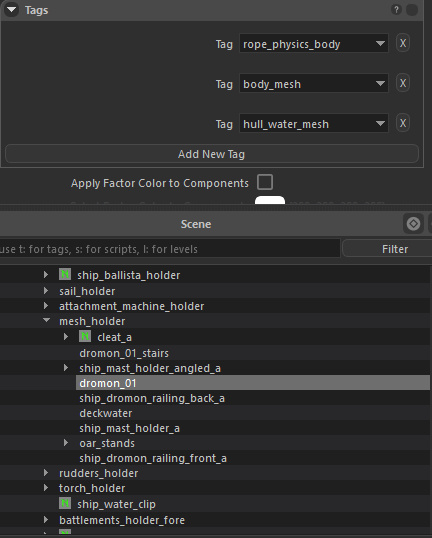
Required Tags on the Main Hull Mesh:
- rope_physics_body — Marks this entity as the physics anchor point for dynamic rope simulations on the ship (rigging, tying lines, etc.). Ropes attached to the ship use this tagged entity as their root attachment.
- body_mesh — Identifies this entity as the primary visual hull. Multiple engine systems (including ShipWaterEffects) use this tag to perform raycasts against the hull to automatically compute particle positions, waterline height, and other visual parameters. This tag must exist and the entity must have a valid MetaMesh with an accurate bounding box.
- hull_water_mesh — Marks the mesh used specifically by the in-hull water simulation system. This mesh defines the visual interior surface on which the simulated deck water is rendered.
Deckwater Setup: Create a child object named deckwater inside mesh_holder and assign it the tag render_to_depth.
- Reason: The render_to_depth tag tells the ship water effects system to include this mesh in the top-down depth render used to define where simulated water can accumulate on the deck. Any mesh with this tag (including oar seats and other deck furniture) contributes to the depth texture. After adding or modifying render_to_depth meshes, press Re-render Depth Texture in the ShipWaterEffects script to update the simulation.
2.1.4. floater_volume_holder
This entity is the container for the buoyancy volume objects automatically created by the Volume_generator script on the root entity. You should not manually create or modify children here — always use the generator.
- Verification: After generating volumes, visually inspect them in the editor to confirm they cover the submerged portion of the hull correctly. Volumes that extend too far above the waterline will make the ship sit unnaturally high. Volumes that do not reach far enough into the hull will cause instability.
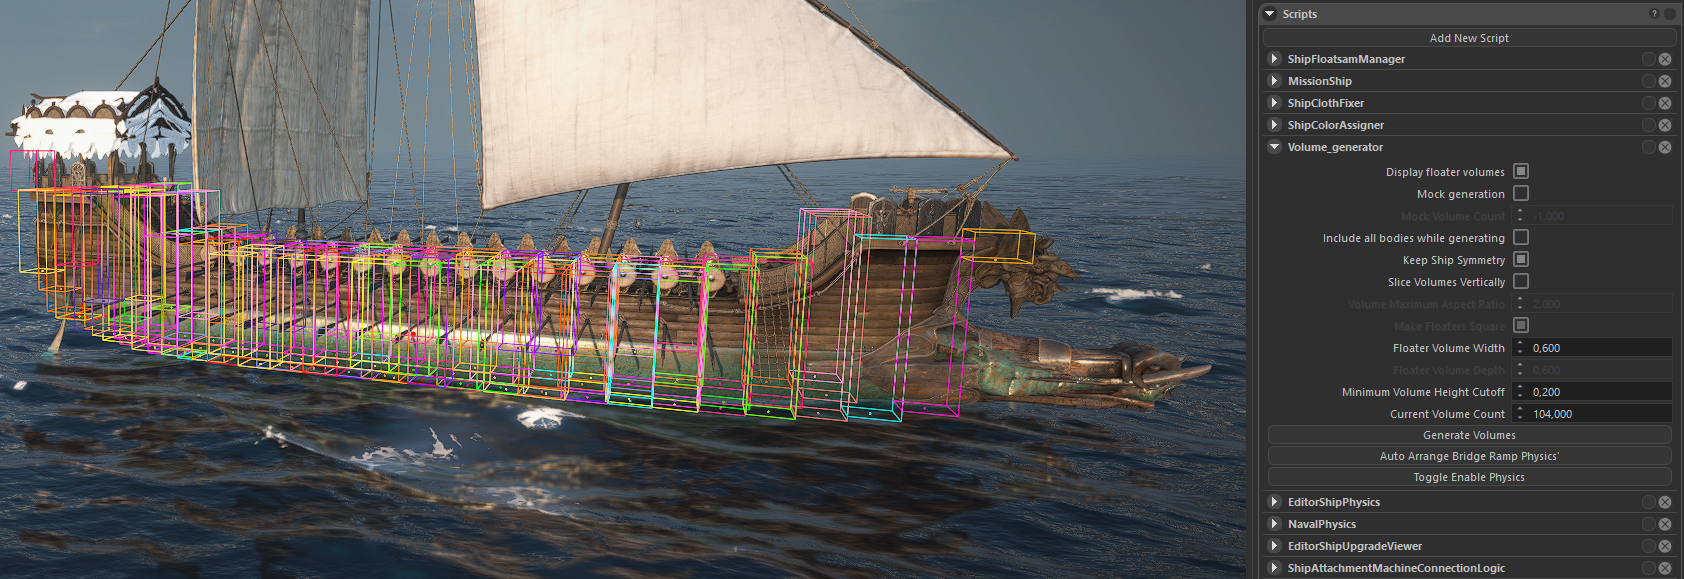
- Visibility: Disable the visibility of this entity in the Entity Inspector once you have verified the volumes. The volume objects are purely functional and should not be visible during normal editing, as they clutter the viewport.
2.1.5. control_point_holder
This entity contains the ship’s steering mechanism. The type of steering prefab you use here depends on the physical design of the ship.
- ShipControl_nested: Use this prefab for tall ships or any ship where the rudder does not physically reach the water surface, or where steering is not performed by a visible in-world rudder (e.g., the steering is abstracted). This prefab handles steering logic without requiring a physical rudder mesh interaction.
- ShipControlRudder_nested: Use this prefab for lower ships where the rudder physically extends into the water and is operated manually by an agent. This is the more physically immersive option.
- Config: Assign the rudder mesh and physics body to the controller’s child entity as a metamesh. The physics shape of the rudder should match its visual mesh closely, as agents will physically interact with it.
2.1.6. climbers_holder
This entity contains the prefabs that allow agents (both AI and players) to climb from the water surface onto the ship’s deck. This is essential for boarding sequences where agents swim to the ship.
Use the prefabs: longboat_rope_climber_small_nested, longboat_rope_climber_medium_nested, or longboat_rope_climber_large_nested depending on the height of the ship’s railing above the water.
Each climber prefab contains three key child entities:
- climb_point — The position on the deck where the agent lands after completing the climb animation. Place this on the deck surface, inboard of the railing.
- end_position — The top of the climbing animation. This should be at or just above the railing height.
- standing_point — The bottom of the climbing animation, at water level. This is where the agent begins the climb. You can adjust the precise starting position via the script on this entity.
Reason: Without correctly placed climbers, agents that end up in the water near the ship will have no way to reboard, breaking the boarding gameplay loop.
2.1.7. attachment_machine_holder (Boarding System)
This section contains the prefabs required for the boarding mechanics. This is one of the more complex parts of the ship setup. There are two main prefab types:
- attachment_machine_nested: Contains all entities required for both incoming and outgoing boarding — i.e., this handles our ship boarding an enemy and an enemy boarding our ship.
- attachment_point_machine_nested: Contains entities required only for an enemy ship to board our ship (the receiving side of a boarding action).
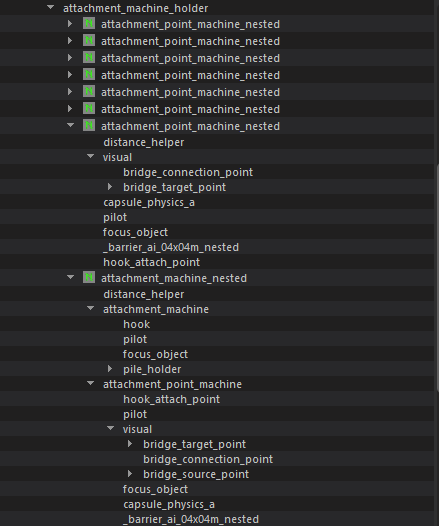
a) attachment_machine_nested Structure:
- distance_helper: A visual entity in the editor that shows the minimum required distance between two ships before a boarding bridge can be deployed. This prevents bridges from overlapping each other or clipping through geometry.
- attachment_machine (Parent):
- hook: The visual representation of the grappling hook thrown by agents when initiating boarding. This should be a small mesh placed at the hook’s resting position.
- pilot: A non-physics entity placed on the deck directly above where the boarding bridge’s NavMesh connection should begin. The game uses the position of this entity to stitch the bridge’s NavMesh to the ship’s deck NavMesh. See the NavMesh configuration section below.
- focus_object: The physics object that agents must hit with their hook throw for a successful boarding attempt. Place this at the ship’s railing where the hook would realistically catch.
- pile_holder: A parent entity containing the visual ropes and hanging elements of the boarding setup. These are purely visual — they have no physics or interaction.
b) attachment_point_machine_nested Structure:
- hook_attach_point: A non-physics entity indicating where an enemy’s grappling hook lands on our railing after a successful hook throw. Place this on the railing surface.
- pilot: A non-physics entity requiring a NavMesh face underneath it for bridge NavMesh connection. Functions identically to the pilot in attachment_machine_nested.
- visual (Parent):
- bridge_target_point: Parent for the non-physics visual objects that appear on the railing and deck after the enemy sets up a bridge. Default visibility should be Off — the game activates these when a bridge is established.
- bridge_connection_point: Defines the start or end point of the boarding bridge. Must be placed precisely on the railing, ensuring it is not buried inside the railing’s physics mesh. If this point is inside geometry, the bridge will clip incorrectly.
- bridge_source_point: Parent for non-physics visual objects that appear after the hook successfully catches and the bridge begins deploying. Default visibility should be Off.
- focus_object: The physics object that must be hit for a successful hook shot from an enemy ship.
- capsule_physics_a: A physics capsule that allows agents to climb from the deck up to the railing height when a bridge is active. This object is inactive when no bridge is present — activating it when no bridge exists would let agents walk off the ship into the air.
- Snap Requirement: The top of this capsule must snap exactly to the bridge_connection_point.
- Auto-Snap: You can place it manually by enabling physics visuals, or use the Auto Arrange Bridge Ramp Physics button in the root entity’s Volume_generator script to automatically snap all capsule physics objects at once.
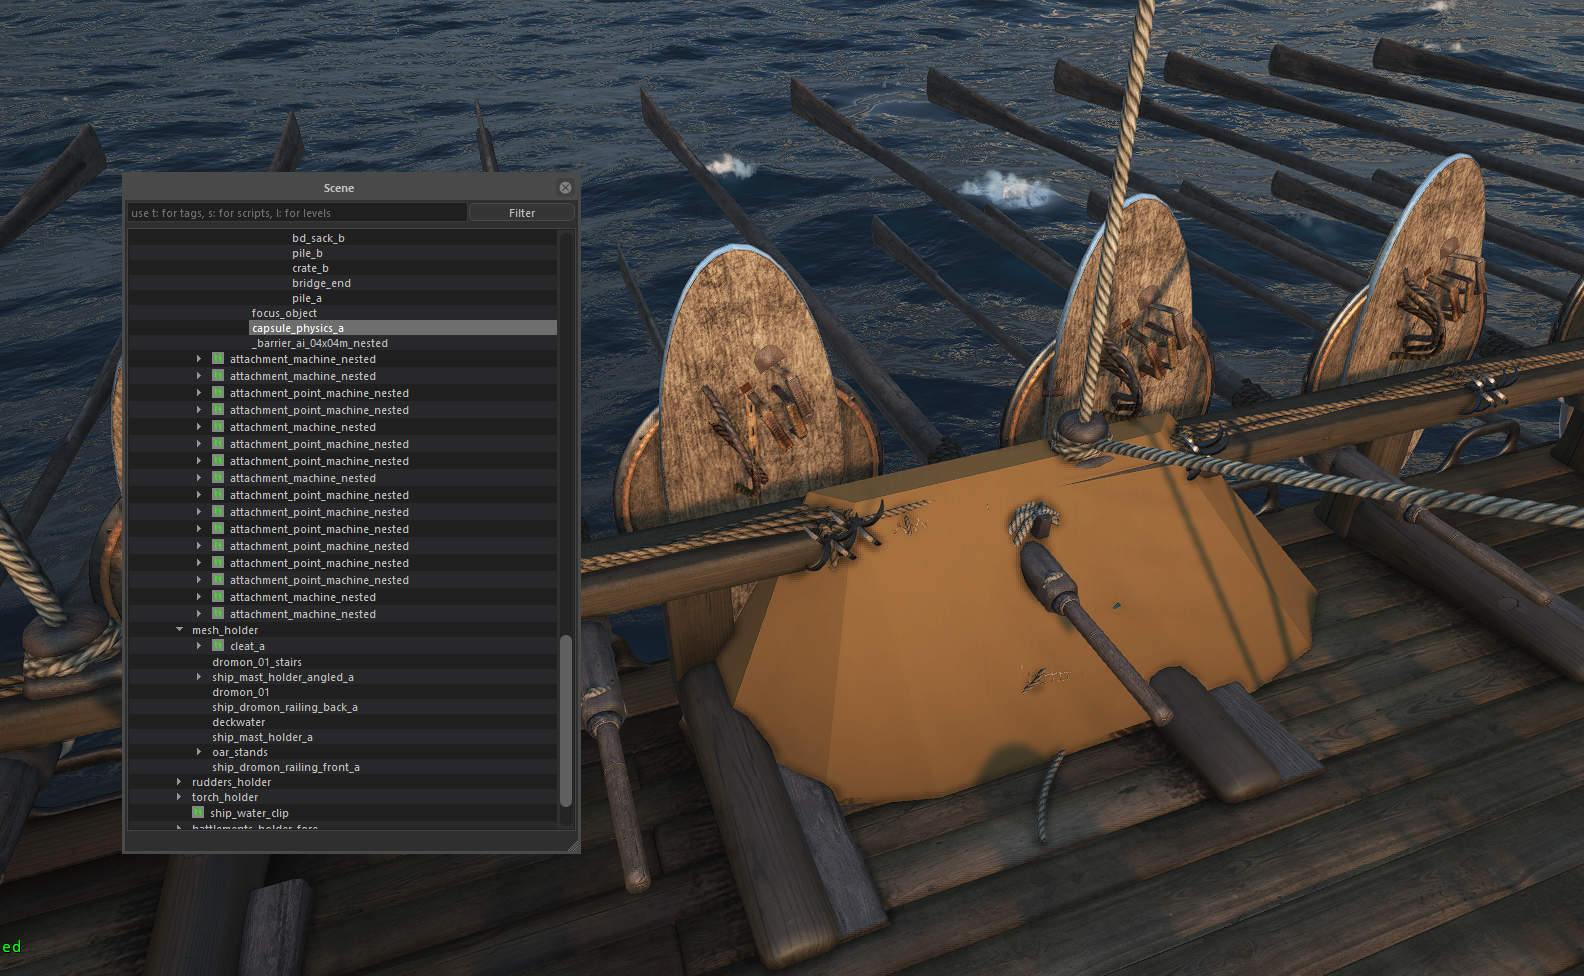
- _barrier_ai_04x04m_nested: An AI barrier that prevents agents from walking off the ship at the boarding connection point when no bridge is present. This barrier deactivates automatically when a bridge is established, allowing agents to cross.
c) NavMesh Configuration & Baking:
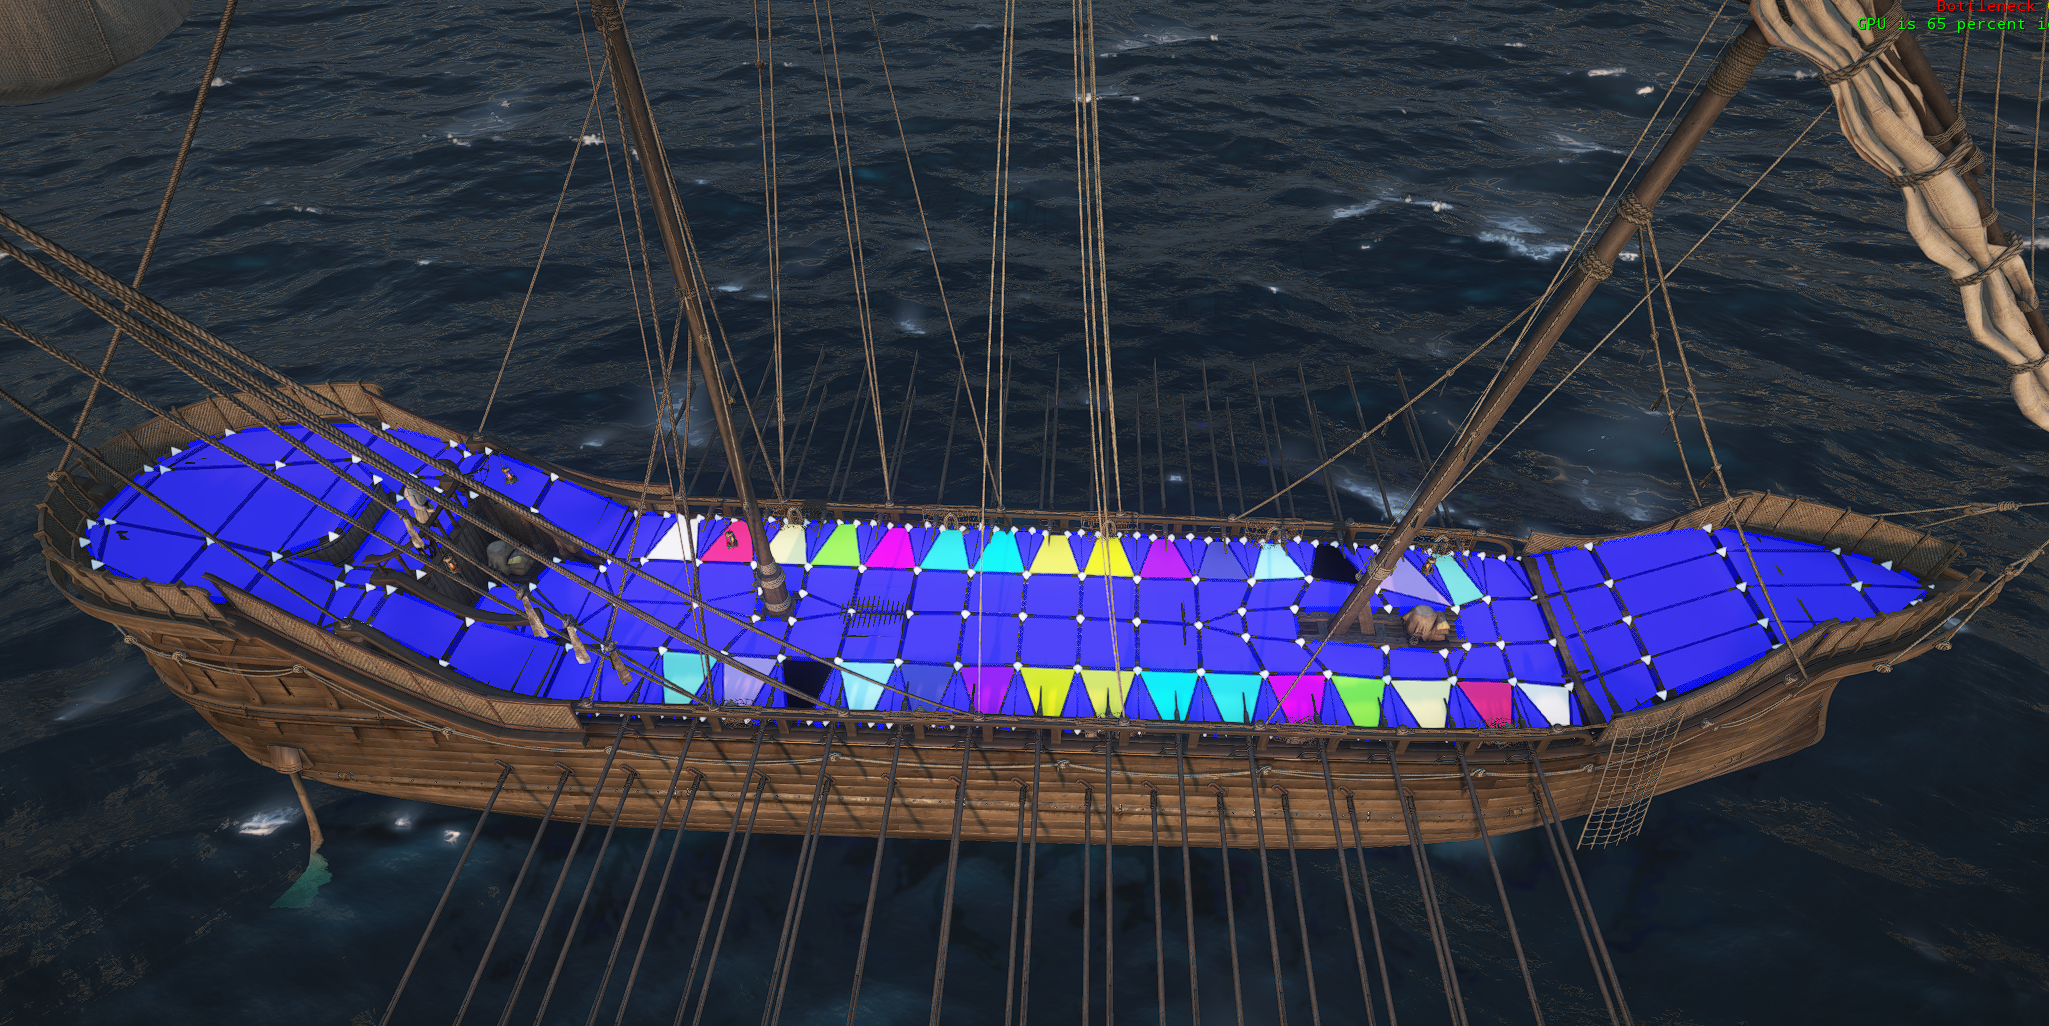
The NavMesh defines where AI agents can walk on your ship’s deck. It must be baked correctly for boarding bridges to function. The bridge system connects two ships’ NavMeshes dynamically at runtime, and the IDs below are how it knows which face to connect to.
- Unique IDs: In the ShipAttachmentPointMachine script (found in both machine prefabs), locate the RelatedShipNavmeshOffset field. Enter a unique integer ID here for each machine. No two machines on the same ship should share an ID.
- Face IDs: In the ship’s NavMesh, the face located directly beneath the pilot entity of each machine must have the same ID as entered in RelatedShipNavmeshOffset. The game uses this matching ID to know which NavMesh face is the connection point for each bridge.
- General Deck: All other NavMesh faces on the ship’s deck that are not bridge connection points should be assigned ID 0.
Baking and Saving:
- Select all NavMesh faces.
- Go to the MissionShip script on the root entity.
- Click SaveNavMeshFromLocal.
- Enter a filename and save it to your mod’s module folder.
- Enter this filename into the NavMeshPrefabName field in the MissionShip script.
2.1.8. barrier_holder
This entity contains barrier physics objects that prevent AI agents from walking off the ship’s edges or into areas they should not reach (below-deck openings, the end of a bowsprit, etc.).
Use prefabs: _barrier_ai_04x04m_nested or _barrier_ai_04x08m_nested. These are functionally identical — the only difference is their default size. Scale them as needed to cover the area.
Reason: Without barriers, the AI NavMesh system may generate valid paths that lead agents off the edge of the ship. The barriers create invisible walls that the NavMesh system respects, keeping agents on the deck.
2.1.9. ship_target_point
This entity holds the ShipTargetMissionObject script and must be present on every ship. It registers the ship as a targetable object within the game’s combat system — without it, ranged weapons such as ballistas cannot lock onto the ship.
What it does:
- Marks the ship as a valid target for ranged weapons (TargetFlags.IsShip | TargetFlags.IsMoving).
- Reports the ship’s current velocity so projectiles can lead their aim correctly against a moving ship.
- Provides a target priority value that scales with the ship’s remaining crew count and hull health. A heavily damaged or nearly crewless ship becomes a lower-priority target automatically.
- When the ship is sinking, it adds the NotAThreat flag so AI ranged units stop targeting it and redirect fire elsewhere.
Setup: Add the ship_target_point nested prefab as a direct child of the ship root. No additional configuration is required — the script reads the ship’s state automatically at runtime via the MissionShip script on the root entity.
2.1.10. kinematic_batch_entity
The kinematic_batch_entity system handles physics optimization for the ship. Without it, every child entity on the ship with a physics body would be simulated individually, which becomes expensive quickly. This system merges all those physics shapes into a single batched body that moves with the ship root — at a fraction of the cost.
How it works: The ship root owns the main physics body (the convex hull). All the detailed collision shapes on child entities — hull planks, deck surfaces, structural parts — need to move with the ship but do not need their own simulation. The kinematic_batch_entity collects all of these into two batching containers:
- simulated — Batches shapes used for full physics interaction (collision response, agents walking on deck, etc.)
- ray_cast — Batches shapes used only for raycasts (targeting, line-of-sight, etc.)
Required Setup:
Add the kinematic_batch_entity as a nested prefab directly under the ship root. The prefab is located at: NavalDLC/NestedPrefabs/kinematic_batch_entity.xml
After placing it, verify the following in the entity inspector:
- Its transform is identity (position 0,0,0 — no rotation, no scale offset).
- Its body flag includes Moveable.
- It carries the tag batched_physics_entity.
- Both the simulated and ray_cast children must be present. The engine will warn if either is missing.
Marking entities for batching: For each child entity whose physics shape should be merged into the batch, enable the Move To Batched Kinematic option in its physics properties.
In the entity’s Physics panel:
- Assign a physics shape (a bo_ body).
- Enable the Moveable body flag.
- Enable Move To Batched Kinematic.
What to batch: Hull mesh, deck structures, mast holders, hull plating variants, fixed structural geometry.
What NOT to batch: The ship root itself, the kinematic_batch_entity and its children, AI barrier entities, rope/cloth physics, and any entities that animate or detach independently at runtime.
Upgrade variants: If your ship has multiple hull variants under an upgrade slot, each variant can have Move To Batched Kinematic enabled. The engine only includes shapes that are active when the ship is initialized — ensure exactly one variant per slot is active at startup.
Common validation errors:
- No entity tagged batched_physics_entity found → “Ship Prefab must contain a root batched physics entity!“
- kinematic_batch_entity does not have identity transform → “Batched physics entity should have identity matrix frame!“
- Missing simulated or ray_cast child → “Ships should have a ‘kinematics’/‘raycast’ batch entity!“
If any of these warnings appear, physics batching is not working and the ship may have performance issues or missing collision.
2.1.11. spawn_point_holder
This entity defines all spawn locations for players and AI troops on the ship. The game’s mission system reads these points to determine where to place agents at the start of a naval battle.
- sp_troop_inner_deck_nested: Spawn points for inner deck troops — agents positioned away from the ship’s edges, typically in the center or below decks.
- sp_troop_outer_deck_nested: Spawn points for outer deck troops — agents positioned near the railings and edges, such as archers and sailors.
- sp_troop_captain_nested: The spawn point for the ship’s captain.
- sp_troop_crew_spawn_nested: Spawn points used for reinforcement troops arriving during battle.
rally_point: Create an empty entity and place it at the front of the ship, on the NavMesh surface.
- Assign the tag rally_point to this entity.
- Rename the entity to rally_point for clarity.
- Reason: This is the gathering point AI agents move toward when given a rally order. Without a rally point, AI agents will have no defined gathering location and may behave erratically when ordered to regroup.
2.1.12. rudders_holder
This entity defines the rudder’s position for the swimming and buoyancy physics calculations — specifically, it tells the physics system where the ship’s steering resistance is applied in the water.
- Placement: Place this entity at the very rear of the ship, as close to the water surface as possible.
- Setup: Add an empty entity as a child, name it rudder_stock, and assign the tag rudder_stock to it.
- Reason: The physics system uses the rudder_stock tag to locate the steering point of the ship. Placing this incorrectly (too far forward or too high) will cause the ship to handle unrealistically — it may turn too quickly, too slowly, or pivot around the wrong point.
2.1.13.oars_holder
This holder contains the ship’s oar systems. Oars are a gameplay upgrade — they determine the ship’s speed when sailing without wind. The oar_deck prefab handles both the visual oar meshes and the agent seating system for rowers.
- Root Setup: Create an empty entity at Identity and name it oars_holder.
- Add the oar_deck prefab as a child. Rename it based on its type:
- oar_deck_upper: Rowers are seated on the open deck, visible to the player.
- oar_deck_lower: Rowers are seated inside the hull, not directly visible.
a) oar_deck_upper (Visible Oarsmen):
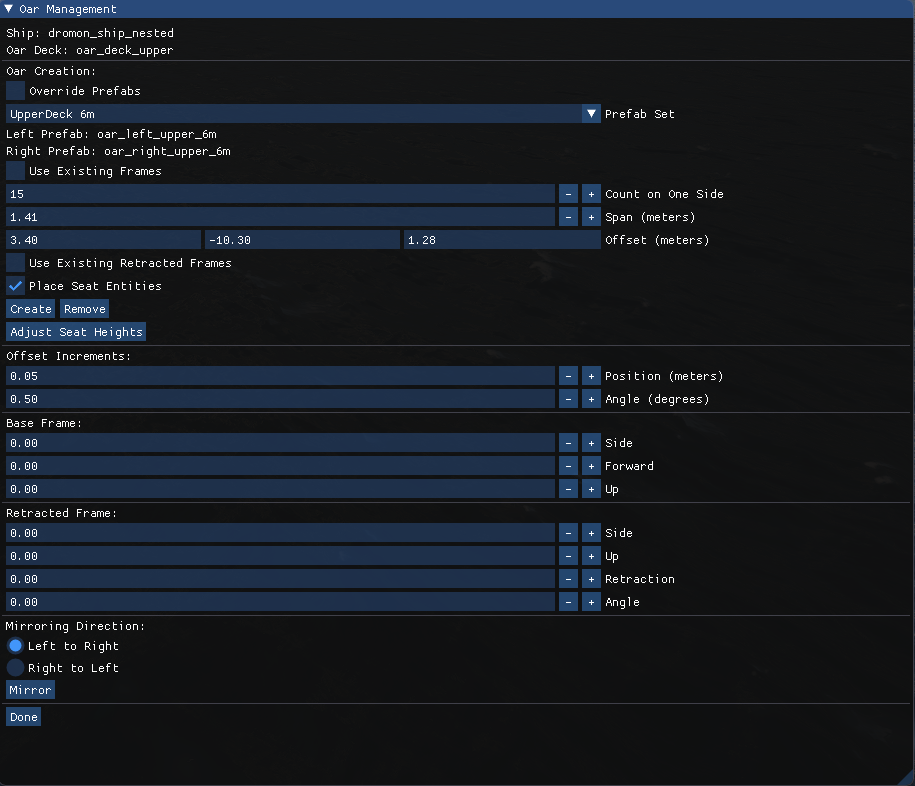
- Configuration: Select the oar_deck_upper entity and click ManageOarMachines in the ShipOarDeck script.
- Initial Setup: Do not check Override Prefabs when creating for the first time.
- Prefab Set: Select the set that matches your ship’s size (UpperDeck 4m, 6m, or 8m — the number refers to the spacing between oar positions).
- Positioning: Use the Count, Span, and Offset values to align the oar positions with your hull. This requires iteration — adjust the values, click apply, and visually verify the positions. The oar tips should enter the water cleanly and the handles should sit naturally in the agents’ hands.
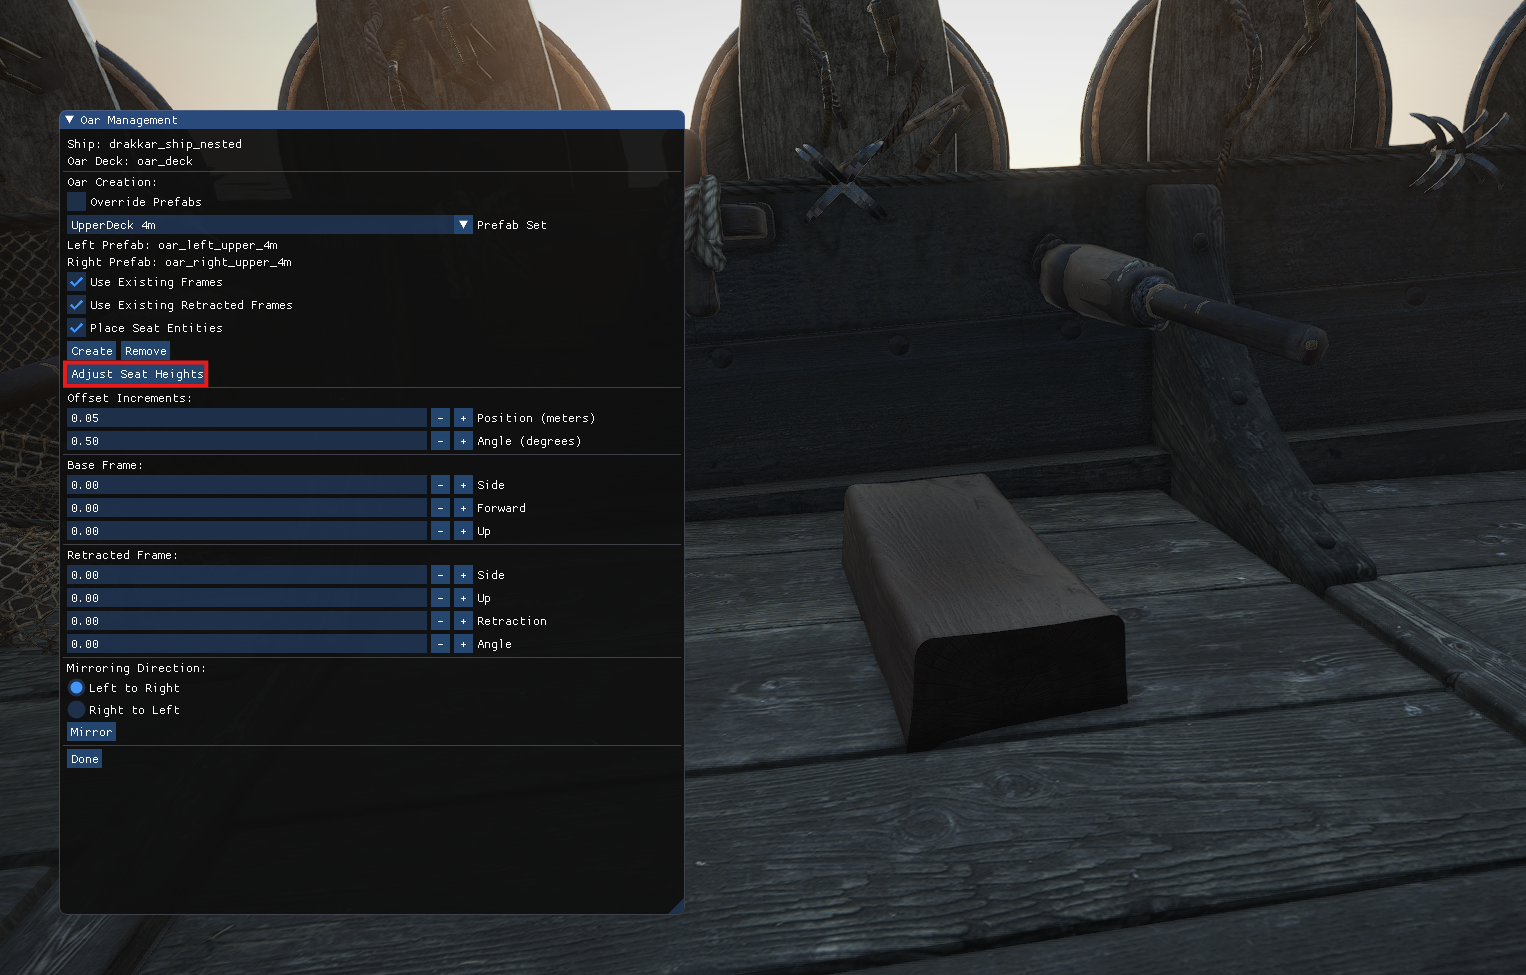
- Seat Heights (Critical): Use the Adjust Seat Heights feature after positioning. This is mandatory. The rowing animation is fixed, and the seats must be at the correct height for the animation to align with the benches. If seat heights are wrong, rowers will visually clip through or float above their seats.
- Angles: Adjust the active (in-water) and retracted (raised) angle of the oars to match your hull geometry.
- Mirroring: Once one side is correctly configured, use the Mirror feature to copy all settings to the opposite side.
b) oar_deck_lower (Internal Rowers):
- Setup: Follows the same process as oar_deck_upper, but select the Lower Deck prefab set.
- No seat height adjustment is required for lower deck rowers.
- Ensure the oars align with and exit cleanly through the oar ports in the hull mesh. Misaligned oars will visually clip through the hull.
- Retracted State: Ensure the retracted oar angle places the oars completely inside the hull. Oars that stick out when retracted will clip through the hull and look incorrect.
c) Upgrade System Integration:
- Oars are treated as upgrade pieces by the game’s upgrade system.
- Different oar sets (bronze-tipped, fire-hardened, etc.) can be created by editing the ship_upgrade_pieces.xml and ship_slots.xml files, using existing oar entries as a reference.
- When adding new oar types, verify the prefab hierarchy structure matches existing types, or the upgrade system will not recognize the new piece.
2.1.14. sail_holder (War Sails System)
Sails are one of the most technically complex components of the ship. They use a combination of skeletal animation, blend shape morphs, and real-time cloth simulation to achieve realistic behavior in wind. Read this section carefully before beginning sail setup.
There are two sail types: Square (rectangular sails hung from a yard) and Lateen (triangular sails on an angled boom). Each type comes in three size variants (small, medium, large), giving six total sail prefabs.
a) Asset Preparation:
- Cloth Simulation Mesh: The sail mesh used for cloth simulation must fit within 15m × 15m × 15m dimensions in its default (fully open) state. The prefab entity can be scaled in-game, but the source mesh must stay within this limit.
- Topology: The mesh’s polygon density and edge flow control how the cloth deforms. Denser topology in areas that should billow will produce more detailed cloth movement.
Vertex Constraints (Critical — using Vertex Color channels):
- Alpha channel \= 0: Vertices that must not move (attached to the mast or boom). Without this, the sail will detach from its mount during simulation.
- Red channel \= 0: Vertices connected to the left control bone.
- Green channel \= 0: Vertices connected to the right control bone.
- Blue channel \= 0: Vertices in stitched areas (seams). These areas simulate tension between panels.
- In-Game: Enable Create Stitching Constraints in the cloth settings for stitching to take effect.
b) Rigging & Skeleton:
- A skeleton drives the control bones that adjust sail tension and yard angle.
- Square Sail: Uses 2 control bones (one for each end of the yard).
- Lateen Sail: Uses 1 control bone (the tip of the boom).
- Bone names must match the names shown in the reference hierarchy images exactly, even if the skeleton object itself has a different name.
c) Animation & States:
- Morph Animation: A 200-frame morph animation is required, representing the sail transitioning from fully open to fully closed. The same morph is played in reverse for the unfurling animation. This animation drives the furling and unfurling sequence players see when the sail order is given.
- Closed State: When fully furled, the cloth mesh is swapped with a static mesh representing the bundled sail. The cloth simulation is inactive in this state.
- Burning State: If the sail catches fire, it transitions to a free-hanging mesh that simulates a torn, burning sail. This mesh does not require a skeleton or morph keys — it is purely visual cloth with no control.
d) Prefab Setup (using sail_square_medium_nested as example):
Add the sail_visual script to the topmost parent of the sail prefab and select the correct sail_type enum value matching your sail variant.
Main children:
- pulley_systems_holder: Contains all rope visual systems.
- stability_ropes: Ropes connecting the control bones to the deck (stays and shrouds). Each rope entity’s tag must match the name of the bone it connects to.
- static_ropes_parent: Static decorative ropes. Tag attached_to_yard for ropes that connect to the yard; tag big_rope for ropes that connect from the yard down to the hull.
- sail_fold_pulley_parent: Ropes that gather the sail when furling. Tag each rope’s entity with the name of the bone it is controlled by.
- sail_rotate_pulley_parent: Ropes responsible for rotating the yard to catch the wind angle.
- force_center_entity: Must have the tag force_center_entity. Defines the point at which wind force is applied to the sail for physics calculations. Position this at the center of the sail’s surface area.
- sail_mast: Place all mast visual mesh entities under this child.
- yaw_rotation_entity: Must have the tag yaw_rotation_entity. Place your prepared sail and yard assets under this entity. This entity rotates to simulate the yard turning to face the wind.
- sail_upgrade_slot: The upgrade slot entity for sail-level upgrades.
2.2. Upgrade & Gameplay Components
These components extend the ship’s capabilities, define its combat capacity, or change appearance and stats based on the ship’s upgrade level. They are optional in the sense that the ship will exist and float without them, but no naval gameplay (sailing, combat, upgrades) will function correctly without them.
The upgrade system is driven by several XML files that you must edit to register your ship and its upgrade pieces with the game:
- ship_slots.xml: Defines all upgrade slot types available for ships. Every upgrade piece type your ship uses must have a corresponding entry here. The IDs defined in this file are referenced by the other XMLs below.
- ship_upgrade_pieces.xml: Defines the individual upgrade pieces — their stats, visual effects, descriptions, and which slot ID they belong to.
- mission_ships.xml: Registers your ship as a usable ship in missions. Contains the ship’s ID, prefab name, mass, and other mission-level properties.
- ship_hulls.xml: Defines the ship’s mission statistics (health, speed, maneuverability, etc.) and specifies which upgrade slots are available on this hull type.
2.2.1. hull_group
This nested prefab controls the visual appearance of the ship’s hull at different upgrade levels.
- Placement: Add the hull_group nested prefab to the ship’s root entity at Identity (0,0,0).
- Structure: The prefab contains 5 child entities, each corresponding to a different hull material or upgrade level.
- Setup: Add your prepared hull mesh as a MetaMesh to the child entity that corresponds to the correct material name.
- Tags: The necessary tags for the upgrade system to recognize hull states are predefined on the prefab’s children. If you are creating a new hull type, you can duplicate existing hull upgrade tags from the XMLs or remove ones that are not relevant to your ship.
2.2.2. shields_group
This nested prefab adds shield decorations along the ship’s railings, which also serve to protect troops on deck from incoming ranged attacks.
- Placement: Add the shields_holder nested prefab at the ship’s root Identity (0,0,0).
- Customization: The number of shields displayed can be increased or decreased by editing the relevant ship XML, or by changing the MetaMeshes on the child entities.
- Faction Colors (Crucial): Every shield child entity has the banner_with_faction_color tag. This tag is what causes the game to apply the owning faction’s sigil and colors to the shields at runtime.
- Important: You must also assign the banner_with_faction_color tag to the MetaMesh asset itself and to all of its LOD variants in the Resource Browser. If the tag is on the entity but not the mesh asset, the faction colors will not appear.
2.2.3. cam_holder_nested
This prefab ensures that ship upgrade pieces are displayed correctly in the City Port UI, where players purchase and preview upgrades.
- Placement: Add the cam_holder_nested prefab at the ship’s Identity. Best practice is to add this after all upgrade pieces have been placed, so the camera can be positioned to see the complete ship.
- Setup: The holder contains one child entity for every upgrade piece type, associated via tags that the UI system reads. Move each child entity to position it over its corresponding upgrade piece on the ship.
- Camera Instance: Move the Camera_Instance child to a position that gives a wide, clear view of the entire ship from a flattering angle.
- Tip: Set your editor viewport to the desired camera angle, then right-click Camera_Instance and select Assign Frame From Camera. Fine adjustments (field of view, near/far clip) can be made via the script on the camera instance child.
2.2.4. roof_group
This prefab adds a roof structure over the aftercastle — the raised rear portion of the ship — and any forward castle if the ship design requires it.
- Placement: Add the roof_group prefab at the ship’s root Identity (0,0,0).
- Structure: The prefab contains 15 different roof variants and platform options. Add the platform mesh appropriate for your ship as a MetaMesh to the platform child entity, then position the roof variants to fit your geometry.
Coloring & Tags:
- Cloth elements (canvas roofing, awnings): Assign the sail_mesh_entity tag. This causes the cloth to be tinted to match the faction’s sail color.
- Wooden structural elements: Assign the auto_factor_color tag to the relevant wood material in the Resource Browser. This causes the wood to match the hull color defined in ShipColorAssigner on the root entity.
- Other cloth elements: Assign the faction_color tag in the Resource Browser (apply to all LODs). This applies a general faction color tint.
2.2.5. figurehead_group
The figurehead is the decorative carved element at the bow of the ship. In gameplay terms it also provides stat bonuses (increased ram damage, morale bonuses, etc.), making it both a cosmetic and an upgrade piece.
- Placement: Add the figurehead_group prefab at the ship’s Identity coordinates.
- Structure: The prefab contains 17 default figurehead variants, plus a base and a platform child for the ship’s default (no upgrade) state. Assign the appropriate mesh as a MetaMesh to the base and platform children if you want a default figurehead visible before any upgrades are applied.
- Adding New Types: New figurehead variants must be added as children to the main prefab, and their stats and descriptions must be registered in ship_upgrade_pieces.xml and ship_slots.xml.
- Visibility: Unlike most other upgrade pieces, figureheads are discovered through exploration in the game world rather than purchased at port. However, they still appear in the editor’s upgrade preview when using EditorShipUpgradeViewer.
2.2.6. battlements_holder_aft
Defensive battle shields mounted on the aftercastle to protect troops on the rear of the ship. Typically used on heavier warships.
- Setup: Create an empty entity named battlements_holder_aft at Identity under the ship root.
- Add the battlement_shield_group_aft nested prefab as a child.
- Configuration: Multiple instances can be added. Each instance of the battlement prefab contains different visual states for different upgrade levels and destruction states. Destruction particles can be added as additional children within each instance, following the same structure used in the main ship burning system.
2.2.7. deck_upgrade_holder
This entity contains the deck_upgrade_assets_nested prefab, which handles interactive and passive assets that appear on the deck at higher upgrade levels.
- Placement: Add the deck_upgrade_assets_nested prefab as a child under this holder. Multiple instances can be placed at different locations on the deck.
- NavMesh Constraint: Because these assets have physics bodies, there must not be a NavMesh baked beneath them. Baking NavMesh under physics objects causes AI path-finding errors.
Component Breakdown:
- Interactable Assets: The children named deck_ammo_1, deck_ammo_2, deck_ammo_3, deck_javelin_2, and deck_javelin_3 are interactive objects. Players and AI agents can interact with these to replenish arrows and throwable weapons during combat.
- Passive Assets: All other children within the prefab are purely visual upgrade decorations with no interaction.
2.2.8. ship_ballista_holder
A nested prefab that contains the complete ballista upgrade — the weapon itself, all ammo type variants, interaction points for agents, and the deck platform it sits on.
- Placement: Add this prefab directly under the root entity.
- Tags: Assign both the upgrade_slot tag and the fore tag to the main holder entity. The upgrade_slot tag registers it with the upgrade system; the fore tag identifies it as a forward-facing weapon and makes it mutually exclusive with battlements_holder_fore (a ship cannot have both a ballista and fore battlements at the same time).
Child Breakdown:
- ballista_platform: A raised deck platform that gives the ballista operator a better field of fire. This platform is only active when the ballista upgrade is equipped.
- Tag: Assign the platform tag to this child.
- NavMesh Constraint: This platform must not be higher than 1.5 metres above the baked deck NavMesh. The game does not generate a separate elevated NavMesh for this platform, so agents must be able to step onto it from the existing deck NavMesh. If it is too high, agents cannot reach the ballista.
- Ammo Type Children: Each remaining child represents a different ammo type (standard bolts, fire bolts, etc.). All ammo children must be placed at the exact same coordinates — the game swaps between them by toggling visibility based on which ammo type is loaded. Each child must have a unique tag identifying its ammo type.
2.2.9. battlements_holder_fore
Defensive shields on the forecastle — the raised front section of the ship.
- Setup: Create an empty entity named battlements_holder_fore at Identity.
- Add the battlement_shield_group_fore nested prefab as a child.
- Mutual Exclusivity: This component is mutually exclusive with ship_ballista_holder. A ship cannot have both fore battlements and a ballista. Ensure the tags on this holder use the fore designation so the upgrade system enforces this exclusivity correctly.
2.2.10. ram_group
The ram is the reinforced prow extension used for ramming enemy ships, dealing hull damage on collision.
- Placement: Add the ram_group nested prefab at the ship’s Identity.
- Structure: The prefab contains 8 predefined ram variants and 1 adapter mesh. Place and orient the 8 ram variants to fit your ship’s bow shape, then add the appropriate deck extension or prow platform mesh as a MetaMesh to the adapter entity.
- Tags: All required tags for the upgrade and damage systems are predefined on the ram prefab’s children. New ram variants can be added to the prefab and registered in the relevant XML files following the existing patterns.
2.3. Cosmetic & VFX Components
This group contains purely visual elements. Their absence does not break the ship’s functionality or gameplay, but they are essential for the ship to look and feel correct in-game.
2.3.1. wetness_decals
These decals simulate water splash marks on the outer hull, showing wet patches where waves hit the ship’s sides.
- Setup: Create an empty entity as a direct child of the ship root (not inside mesh_holder or ship_water_effects). Name it wetness_decals and assign the tag wetness_decals to it.
- Add child entities under it. Each child must have a Decal component with the desired wetness material assigned.
- Position and orient each decal against the hull surface. The decal’s local up axis is used as its surface normal — ensure it points outward away from the hull surface, otherwise the system cannot correctly determine whether a splash particle is near enough to activate the decal.
- Behavior: Decals fade in when active splash particles are nearby on the same side of the hull, then gradually fade out over approximately 6 seconds of inactivity.
2.3.2. rudder_objects
Used when you want a visible physical rudder on the ship that rotates in response to the ship’s steering, even when the steering is not controlled by a ShipControlRudder (i.e., the rudder is visual only, not interactive).
- Setup: Add the appropriate rudder mesh as a MetaMesh to a child entity of this holder.
- Tag: Assign the tag rudder_rotation_entity to the entity containing the mesh. The game reads this tag to find the visual rudder and synchronize its rotation angle with the ship’s current steering input.
2.3.3. ship_water_effects
ShipWaterEffects (ship_water_effects) is a script component that adds all water-related visual effects to the ship. It is purely visual and has no effect on physics or gameplay logic.
Prerequisite: The ship’s buoyancy (floater volumes) must be fully set up before adding this script. ShipWaterEffects reads the floater configuration to determine the waterline position used for particle placement.
The script is attached to a child entity of the ship root — not the root itself. Create a child entity named ship_visual_only and add the ship_water_effects script to it. The ship_visual_only tag scopes this script to visual-only entities, keeping it separate from physics and gameplay logic.
[ship_root]
└─ [ship_visual_only] ← ShipWaterEffects script lives here
Overview of Features:
| Feature | Description |
|---|---|
| Wake | A trail on the water surface behind the moving ship. Shape and size are derived automatically from the hull mesh. |
| Movement Particles | Continuous water spray along both sides of the hull while the ship is underway. |
| Splash Particles | Velocity-triggered burst particles at the waterline. Thresholds: small at ≥2 m/s, medium at ≥5 m/s, large at ≥8 m/s. |
| In-Hull Water Simulation | A simulated water surface rendered inside the hull interior. Reacts to wave entry events and rain automatically. |
| Foam Trail Decals | Foam patches spawned at the bow as the ship moves, which drift and fade over time. Requires a decal renderer in the scene. |
| Wetness Decals | Hull decals that become visibly wet near active splash particles and dry out over time. See section 2.3.1 for setup. |
| Rain Interaction | The in-hull water surface reacts to scene rain density automatically. |
Note: You do not need to manually place any particle entities. All particle positions are computed automatically at startup using raycasts against the body_mesh entity. Ensure body_mesh exists and has a valid MetaMesh with an accurate bounding box. If the ship has a ram, the bow particle strip extends automatically to cover the ram tip — no extra setup is needed.
Configurable Parameters:
In-Hull Water Simulation:
- Water Simulation Bounding Box (default: 1,1,1) — XYZ extents of the bounding volume. Use Reset Water Simulation Bounding Box to auto-compute from render_to_depth meshes.
- Hull Water Simulation Resolution Scale (default: half) — Options: one, half, quarter, one_eight, one_sixteenth. Lower values improve performance.
- Hull Water Splash Water Multiplier (default: 1.75) — Scales wave displacement intensity inside the hull on splash events.
- Ship Hull Height Type (default: Small) — Use Large for tall-sided vessels. Options: Small, Medium, Large.
Movement Particles:
- Movement Particle Type (default: Small) — Use Small for small boats, Medium or Large for bigger ships.
- Movement Particle Height Offset (default: 0.34) — Vertical offset in metres from the computed waterline.
- Movement Particle Surface Distance Offset (default: 0.7) — Distance from the hull surface for particle origins.
Splash Particles:
- Splash Particle Height Offset (default: 0.4) — Vertical offset from waterline for splash particle placement.
- Splash Particle Surface Distance Offset (default: 0.7) — Distance from hull surface for splash particle origins.
Editor Debug Tools (editor only, no effect in shipped builds):
- Reset Water Simulation Bounding Box — Auto-computes bounding box from render_to_depth meshes.
- Re-render Depth Texture — Forces the depth texture to re-render after modifying render_to_depth meshes.
- Reset In-Hull Water — Resets the hull water simulation to its initial state.
- Show Water Simulation Bounding Box — Draws the bounding box in the viewport.
- Show Movement Particles / Show Splash Particles — Draws debug markers at each particle origin.
- Show Water Balance Plane — Visualizes the computed waterline as a red plane.
- Show Wetness Decal Values / Force Wetness Decal To Full — Tools for inspecting wetness decal placement and opacity.
Campaign Map Behavior: On the campaign map (Main_map scene), this script automatically disables all particle and simulation logic. No visual overhead is incurred on the campaign map — the entity structure simply needs to be present.
2.3.4. ship_burning_system
This entity contains all visual and audio content related to the ship’s burning mechanics — fire particles, light sources, and sound nodes. The system is designed to spread fire progressively across the ship in a controlled sequence.
a) Particle Placement Hierarchy:
The ship_burning_node prefabs are sorted into specific parent entities to define where fire can appear. These parents must exist inside the ship_burning_system entity:
- railing_parent: Place burning nodes along the railings.
- ship_deck_parent: Place burning nodes at random positions across the open deck.
- deck_upgrade_parent: Place burning nodes on and around deck upgrade assets.
- mast_parent: Place burning nodes on the deck in the area beneath each mast.
b) BurningNode Configuration:
Each ship_burning_node prefab contains the BurningNode script and a particle system child.
- Node Index (Critical): The Node Index value in the BurningNode script controls the order in which fire spreads. Assign sequential, unique integers (0, 1, 2, 3…) to adjacent nodes along a logical spread path — for example, numbering railing nodes from stern to bow causes fire to visibly travel along the railing in sequence.
- Audio Restriction (Important): Remove all sound file paths from the particle systems used inside burning nodes. The burning system has its own dedicated sound management through sound_parent. Leaving sounds on individual particles causes multiple overlapping audio sources and a loud, incorrect soundscape.
c) Lighting & Sound:
- light_parent: Contains point light entities. Position these near clusters of burning nodes to create convincing firelight illumination. Lights fade in and out automatically based on fire progress values in the ShipBurningSystem script.
- sound_parent: Contains burning_sound_node prefabs. Place 2 to 6 of these around the ship depending on its size. These nodes trigger fire sounds only when fire particles in their immediate vicinity are active.
d) ShipBurningSystem Script (Root Settings):
- Start Fire / Stop Fire: Editor buttons to preview the full burning sequence without launching the game.
- Spread Rate: Controls how quickly fire spreads across the ship. Higher values cause faster, more aggressive burning.
- All Fire Mode: Activates all fire particles simultaneously, useful for visually checking node placement.
- Small Hit Debug: With this enabled, aim at the ship and press middle-click to simulate a small localized fire hit.
- Min/Max Fire Progress For Light: Controls the timeline for light activation.
- Min: The fire progress value (0–1) at which the point lights begin to fade in.
- Max: The fire progress value at which lights reach their peak intensity.
- Max Light Intensity: The maximum brightness value the lights under light_parent will reach at peak fire intensity.
2.3.5. rope_cosmetics_holder
This holder contains decorative ropes that are tied between points on the ship — rigging lines, mooring ropes, and other atmospheric rope details.
- Prefab: Use simple_rope_nested for each rope. Place the start and end child entities of each rope at the desired anchor points on the ship.
- Configuration: Adjust the following via the script on the start child entity:
- fixed size: Whether the rope has a fixed length or sags based on the distance between endpoints.
- loose amount: How much the rope sags between its endpoints (catenary curve depth).
- default length: The rope’s natural unstretched length.
- Visual Properties: Rope thickness, length-based texture tiling, and other visual parameters are controlled via the material’s custom mesh parameters on the rope entity.
2.3.6. brazier_holder
Braziers provide the lit coal pots from which archers can ignite fire arrows. This component works interchangeably — or mutually exclusively, depending on ship design — with some shield upgrade configurations.
- Placement: Place brazier_b or brazier_d prefabs as children under this holder at suitable positions along the ship’s edges or deck. Tags are predefined on the prefab — no additional tag setup is required.
- Multiple braziers can be placed, and their positions should be accessible to standing agents without requiring them to move far from their combat positions.
2.3.7. ship_water_clip (SDF System)
The SDF (Signed Distance Field) system prevents ocean water from visually appearing inside the ship’s hull — without it, the sea surface would clip through the hull geometry, which looks incorrect.
- Model Preparation: Create a custom 3D mesh that closely follows the outer shape of the ship’s hull below the deck line, extending slightly above deck level to create a sealed volume. This mesh defines the “dry” interior zone.
- Naming Convention: The mesh name must begin with the prefix sdf_ (e.g., sdf_dromon). The engine automatically processes any mesh with this prefix as SDF data when it is imported.
Setup:
- Add the ship_water_clip prefab to the ship hierarchy.
- Find the signed_distance_field script inside this prefab.
- Assign your prepared SDF mesh asset to the script.
Verification: Enable the Visualize SDF checkbox in the script to see the field rendered in the editor viewport as a colored volume. Verify that the volume completely encloses the hull interior below deck.
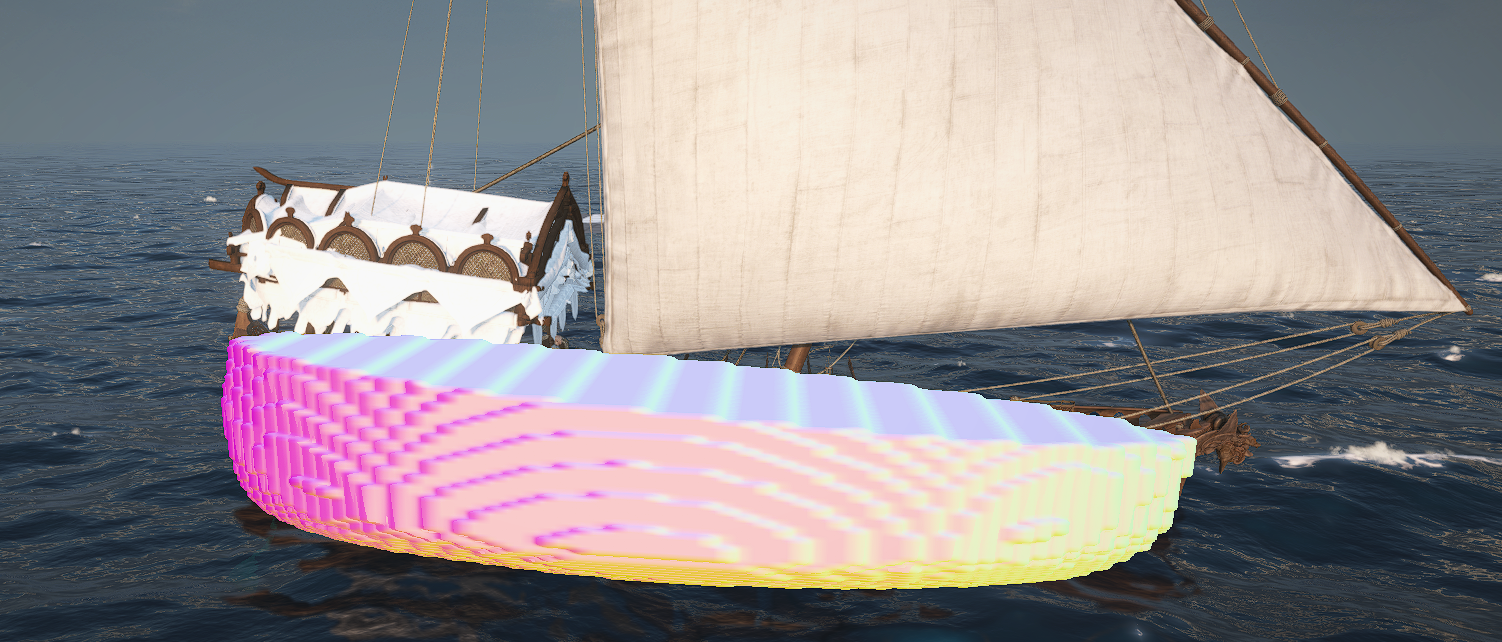
2.3.8. deckwater (Heightmap Simulation)
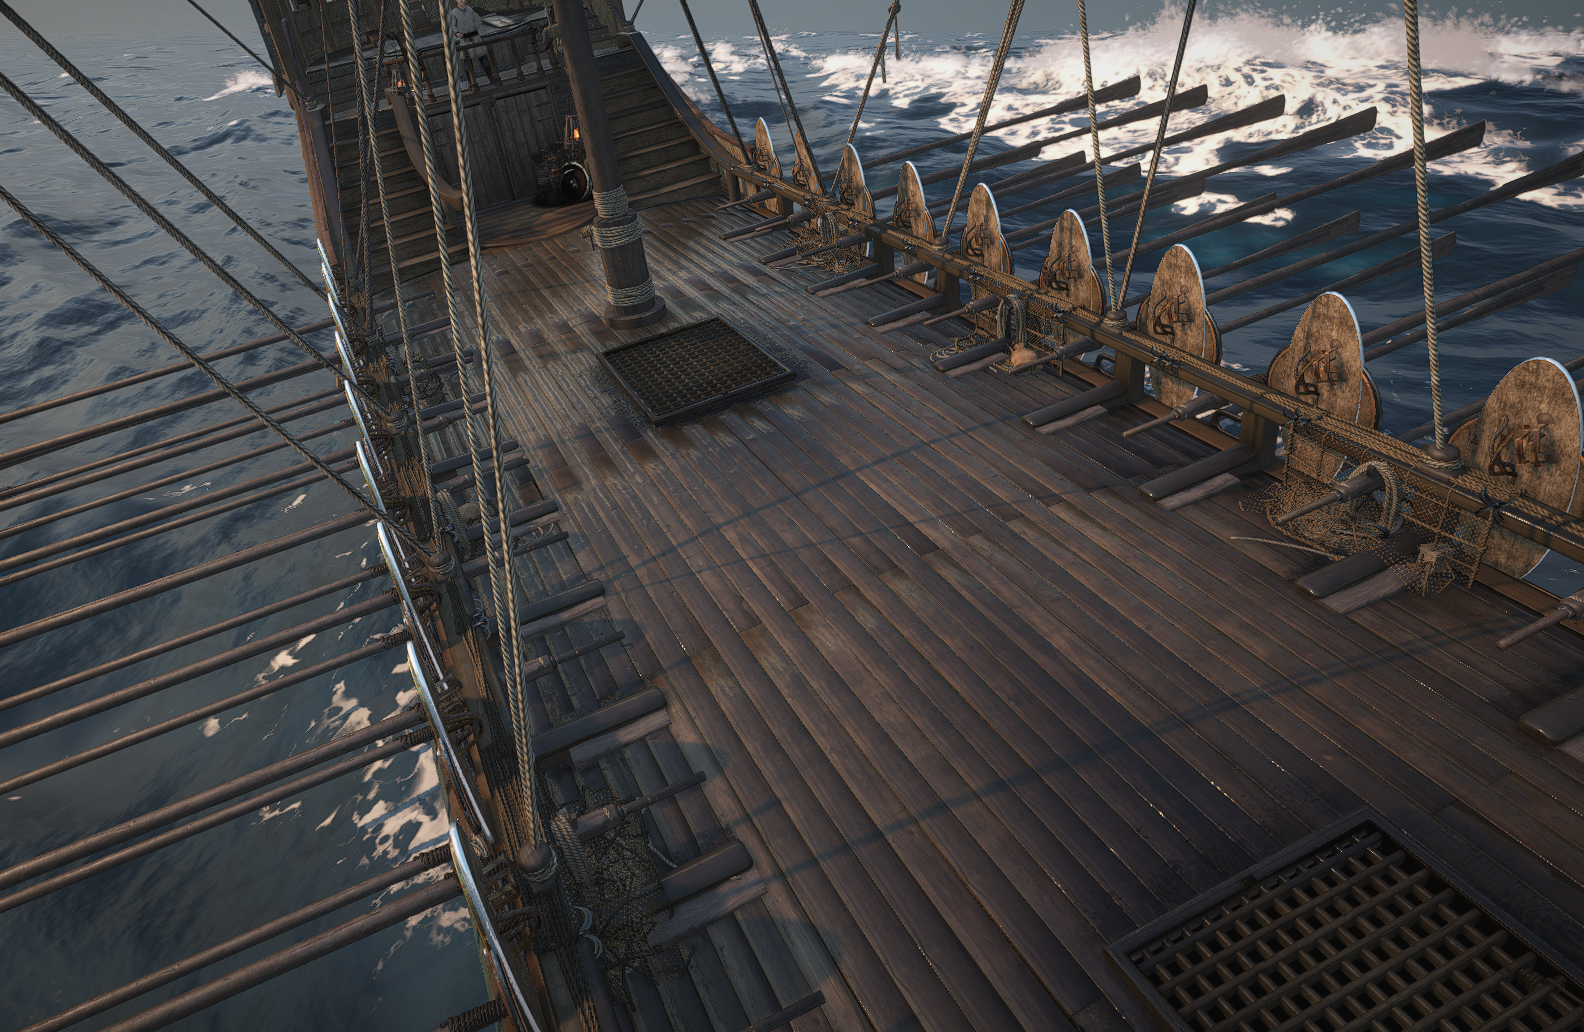
This system simulates water pooling and sloshing on the ship’s deck — the visible water that accumulates from waves washing over the sides.
- Asset: A simplified “fake deck” mesh is required. This mesh is used to generate the top-down depth texture (heightmap) that the simulation reads.
- Setup:
- Add this fake deck mesh as a child entity under mesh_holder.
- Assign the render_to_depth tag to this entity. The water effects system will include it (along with all other render_to_depth tagged objects such as oar_seats and deck furniture) in the depth render.
- After setup, navigate to the ship_water_effects child entity and click Re-render Depth Texture in the ShipWaterEffects script to bake the depth texture.
- Debug: Increase the Water Strength value in the Scene Options window and enable Enable Physics in the Visibility window to observe the deck water simulation behavior in the editor.
2.3.9. torch_holder
This holder contains lanterns and torches that provide ambient lighting on the ship at night and in dark scenes.
- Prefab: Add nord_lantern_nested as a child for each light source position.
- Each lantern prefab contains:
- collision_sphere: A small physics sphere used for collision interactions (e.g., agents brushing past the lantern).
- swinging_object: The part of the lantern that physically swings in response to ship movement. Assign the tag swinging_entity to this child. This child contains both the light source entity and the lantern mesh that visually sways.
- nord_lantern_part_02: The static mounting bracket or chain that does not swing. This part stays fixed relative to the ship.
2.3.10. knobs_holder
This holder contains the deck-level anchor points where ropes from the sails tie off. They are the cleats, bollards, and belaying pin racks that sailors use to secure running rigging.
- Parent Tag: Assign the tag knob_points_parent to the knobs_holder entity itself. The sail system uses this tag to locate all available rope anchor points on the ship.
Available prefabs:
- bollard_a
- cleat_a
- belaying_pins_a
- belaying_pins_b
- Setup: Inside each prefab are child entities that serve as the precise rope endpoint anchors. Assign the tag knot_point to each of these child entities. You can duplicate and place as many anchor prefabs as your rigging design requires. The sail system will automatically use the nearest knot_point to route rope visuals from each sail’s control bone.