
Navmesh
What is the Navigation Mesh?
Navigation Mesh is a compilation of models created by the scene designer for the use of AI to make sure they can move around without colliding with the physic objects in the scene.
What are the important rules for Navigation Mesh?
a. 1,5 Meter Rule: Designers needs to arrange the navigation mesh in a 1.5-meter diameter when creating on terrain or other objects that can be walked on or can stand on (Rooftops, castle walls etc.) This diameter needs to be in 1.5 meters on a vertical axis. If this 1.5 rule is not applied, AI won’t be able to find the way when walking.
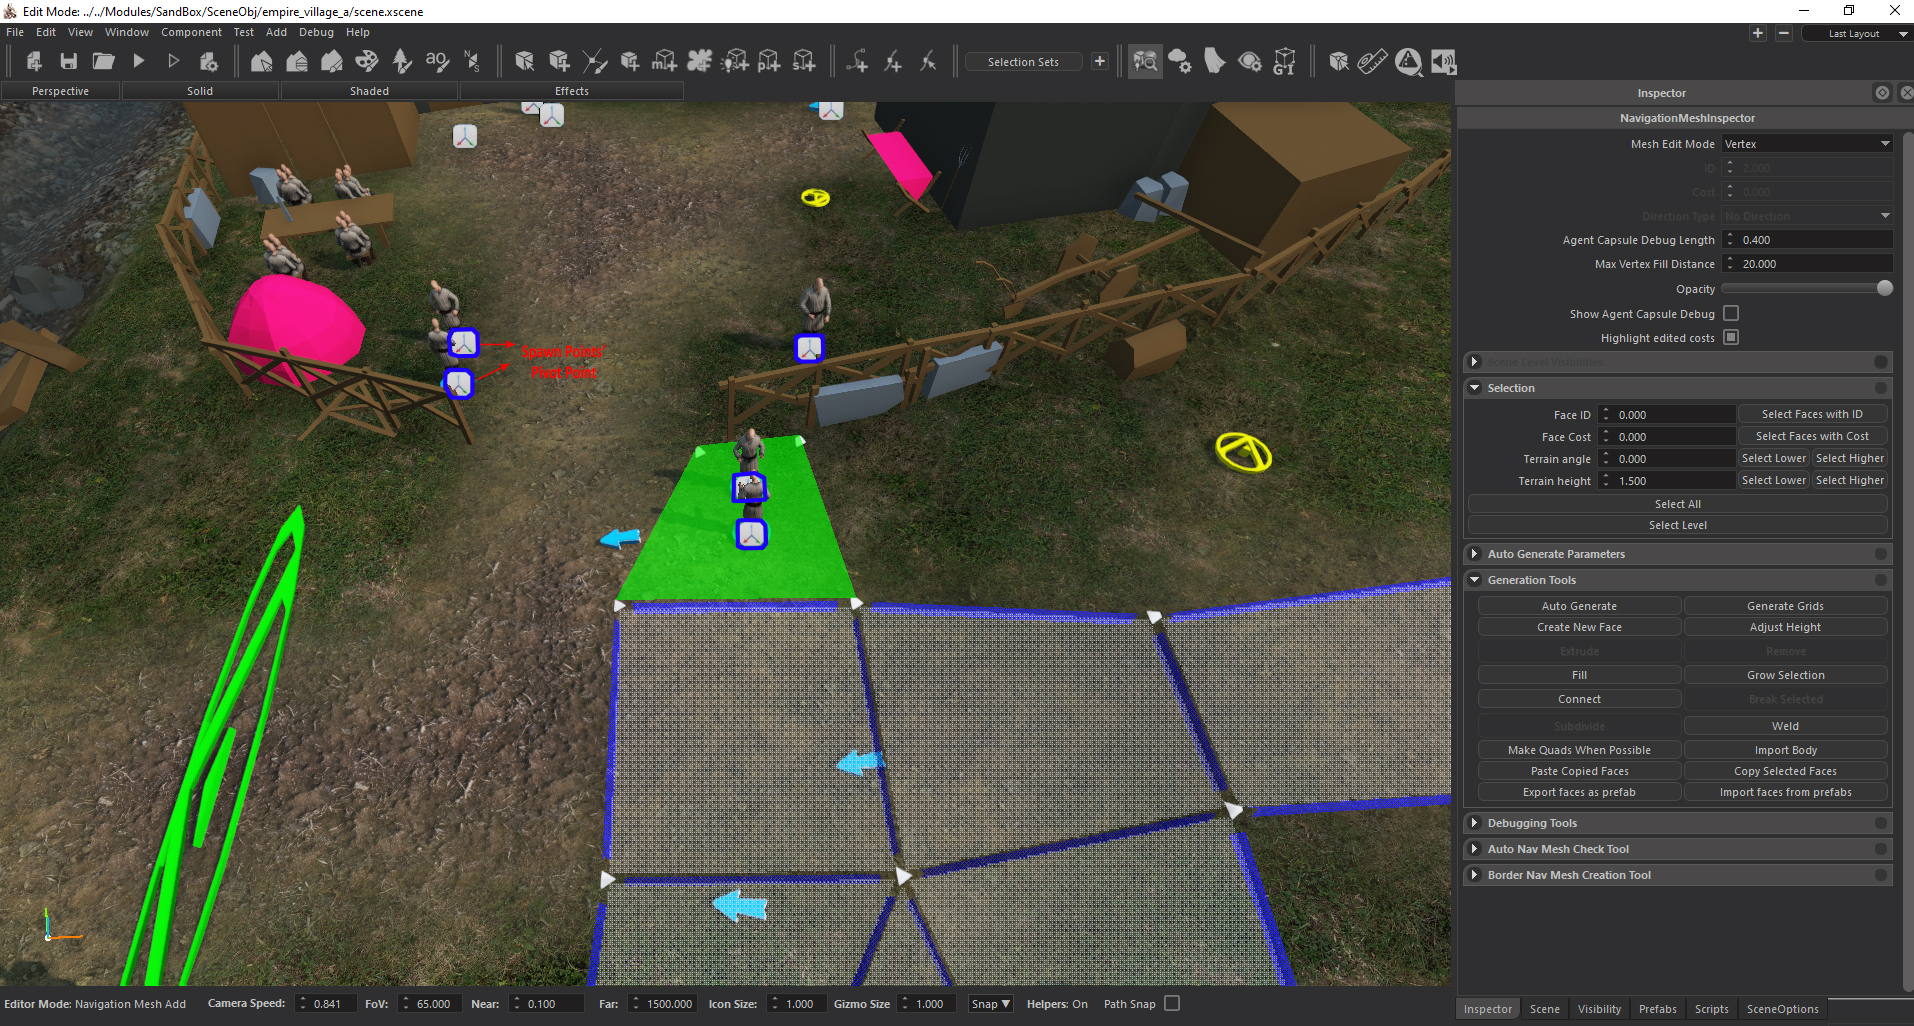
b. Spawn Point Pivot Points: Each spawn point in a scene has pivot points. Navmesh polygon faces have to include these spawn point pivot points. Otherwise, spawn points will not work.
c. Existing Trees: Each tree in a scene has a physical object which we call ‘capsules’. AI will see these capsules automatically when in a battle. Because of this, AI won’t walk into trees. Navmesh can be applied under trees.
d. Terrain Angle: There are some areas that won’t be traversable because of their steep angle. These areas can be enabled with: Shaded > Debug - Terrain Angle. On the opened Angel Limit window, designers can input “50” to enable these. You can see two areas which are green and red. Green areas are traversable and red areas aren’t.
e. Where to apply Navemesh: Navigation Mesh should be applied to every surface upon which players can walk. Navigation mesh should not be applied under the physical objects. Since the AI can’t jump, areas which can be accessible with jumping should not contain the navigation mesh.
There is no “Undo” operation in the Navigation Mesh. If you press CTRL + Z, the last scene change will be reverted. Do not try to undo when applying Navigation Mesh
How many types of Navigation Mesh need to be applied?
There are three types of Navigation Mesh:
1.Basic navigation mesh areas (without an ID, ID:0), for example, battle_terrain, hideout or lords hall. 2.Village Scenes. Scenes like villages have multiple navigation mesh ID’s. 3.Siege-Town scenes. In these kind of scenes, there are two main visibility modes for Civilian and Siege. The town scene in civilian mode can be seen as a big village scene. But on Siege mode, there are some places and cases that demand Navigation Mesh faces to have special ID’s.
Navigation Mesh Modeling Foreknowledge
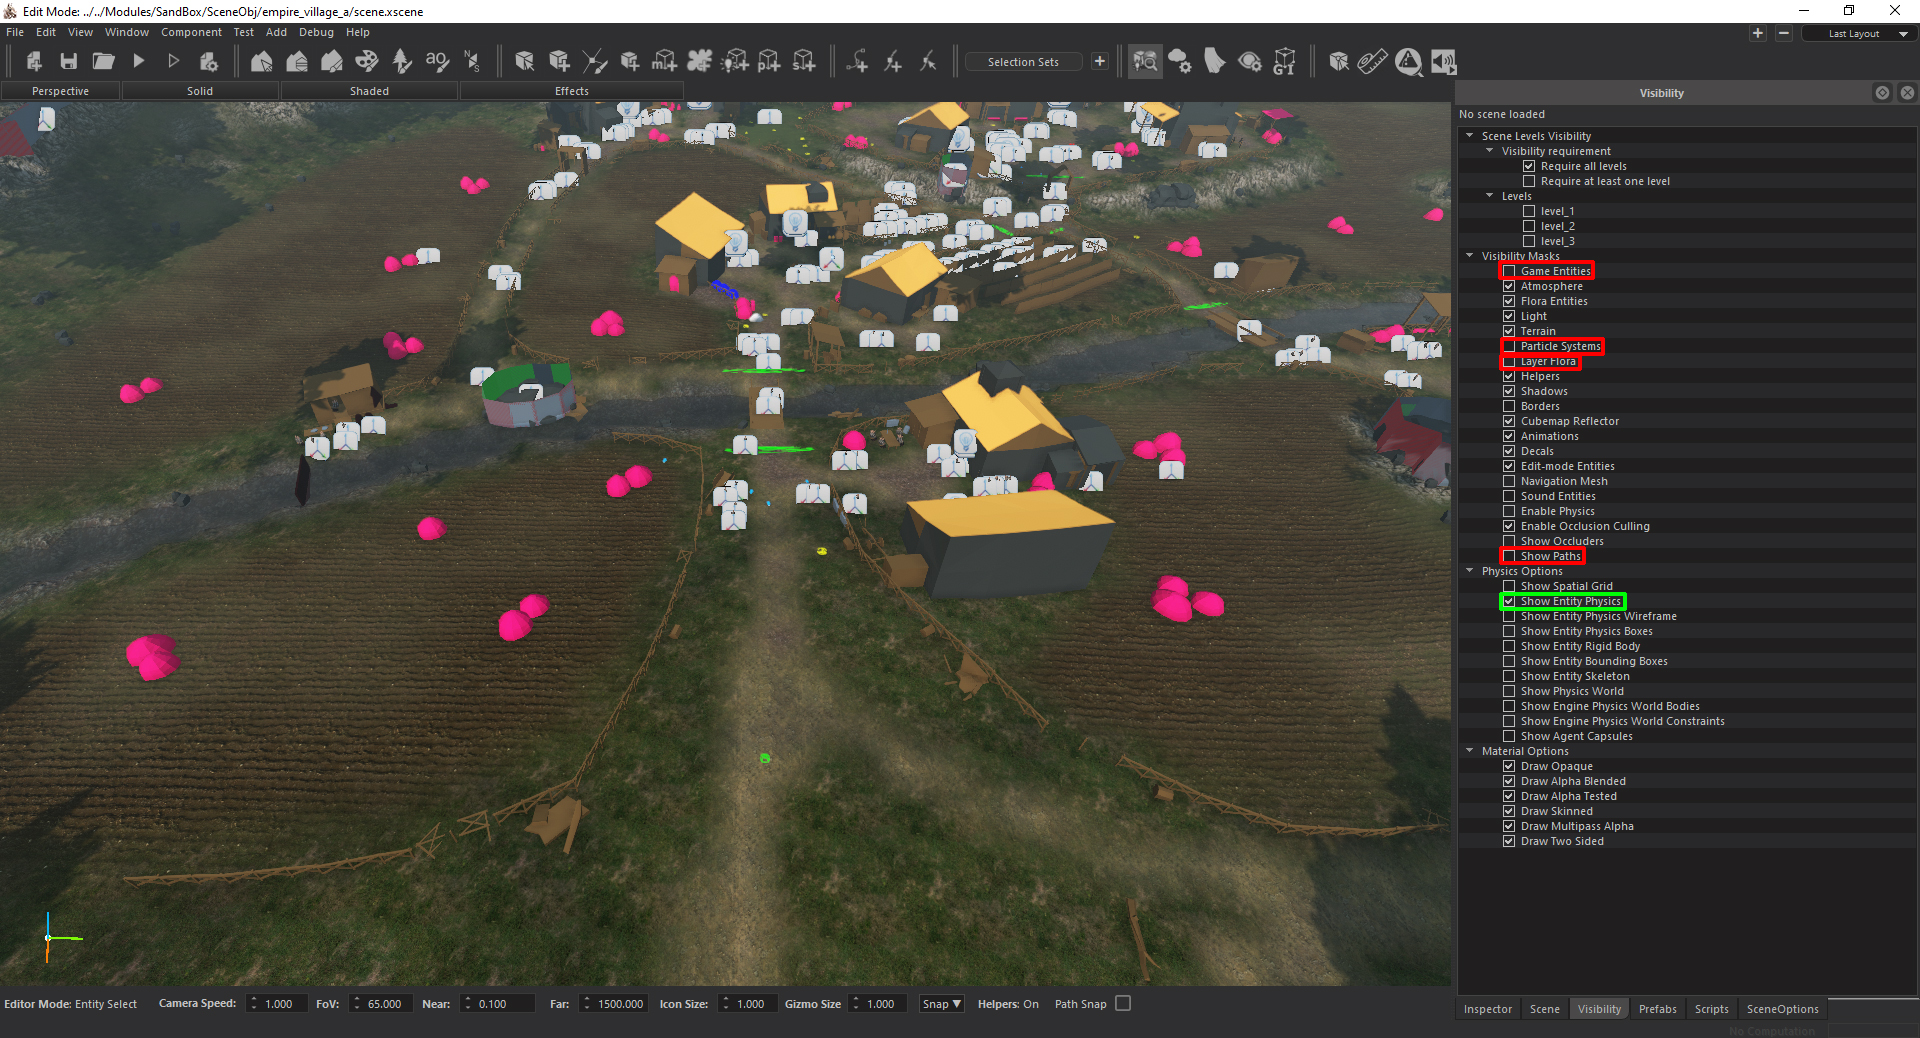
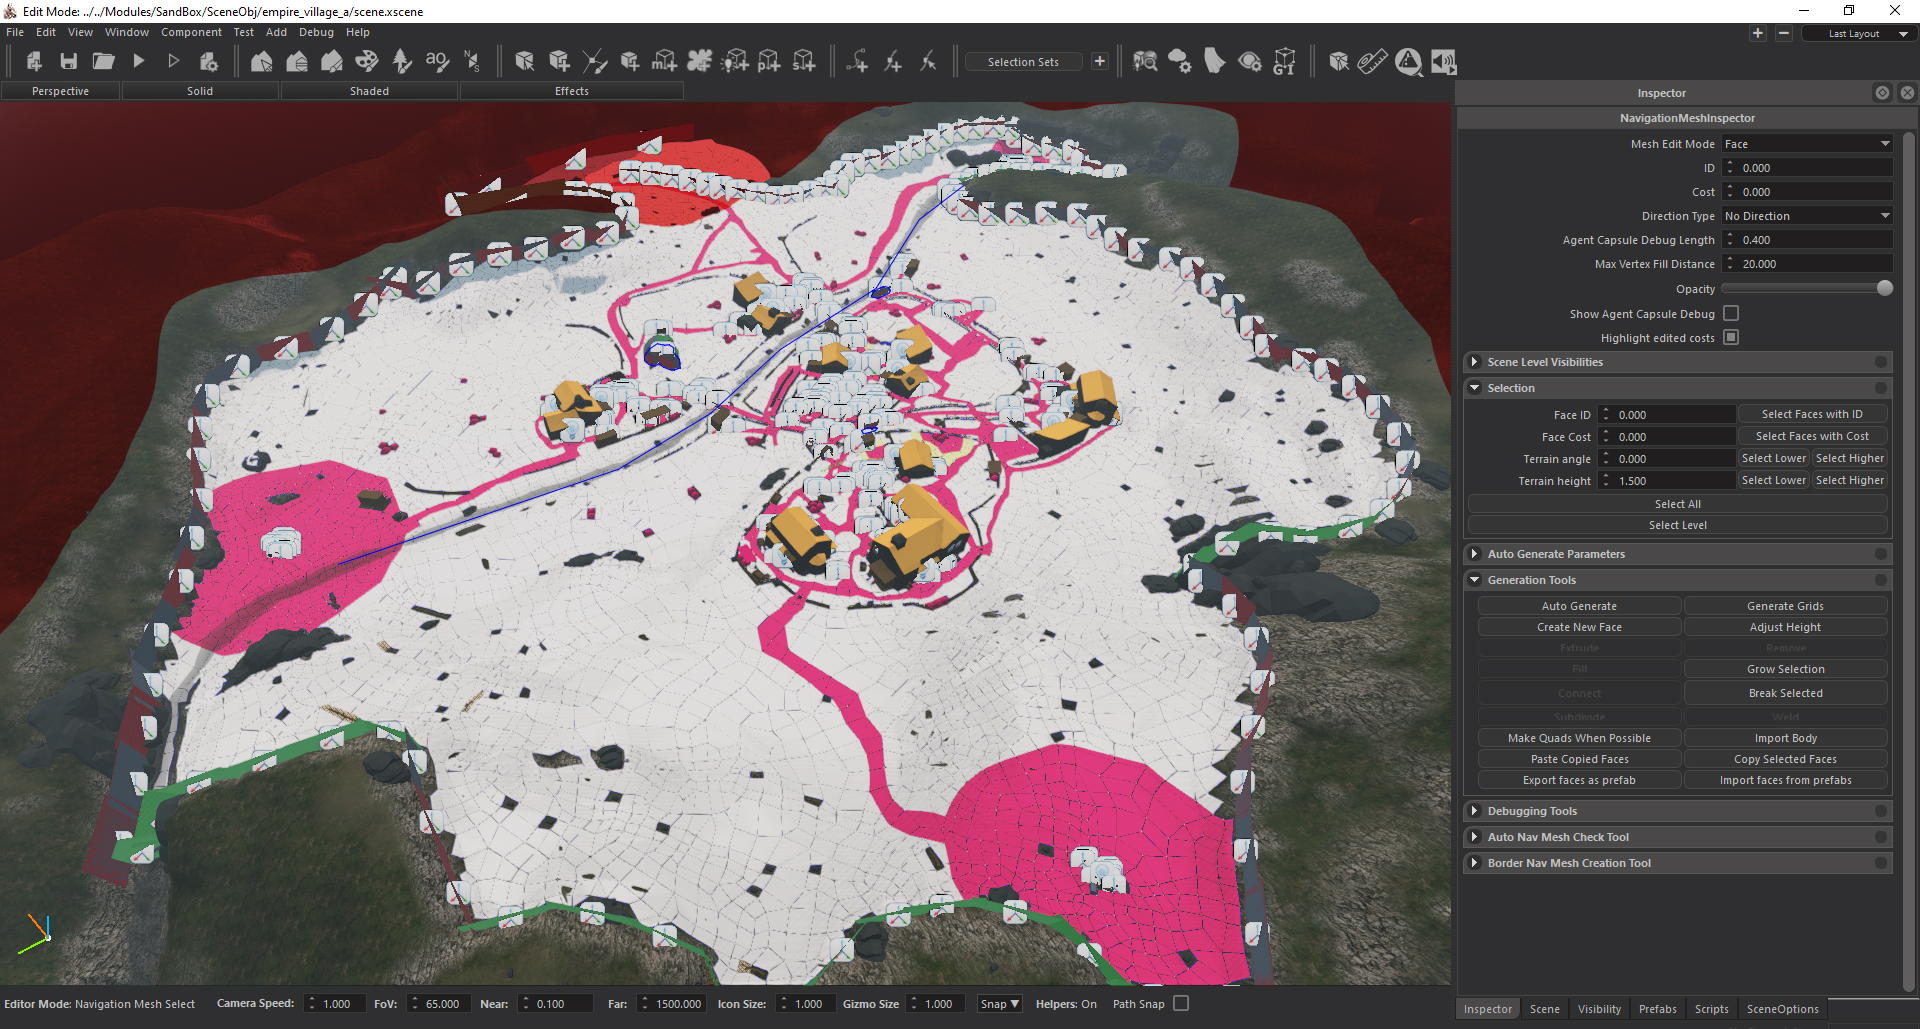
When opening the editor you will see a toolbar as shown in the photo below.

The icon in the red square is for the Navigation Mesh. When you click on it, you will see that the “NavigationMeshInspector” is opened in the inspector.

After the Navigation Mesh Inspector is opened you will see ‘Editor Mode: Navigation Mesh Select’ in the UI.

All the dropdown menu functions in the Navigation Mesh Inspector can be used in the Navigation Mesh Select mode. Hitting 1,2 or 3 on the keyboard will select these faces: 1: Vertices 2: Edges 3: Faces.
Navigation Mesh Modeling
**Until now we spoke about the Navigation Mesh Select Tool mode. Another editor mode for Navigation Mesh is Navigtation Mesh Add mode.


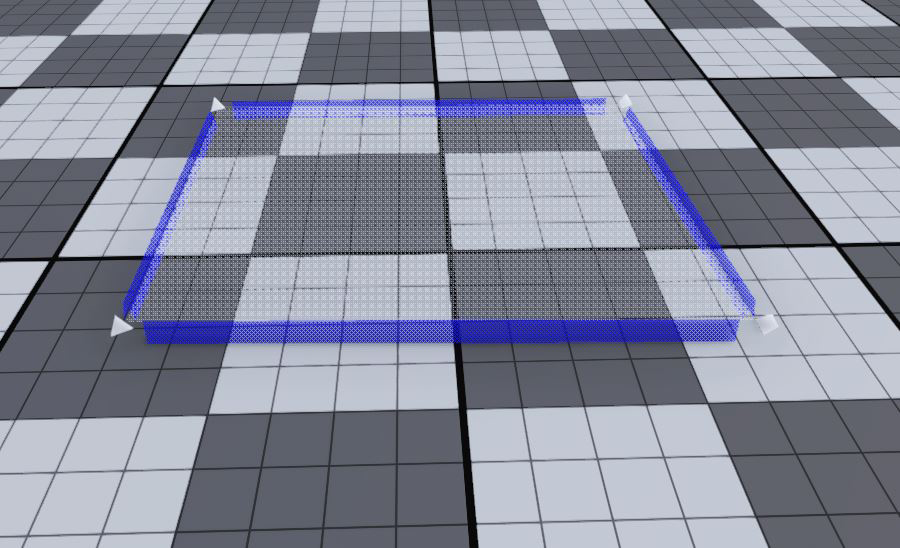
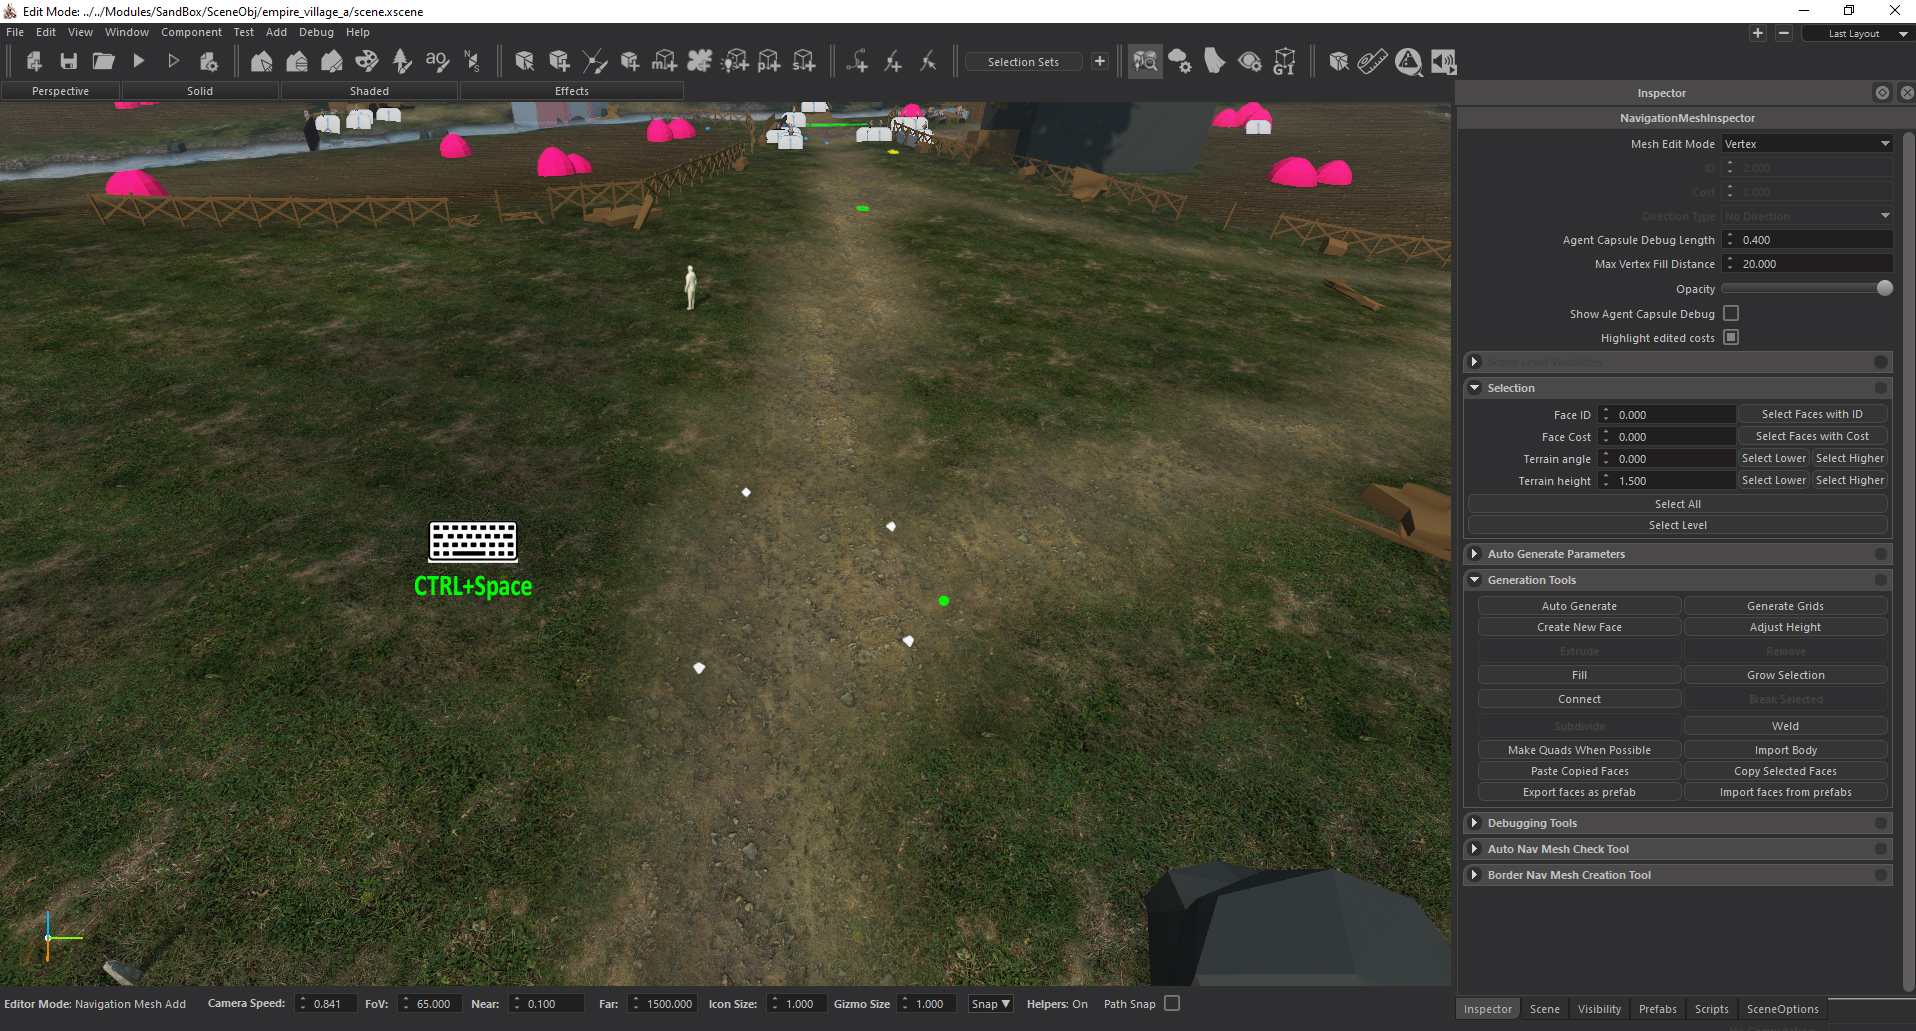
To open this mode you can press the ‘Spacebar’ key. You will see a vertex preview in the mouse pointer.
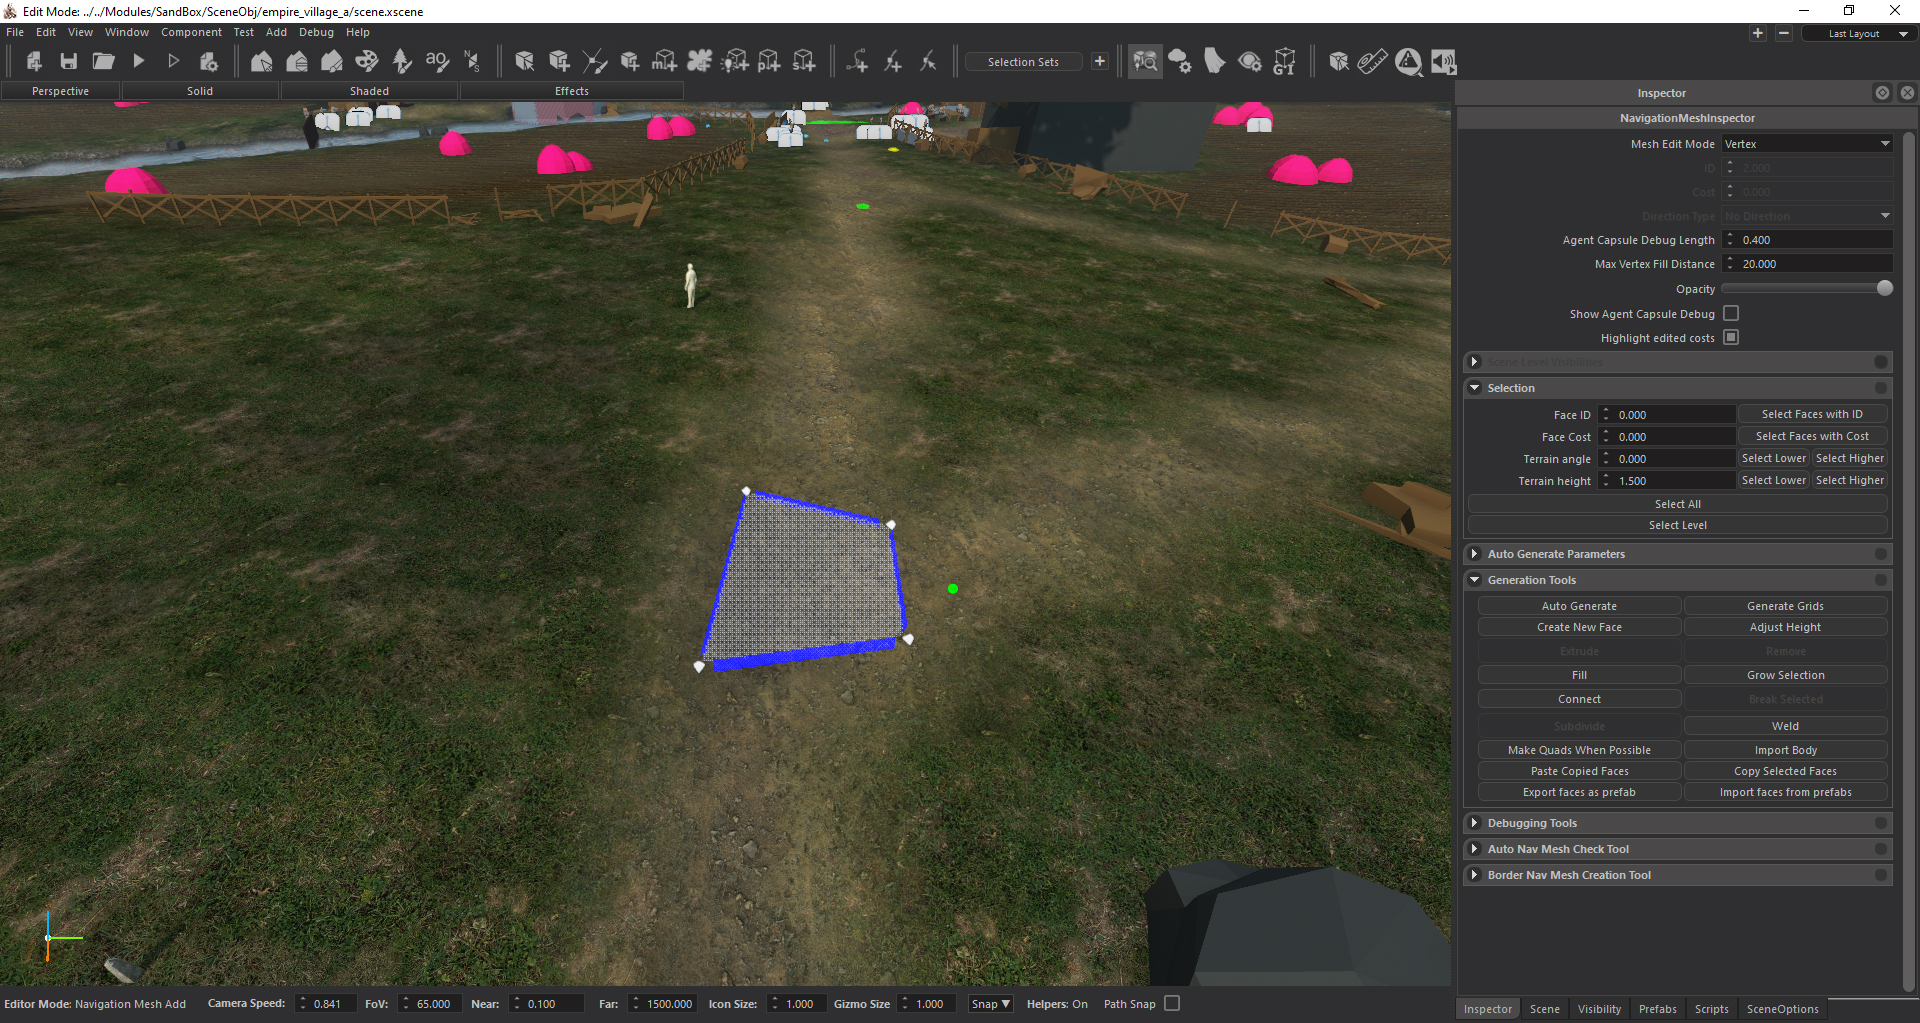
After pointing out 4 different points in the map, press CTRL+Space to create the Navigation Mesh polygon.
 |
 |
The shortcut table below can be helpful after the polygon creation phase. Below that, you also have the explanation of the tools available under the Generation Tools tab in the Navigation Mesh Inspector.
| Navmesh hotkeys | Shortcut | Editor State |
|---|---|---|
| Fill in closest 4 vertices (creates a quad) | Shift + Click | Navigation Mesh Add |
| Fill in the last 4 vertices (creates a quad) | Ctrl + Space | Navigation Mesh Add |
| Move vertex without selecting | Ctrl + Drag | Navigation Mesh Add |
| Delete face with mouse over (leaves vertices) | Alt + Click | Navigation Mesh Add |
| Delete face and remove all vertices | Alt + X + Click | Navigation Mesh Add |
| Selection mode - vertex | 1 | Navigation Mesh Select |
| Selection mode - edge | 2 | Navigation Mesh Select |
| Selection mode - face | 3 | Navigation Mesh Select |
| Select all vertices, edges or face (depends on the current selection) | Ctrl + A | Navigation Mesh Select |
| Delete selected vertices, edges or face | Delete | Navigation Mesh Select |
Generation Tools
The most useful and used tools are:
- Extrude: Extrusion along the selected edge’s (or edges’) axis.
- Fill: Fills between the selected navigation mesh vertices (or edges) and forms a face.
- Grow Selection: Grows the selection by selecting the adjacent elements to the selected elements (works for all vertex, edge and face structures).
- Connect: Connects the selected two navigation mesh vertices by drawing an edge between them.
- Weld: Removes vertices forming the edge and makes the edge one single vertex. It connects the old adjacent vertices to the newly generated vertex.
Navigation Mesh Modeling on Scene Types
We discussed briefly how to create and apply the Navigation Mesh. Let’s consolidate this information by creating a Navigation Mesh for a village scene with the help of some screenshots along the way.
1.Village Scene
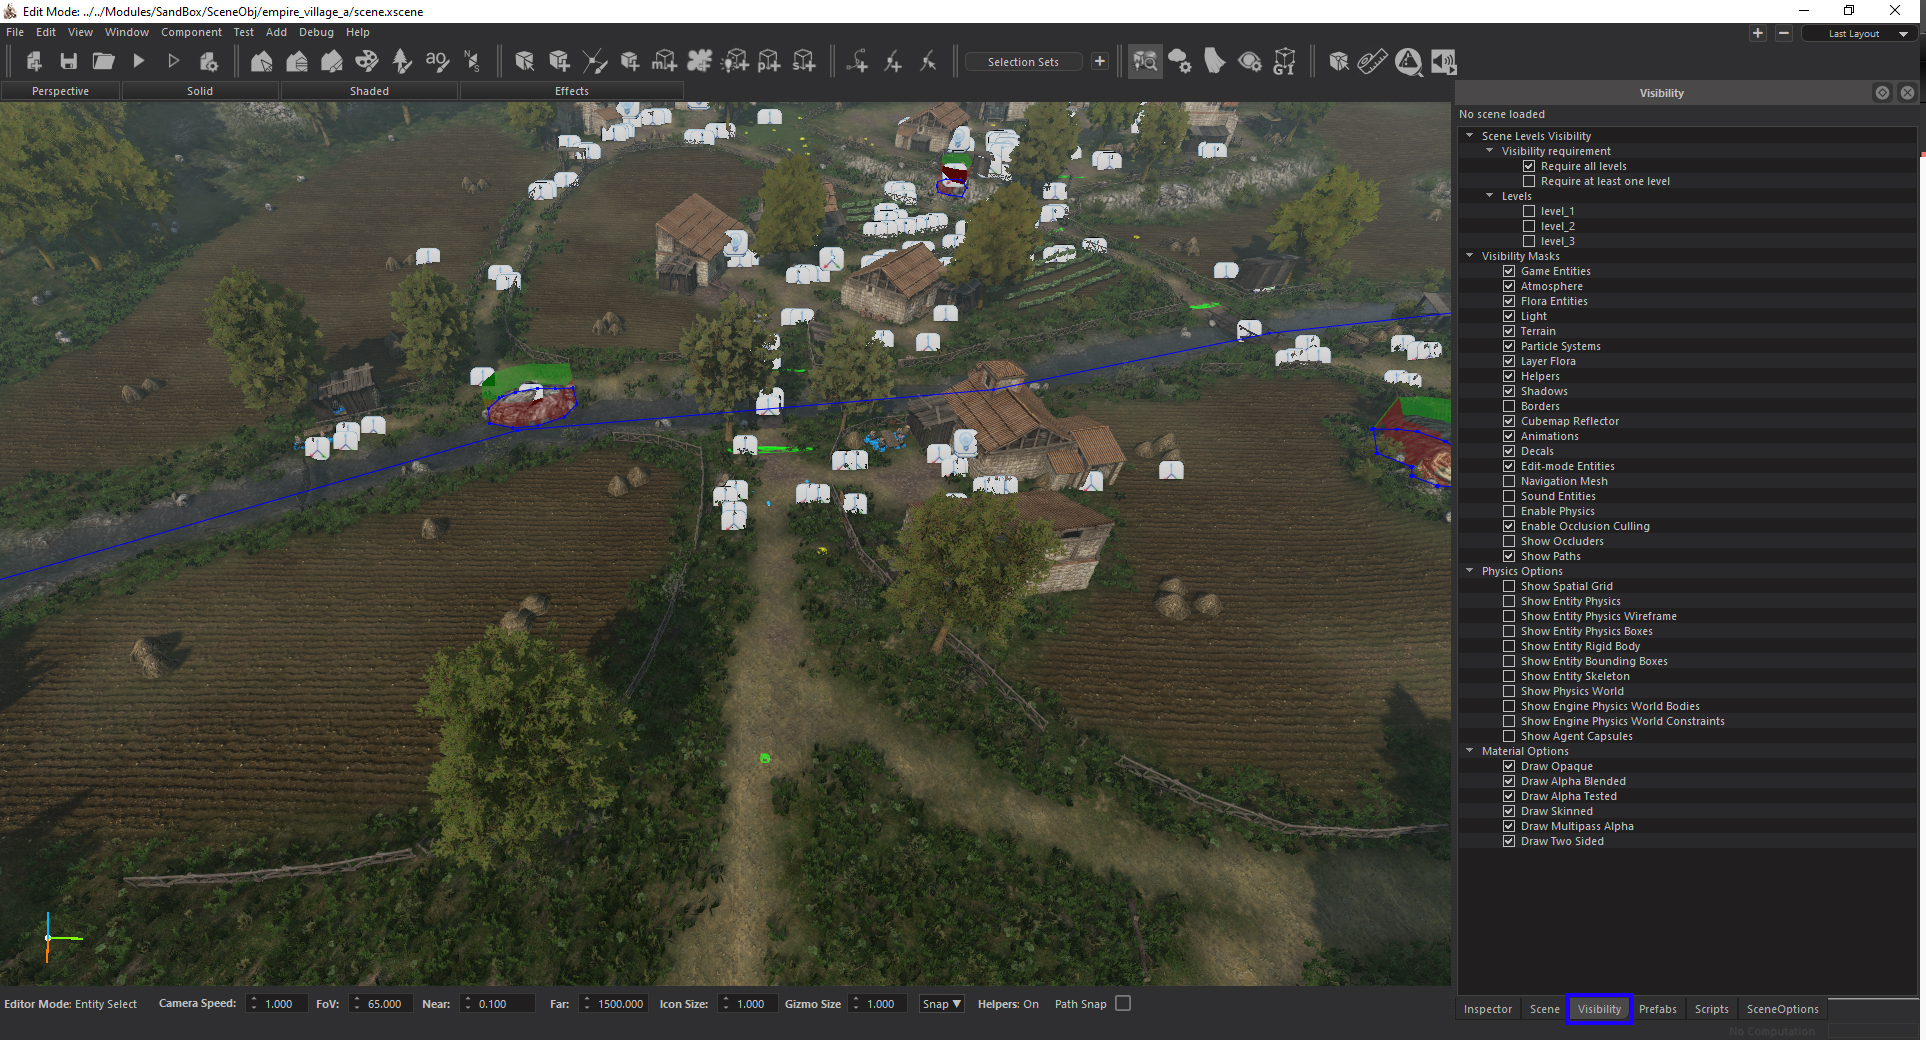
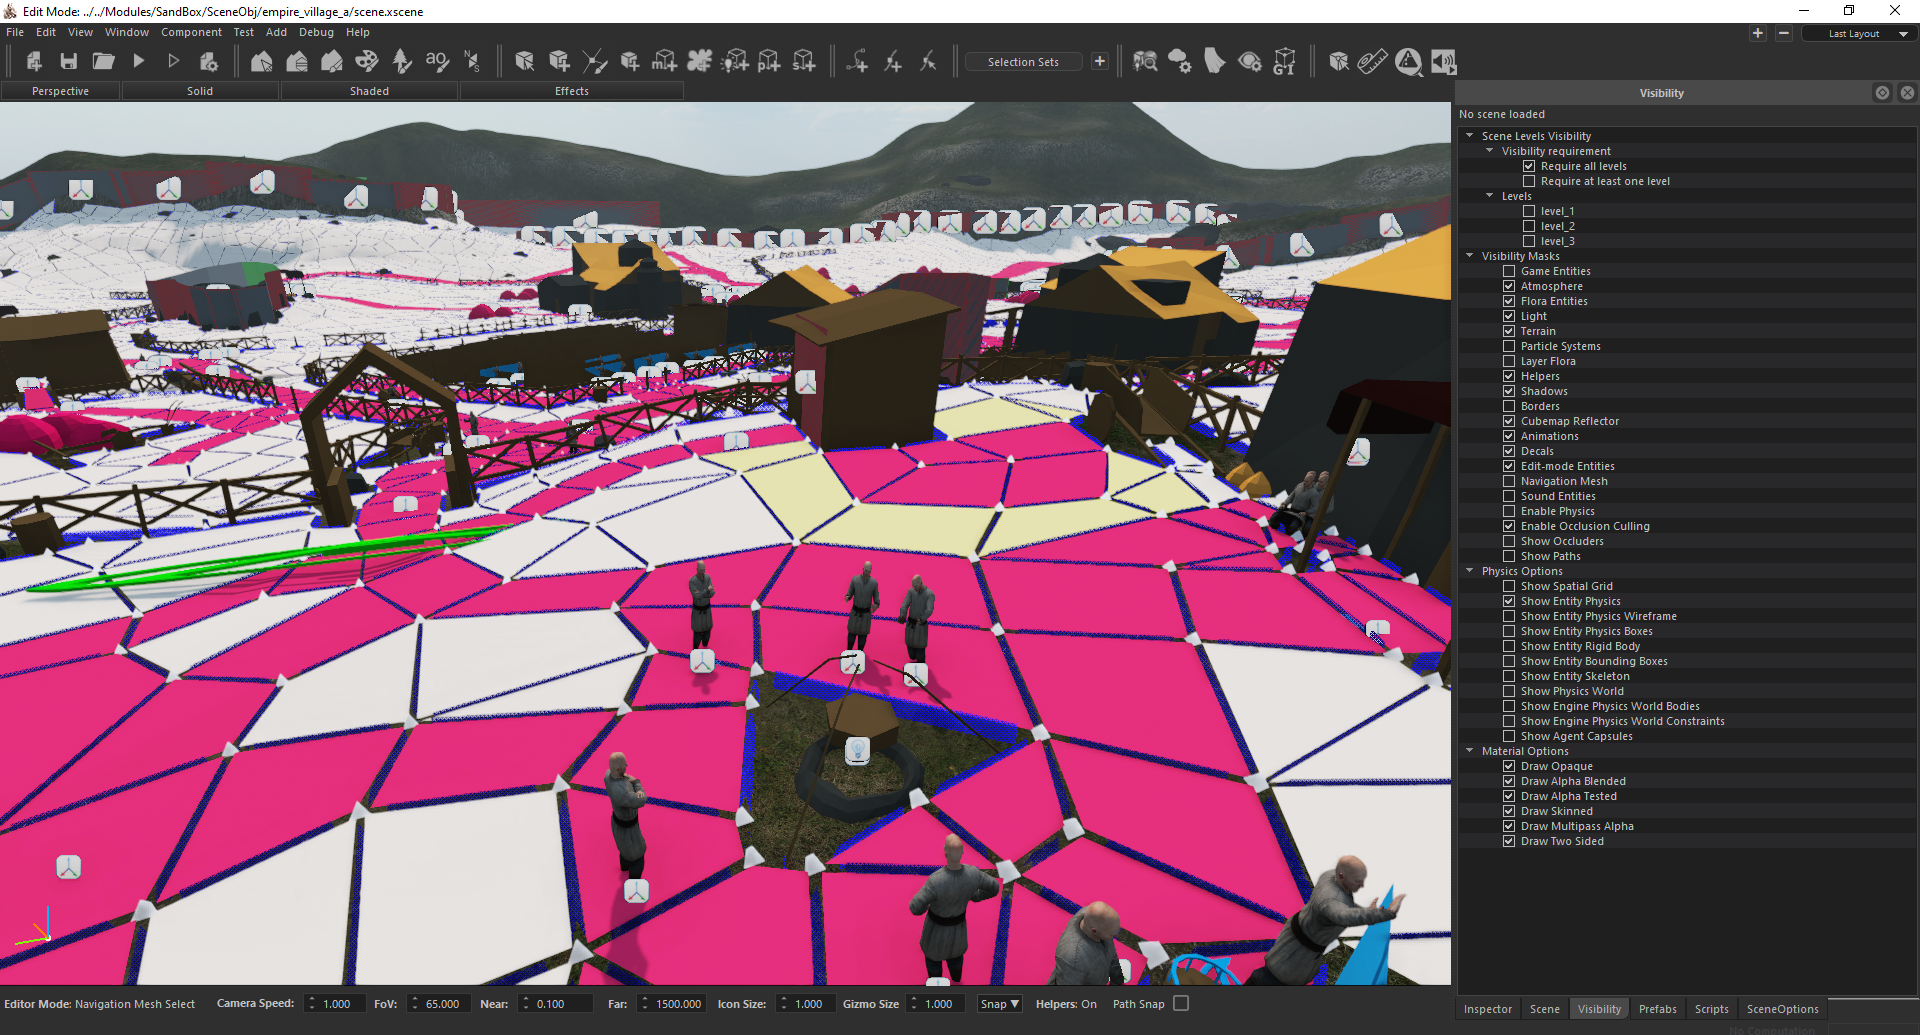
After opening a village scene, let’s navigate to the Visibility tab and change it as seen in the screenshot below to work more comfortably. Visibility Masks > Game Entities (Uchecked), Particle Systems (Unchecked), Layer Flora (Unchecked), Show Paths (Unchecked) Physics Options > Show Entity Physics (Checked).
 |
 |
Click on the Navigation Mesh Icon on the toolbar and open the Navigation Mesh Inspector tab on the right side. After that, press 3 on your keyboard to open the Face mode. Change the ID part from 0 to 2.
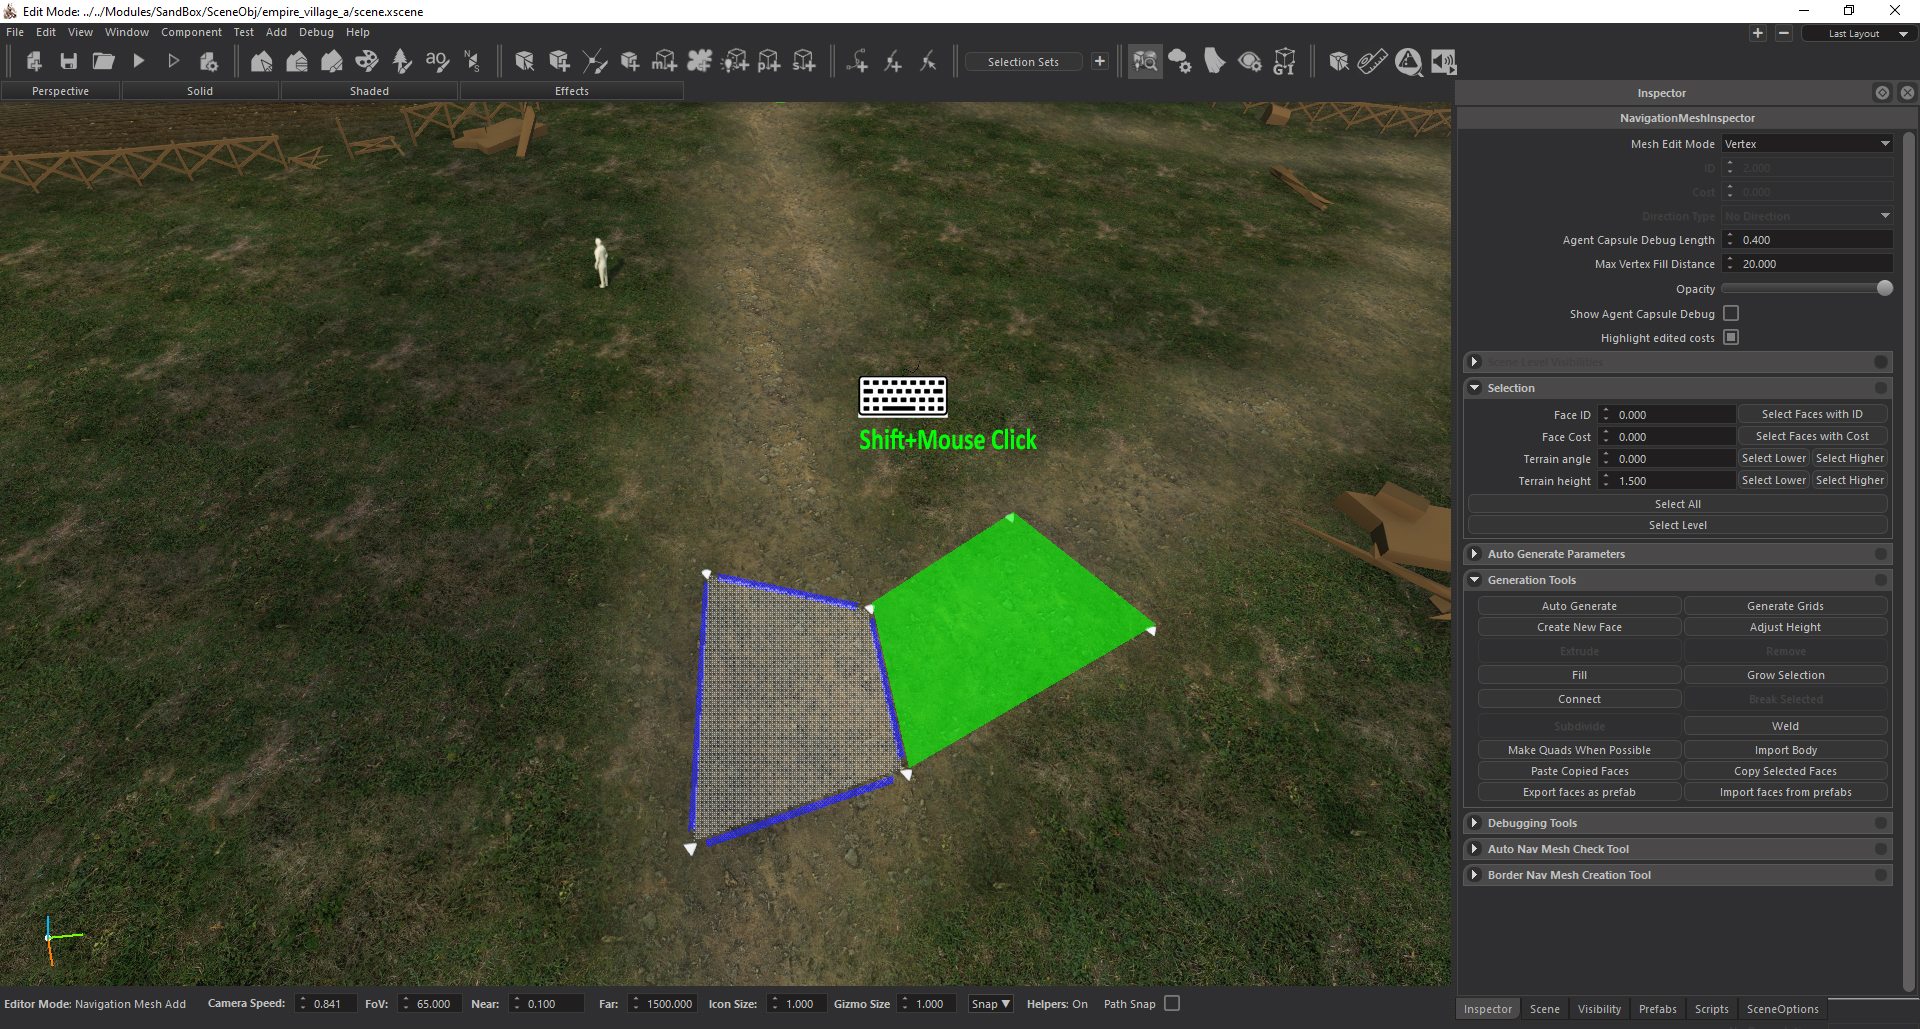
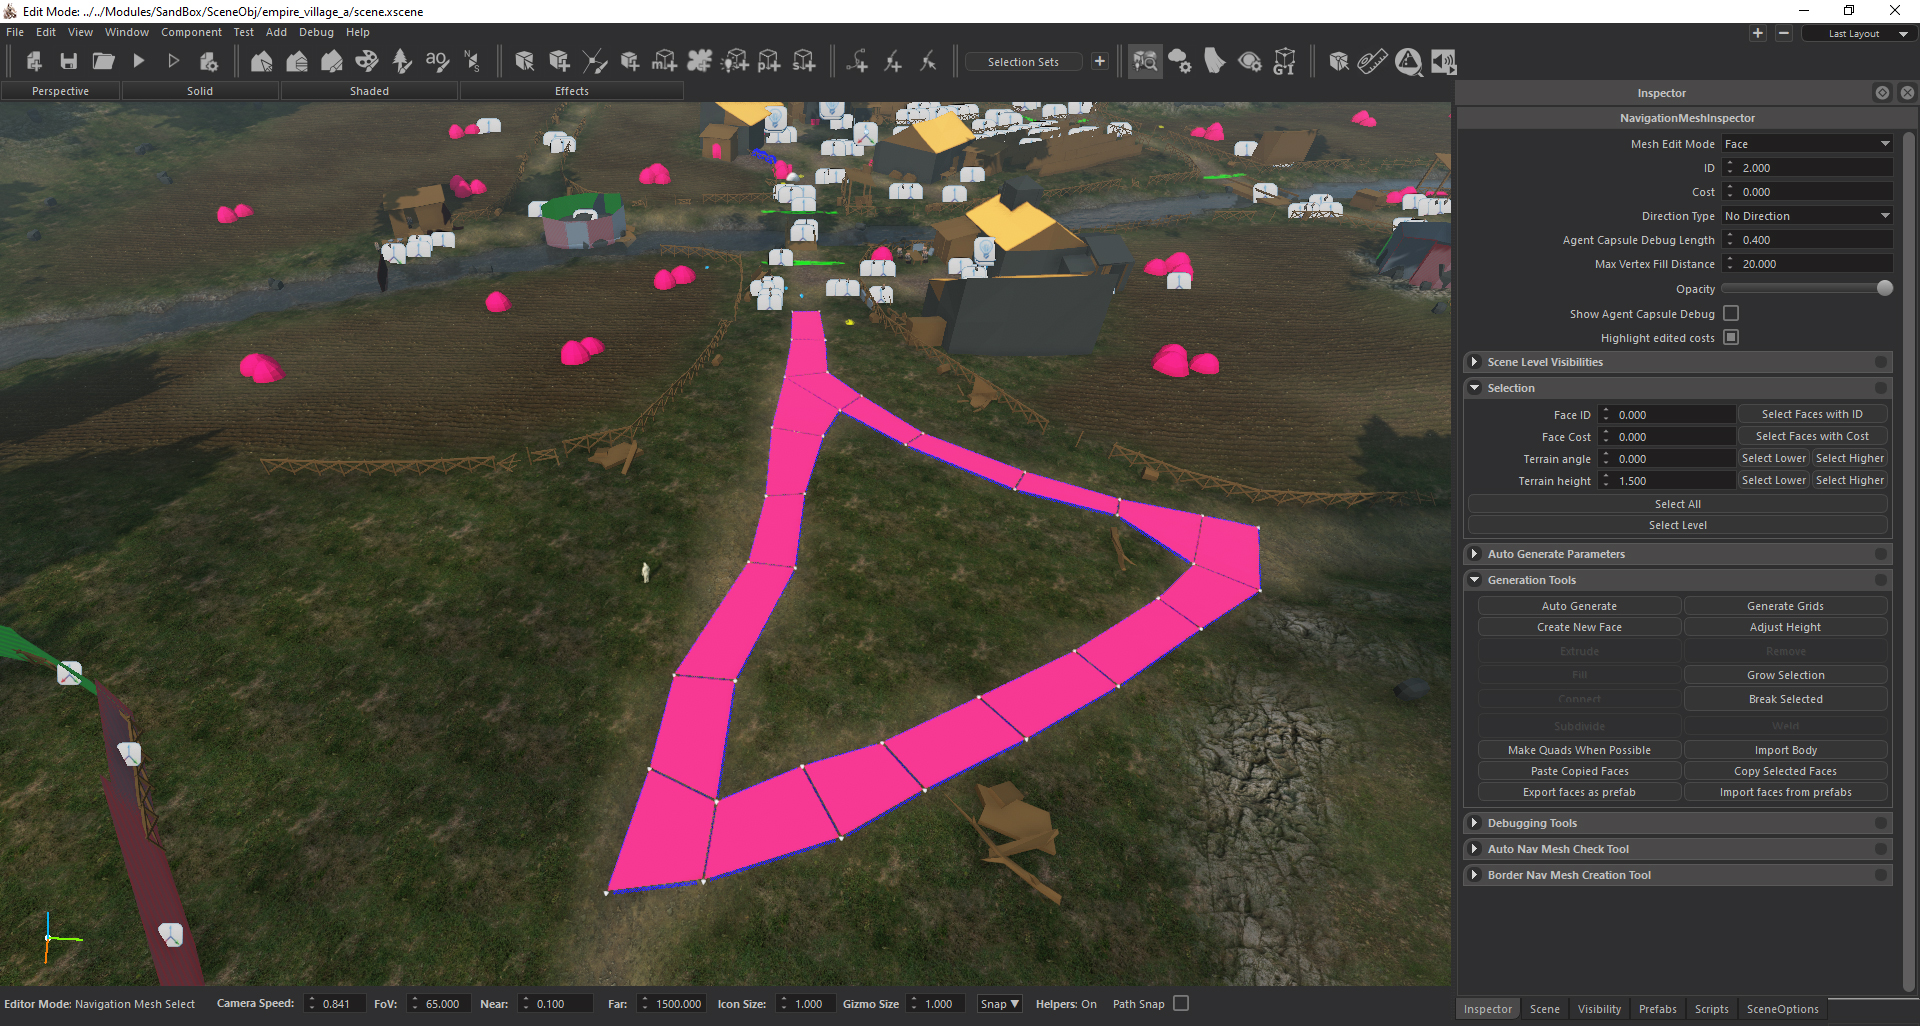
Let’s create our first face. As seen in the screenshot below, place the vertices on top of the road and click CTRL+Space. You will see a Navigation Mesh Polygon created. We can place 2 more vertices near the existing polygon and press Shift+Left Mouse Button to create additional Polygons.
 |
 |
 |
 |
 |
By holding CTRL while navigating the mouse to the vertices we can see the yellow previews. Holding these vertices with Left Mouse Button will allow us to move the vertex freely.
In the Navigation Mesh Select mode, select what mode you want to use (1 (Vertex) 2 (Edge) 3 (Face)) and use Alt+Delete to remove. This will leave the vertices in the scene (If Edge 2 ((Edge)) and 3 ((Face)) are selected). If you want the vertices to be inactive you can press Alt+X+Delete keys. The other remove method is in the Navigation Mesh Add mode. If we hover over the vertex, edge or faces with ALT button pressed we can see a red preview. We can remove them by clicking the Left Mouse Button.
| Navigation Mesh Select Mode-NavDelete | Navigation Mesh Add Mode-NavDelete |
|---|---|
 |
 |
EASY AND FASTER NAVMESH CREATION TIP

Navigation Mesh needs to contain the spawn point pivot points. Let’s apply the navigation mesh as they are connected with all the roads and navigation mesh face on spawn points.
 |
 |
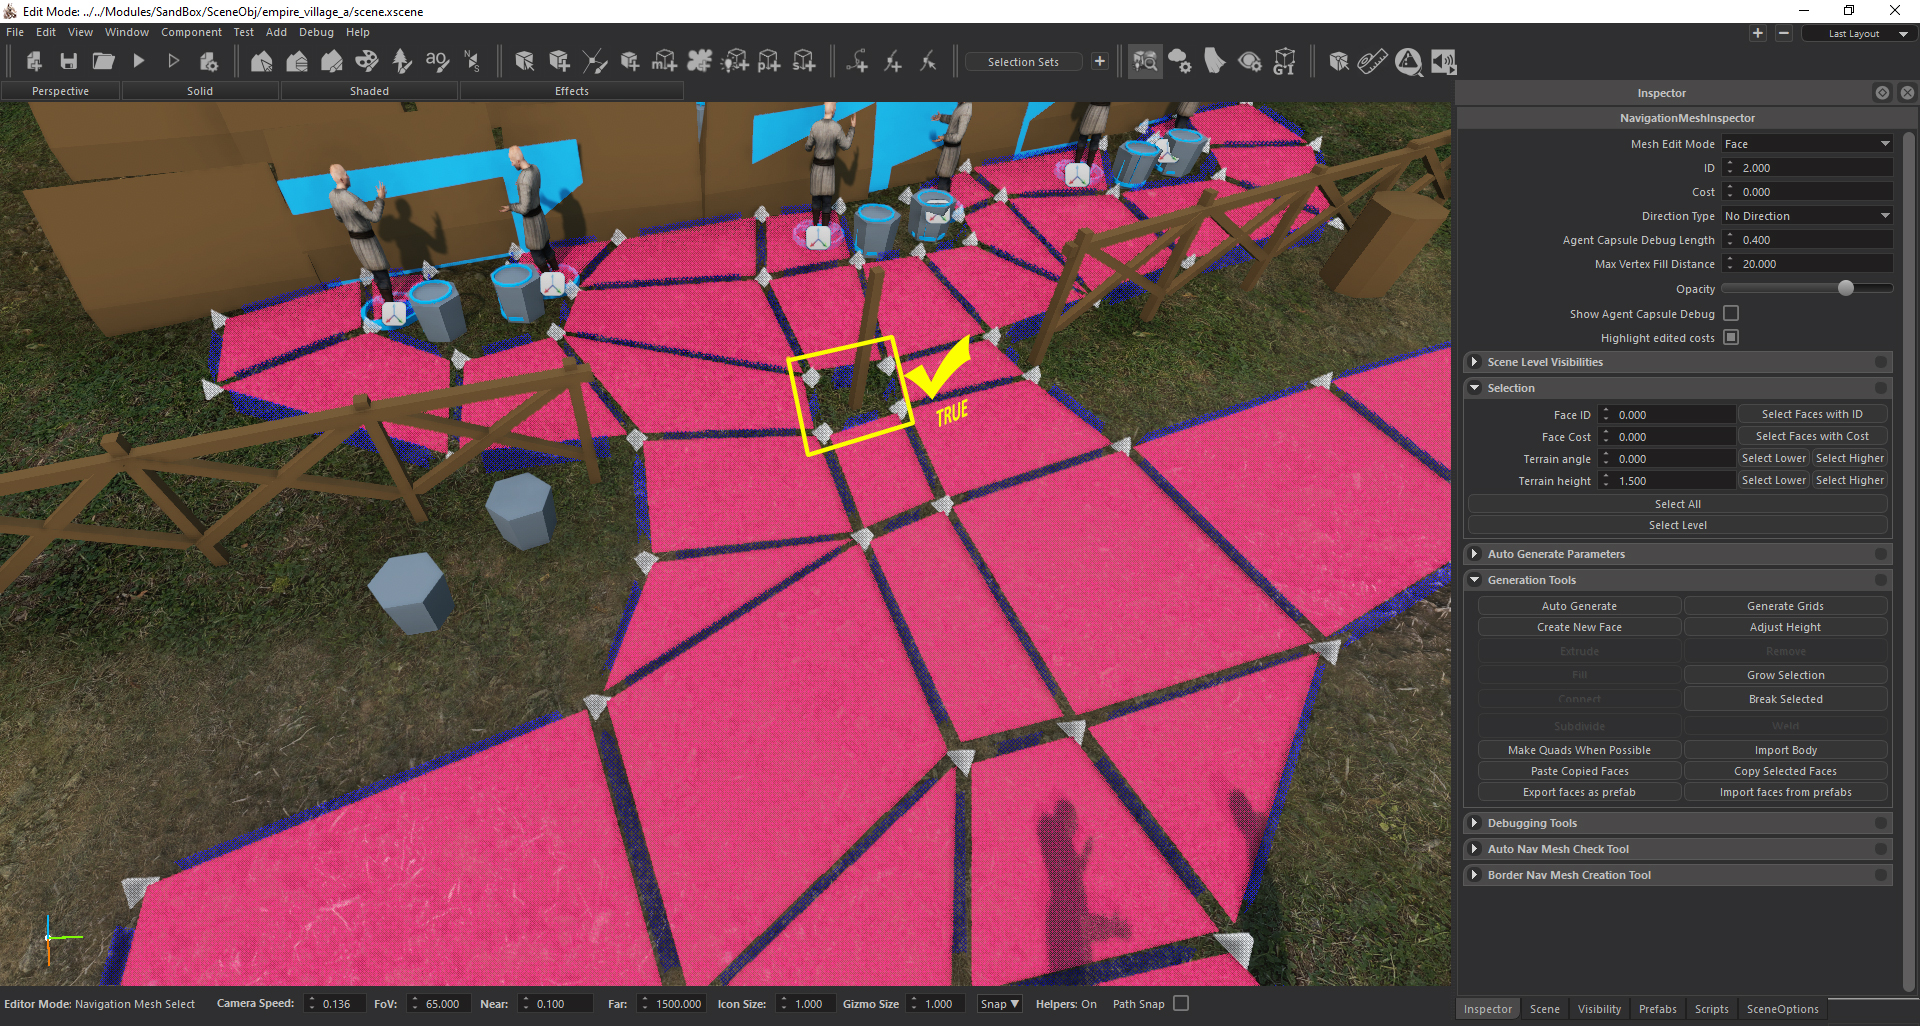
Let’s press the Spacebar after creating a navigation mesh face to check that the ID is set to 2 and change the Editor mode to Navigation Mesh Select mode and press the “3” key on the keyboard. This process will ensure that we chose the navigation mesh face. After this, let’s select the face and make sure that the ID is 2 on the Navigation Mesh Inspector. We already saw it was 2 when we started but we are now sure it is 2. We can deselect what we chose by clicking on an empty space on Viewport. Now, we can press the Spacebar to change the Editor mode to the Navigation Mesh add and continue.
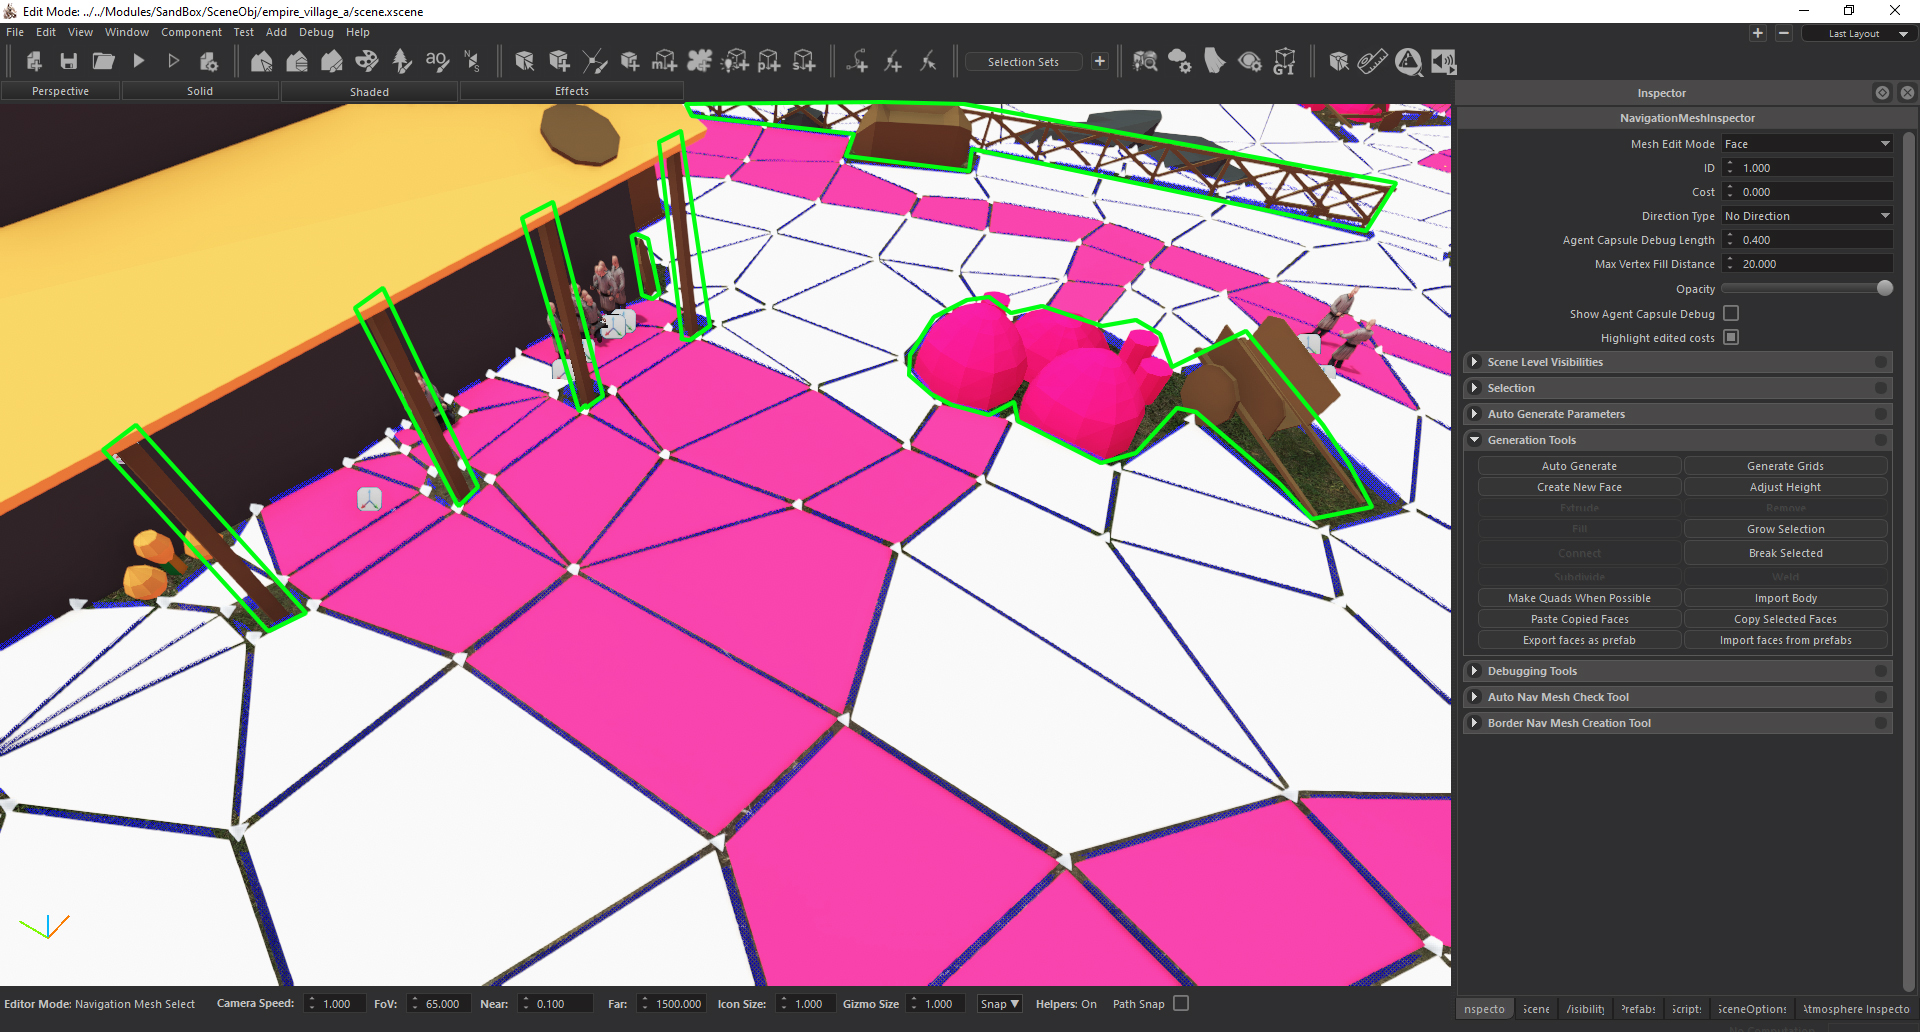
Please make sure your navigation mesh areas don’t contain any physical objects.
 |
 |
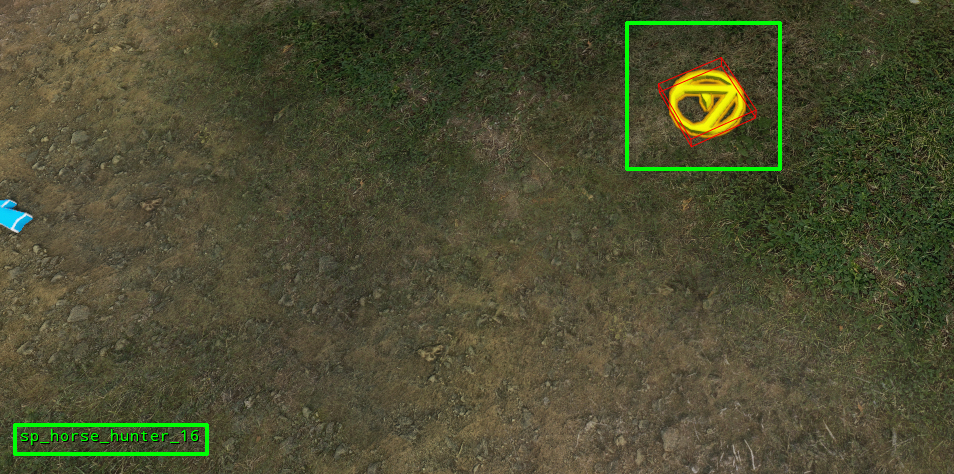
The animal spawn points can be seen in the screenshot below. To make sure the scene has animal spawn points you can click on the entity in the scene and check the text located on the bottom left of the screen.
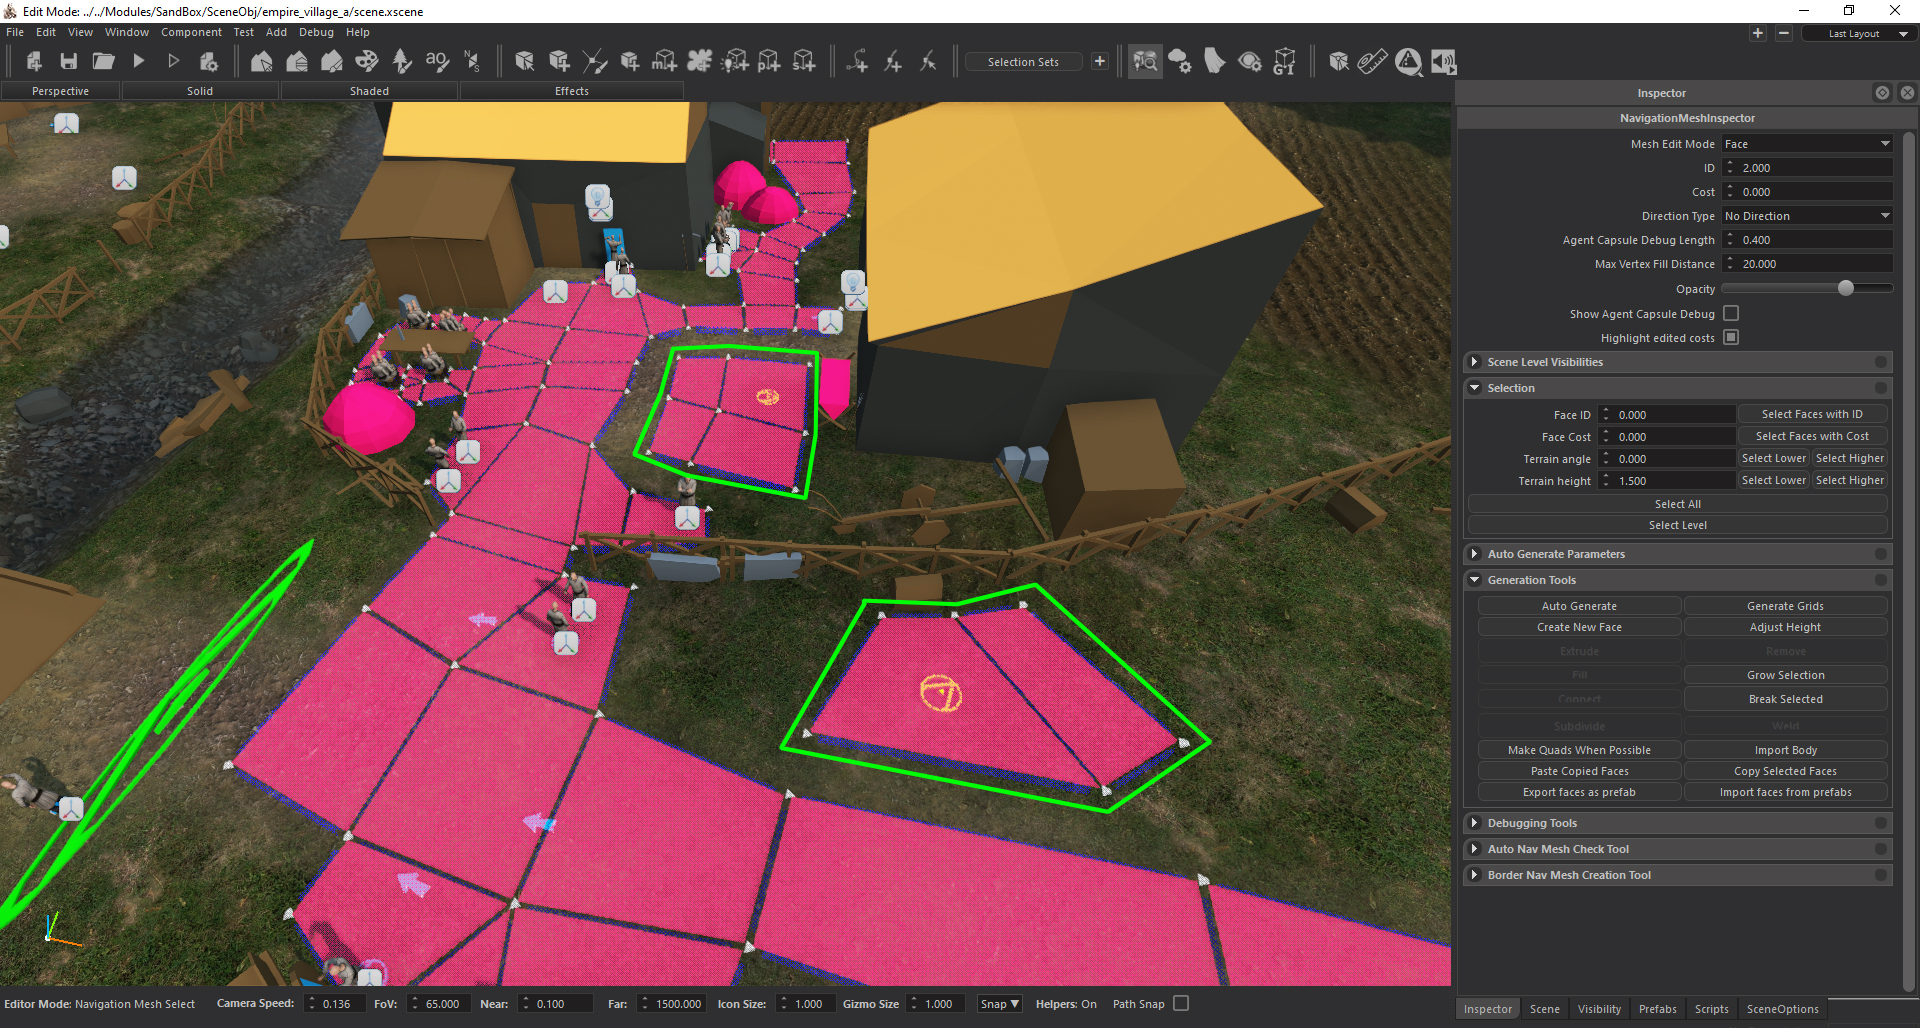
To prevent animals from escaping let’s apply navigation mesh like an island and use the mesh ID 2. After that, let’s change the ID of the surrounding mesh faces to 3. That way, the animals won’t be connected with the rode and won’t be able to escape.
 |
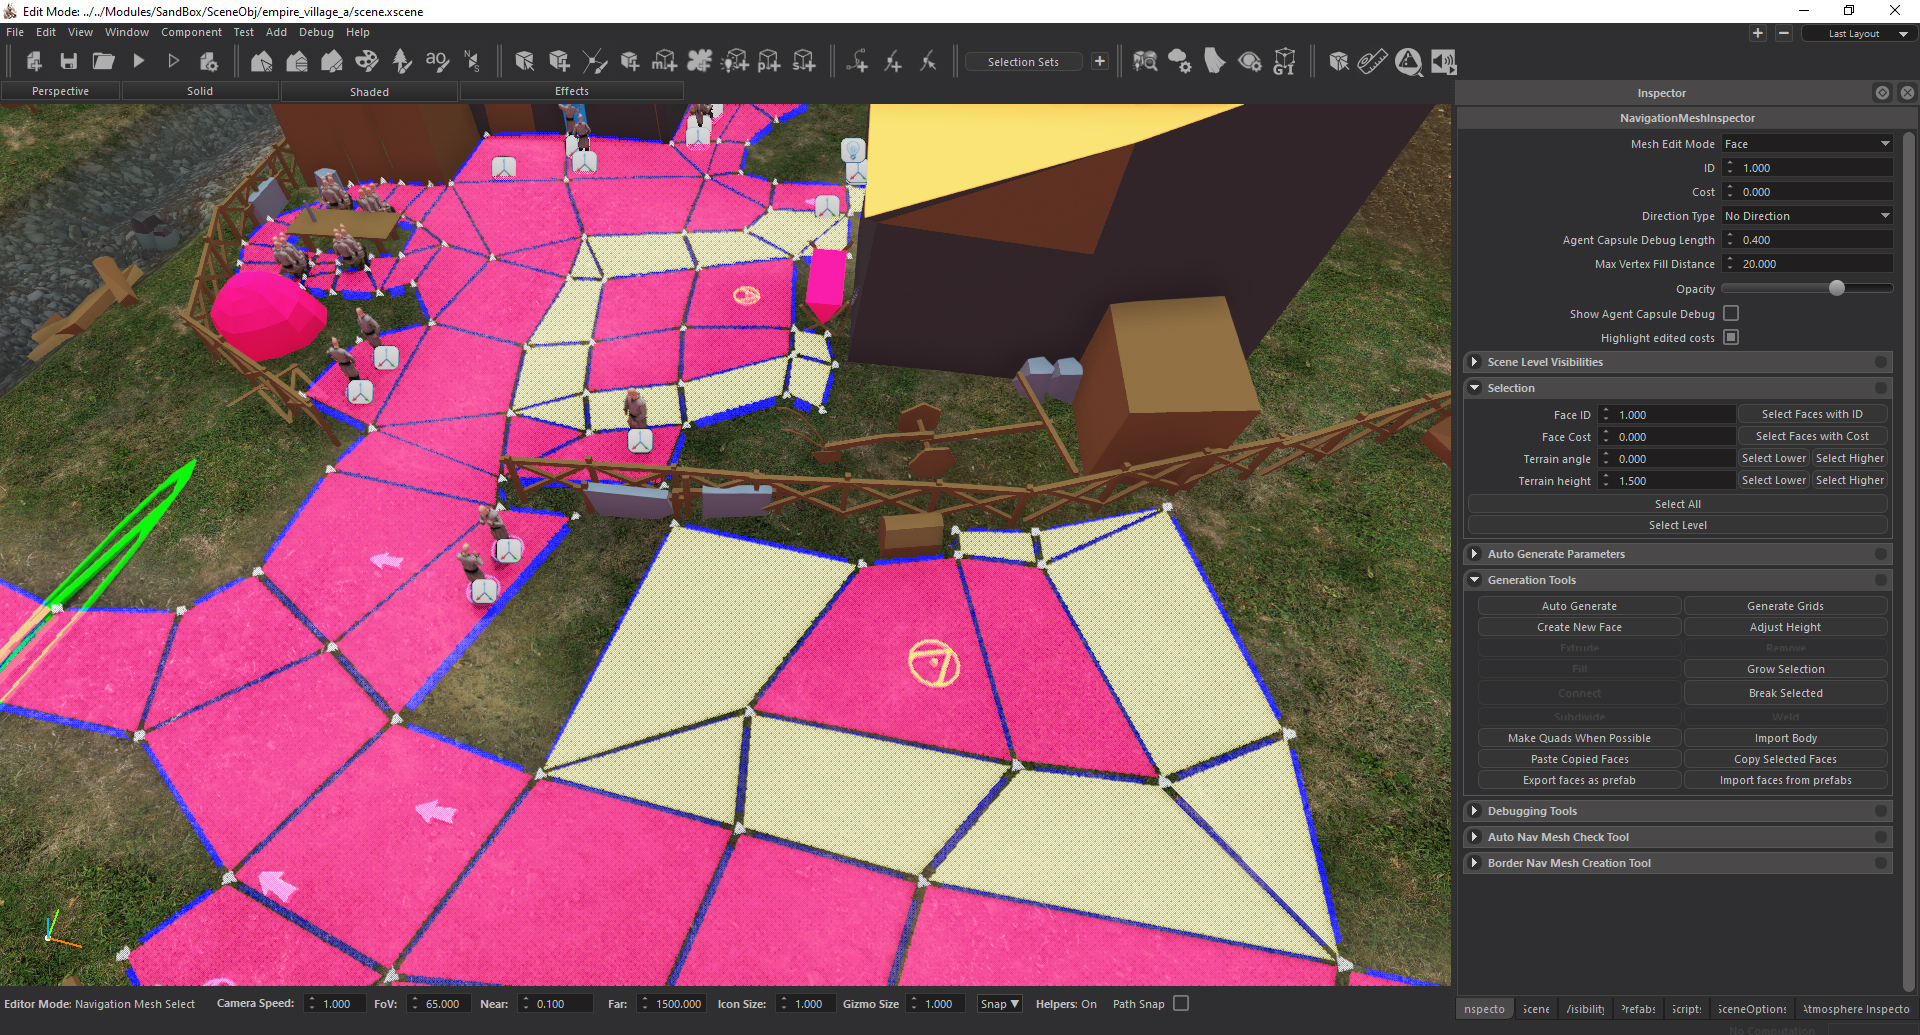 |
There are special fields in the scenes that we call ‘common areas’. You can see these areas in the scene with a sphere. Let’s fill in this sphere with the navigation mesh faces that has the ID 2, while making sure there are no physical objects inside of them.
 |
 |
After making sure all the roads and spawn points are applied and connected to each other we have finished the phase one.

If there are any unwalkable terrain fields, you can click on the “Shaded” option in the dropdown menu located in the top bar. Choose the Terrain Angle in the “Debug” field and change the Angle Limit to 50. Now, we can see the red areas and apply navigation mesh according to this information.
Let’s change the ID to 1 in the Navigation Mesh Inspector while making sure there are no selected navigation mesh faces. Let’s continue to apply navigation mesh while making sure there are no physical objects inside of them.
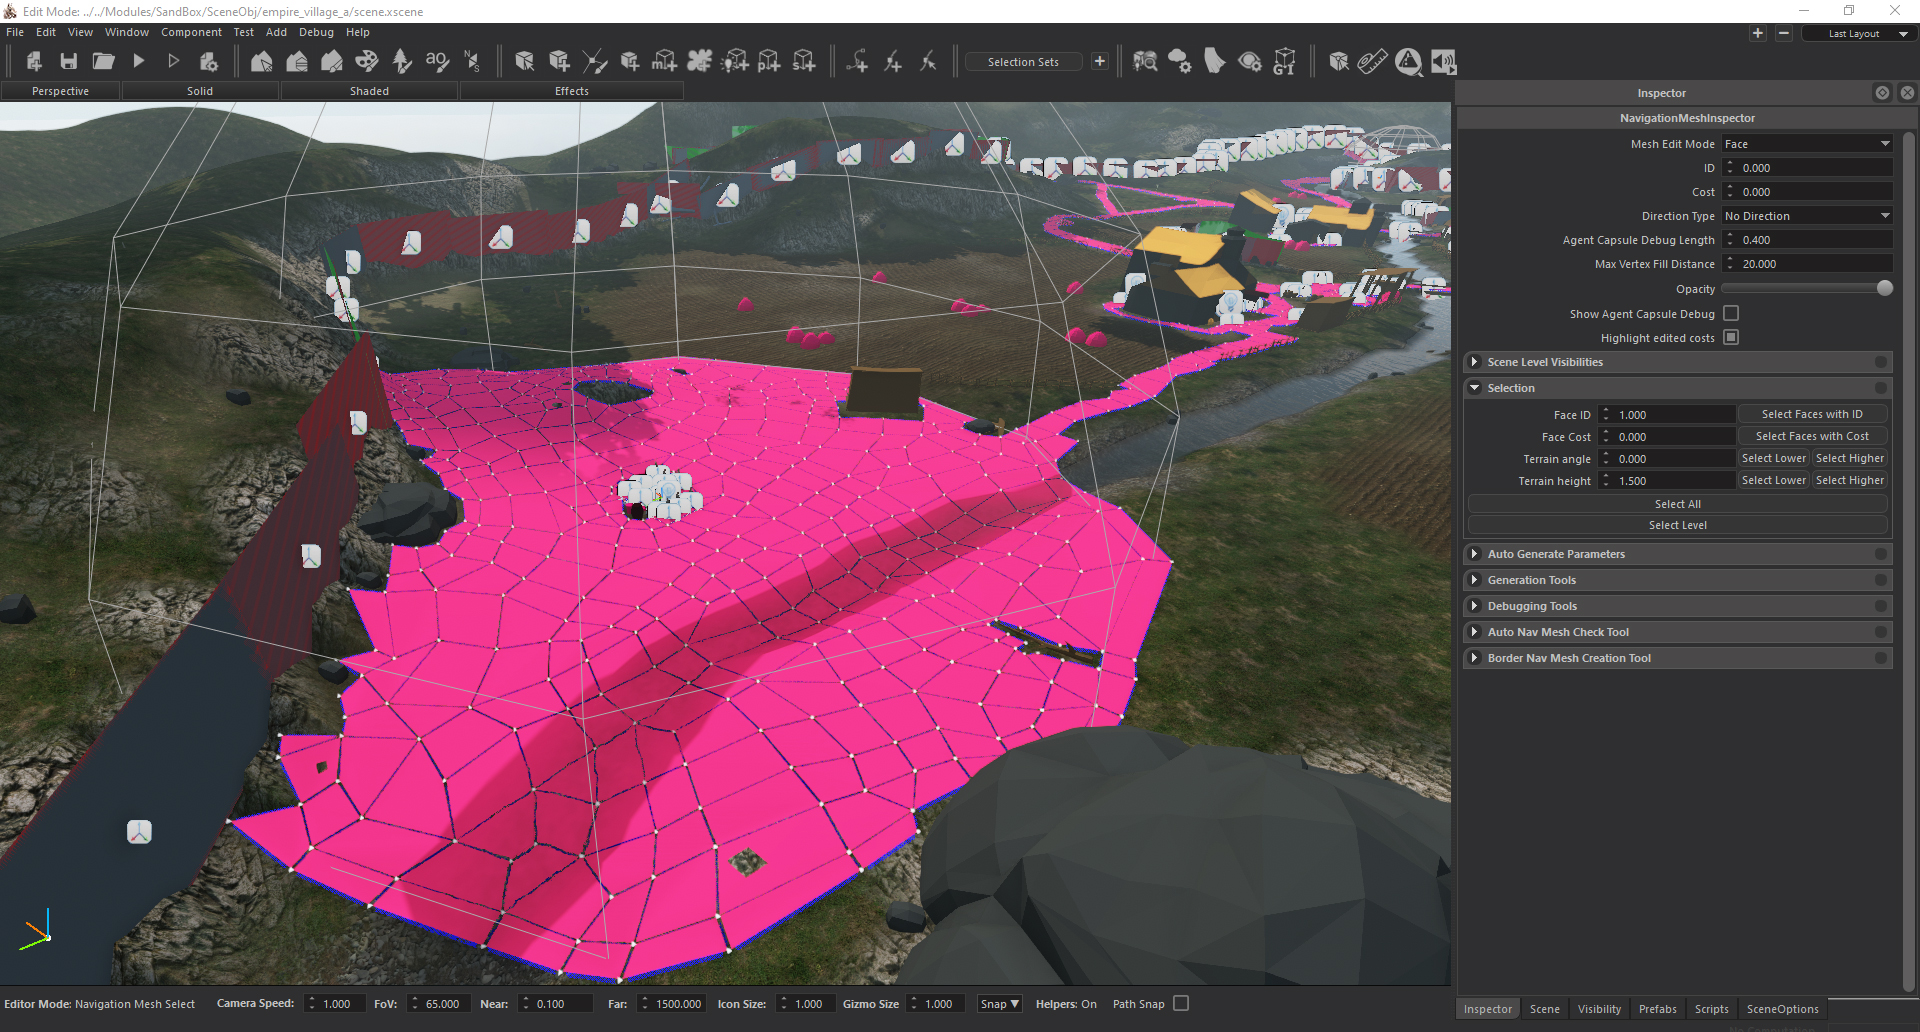
Let’s complete the navigation mesh of the scene after we make sure every surface on the scene is inside of the borders (you can toggle the Border view with Visibility > Visibility Masks).
The navigation mesh of this village scene is complete.
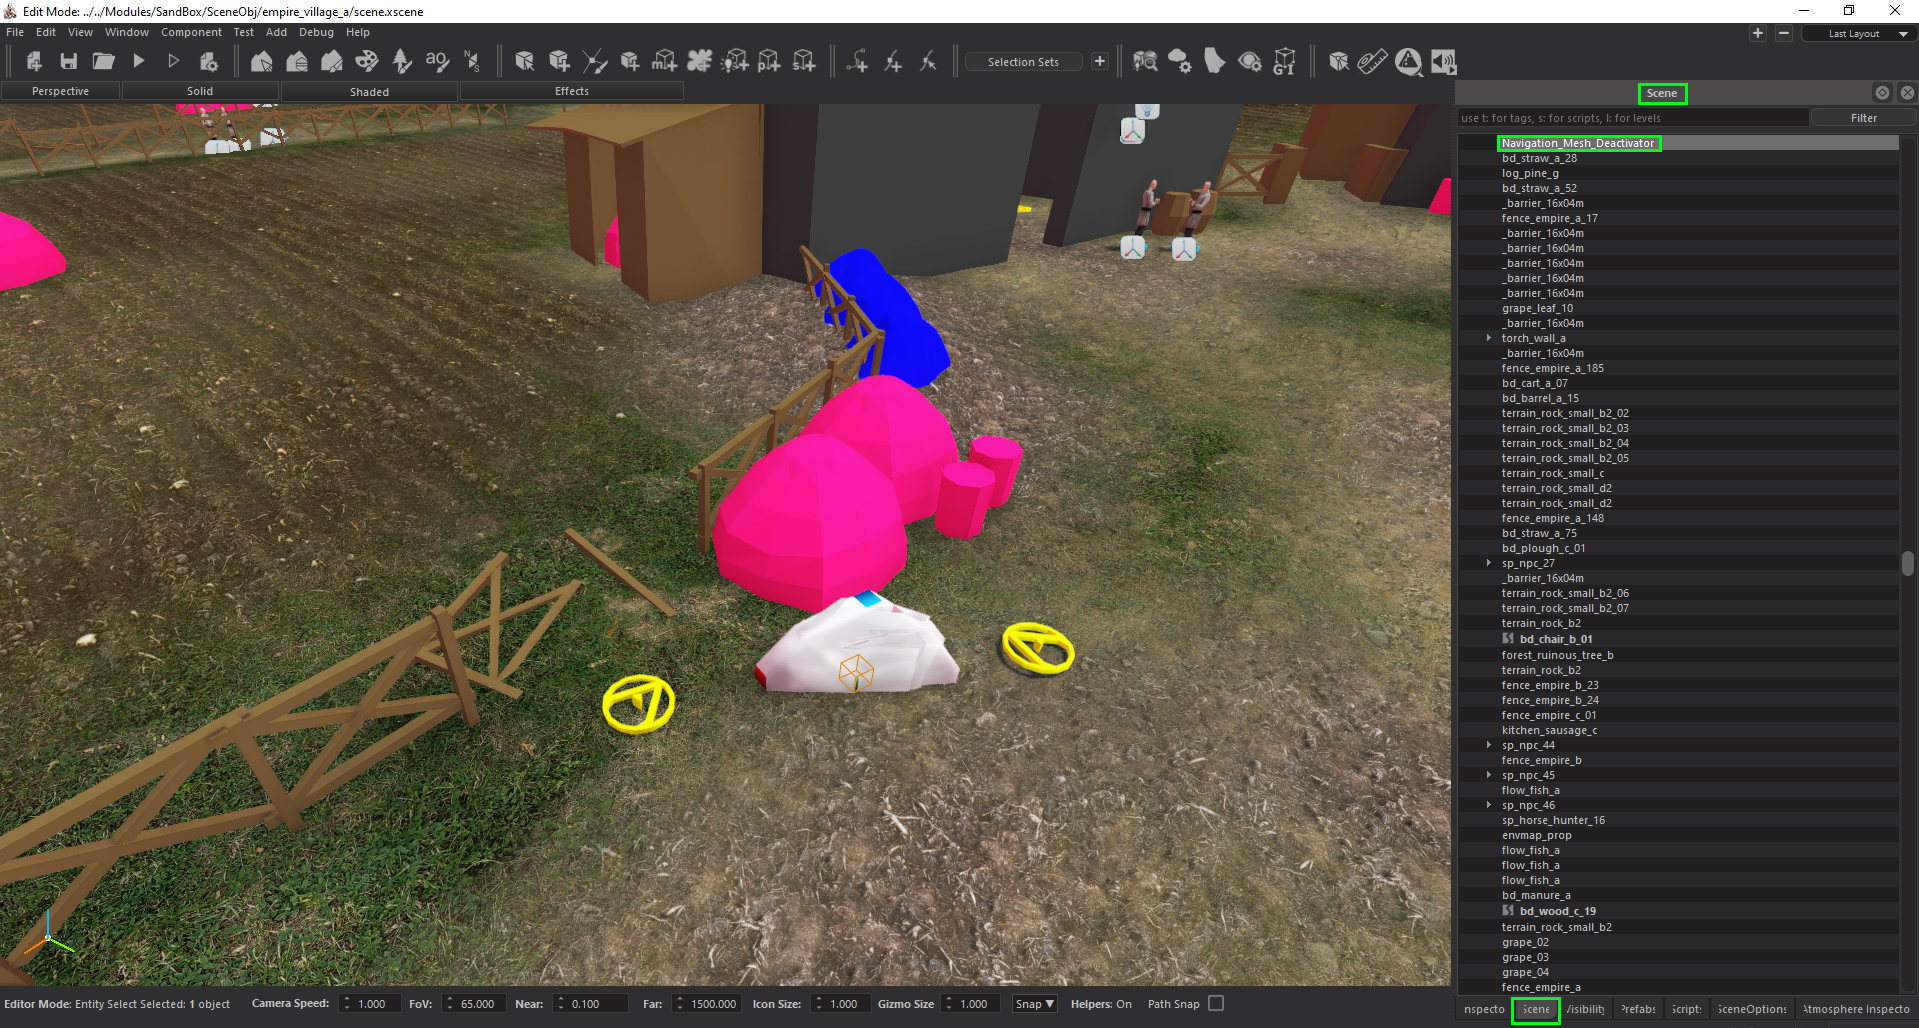
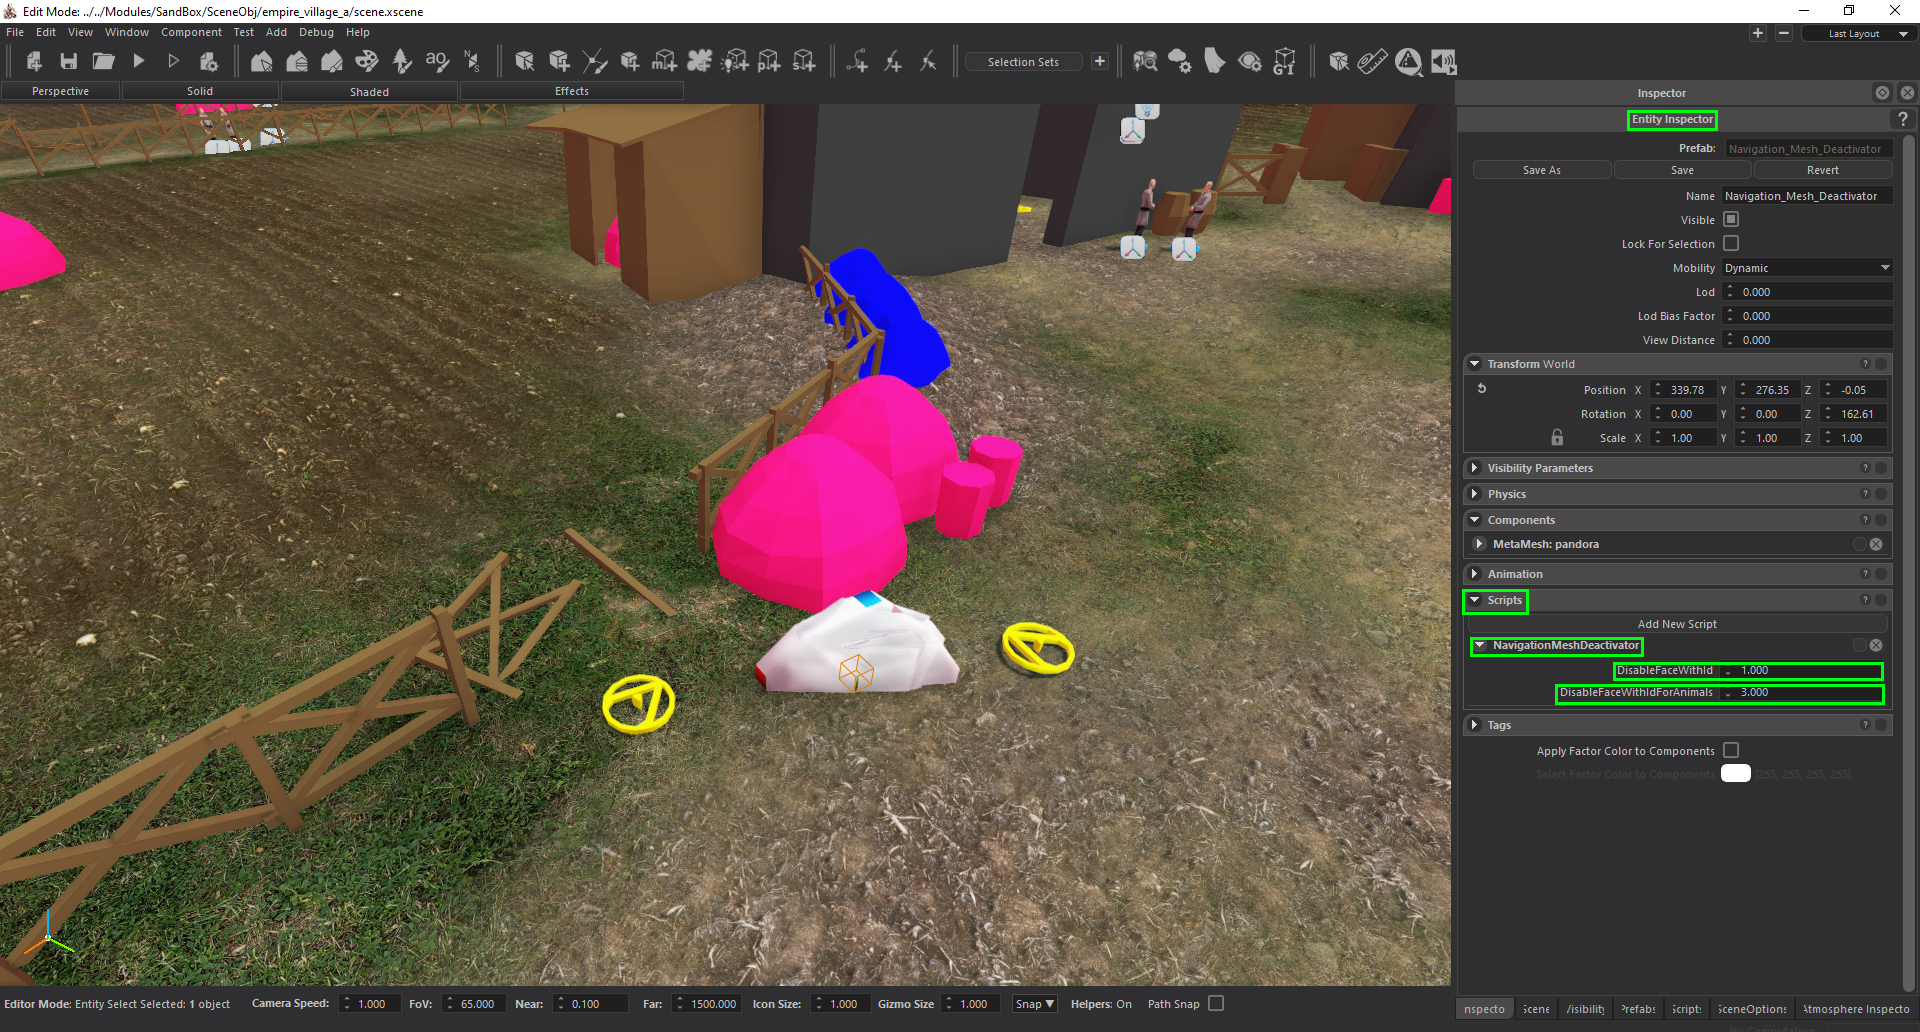
Now, let’s take a look at the scripting of the Navigation Mesh IDs. Navigate to the Prefabs tab and search for “navigation_mesh_deactivator” in the filter field. Let’s put that into the scene. Select the Navigation_Mesh_Deactivator entity in the scene tab. Let’s open the dropdown menus in the Entity Inspector > Scripts > NavigationMeshDeactivator. Set the DisableFaceWithId to 1 and DisableFaceWithIdForAnimals to 3.
 |
 |
Save the scene. The navigation mesh process for our village scene is completed.
The Logic of Navigation Mesh IDs
The navigation mesh faces with the ID of 2, are the navigation mesh faces that the AI sees while we take a walk in a scene. These faces needs to be connected to each other. The faces which include the animal spawn points need to have the ID of 2, as well. The reason why these faces are not connected is because we don’t want the animals to walk on the roads as the human NPCs. To make sure that the animal spawn points are active their navigation mesh face ID has to be 2. To disconnect their connection with the road, we apply navigation mesh that surrounds the animal spawn point faces with the ID of 2 and give the new navigation mesh faces the ID of 3. After this we also include this to the navigation_mesh_deactivator script. The faces with the ID of 1 are the faces that are not active in the walk mode, but they have to be applied. When a village is raided all the navigation meshes are active, without looking out for the IDs. Those are activated when we take a walk in the scene.
| Navigation Meshes with the ID of 2 are active | All the navigation meshes are active |
|---|---|
 |
 |