
What Makes a Siege Scene
Introduction
This list of siege-specific features will aid you when creating towns and castles that are appropriate for sieges.
Siegable Walls
Siegeable walls are wall positions that support the breached walls function in siege scenes. We will have to specify solid and broken stages and their important positions as well as AI navigation mesh changes as if there is a breach.
- Add a tag to the parent entity, that will later be used on siege ladders and siege towers (ex:wall_segment_left, wall_segment_right). This tag will identify which siege machines are related to which lanes, and will be used for “target wall segment” variable on siege machines.
- Add the tag “broken_child” to the broken wall, and add the tag “solid_child” to the solid wall.
- Add two entities as child entities to the solid wall. First one for where defender troops will wait as attackers approach the castle, and second for where they should stand for defending position. These entities should have the tags “wait_pos” and “middle_pos” respectively.
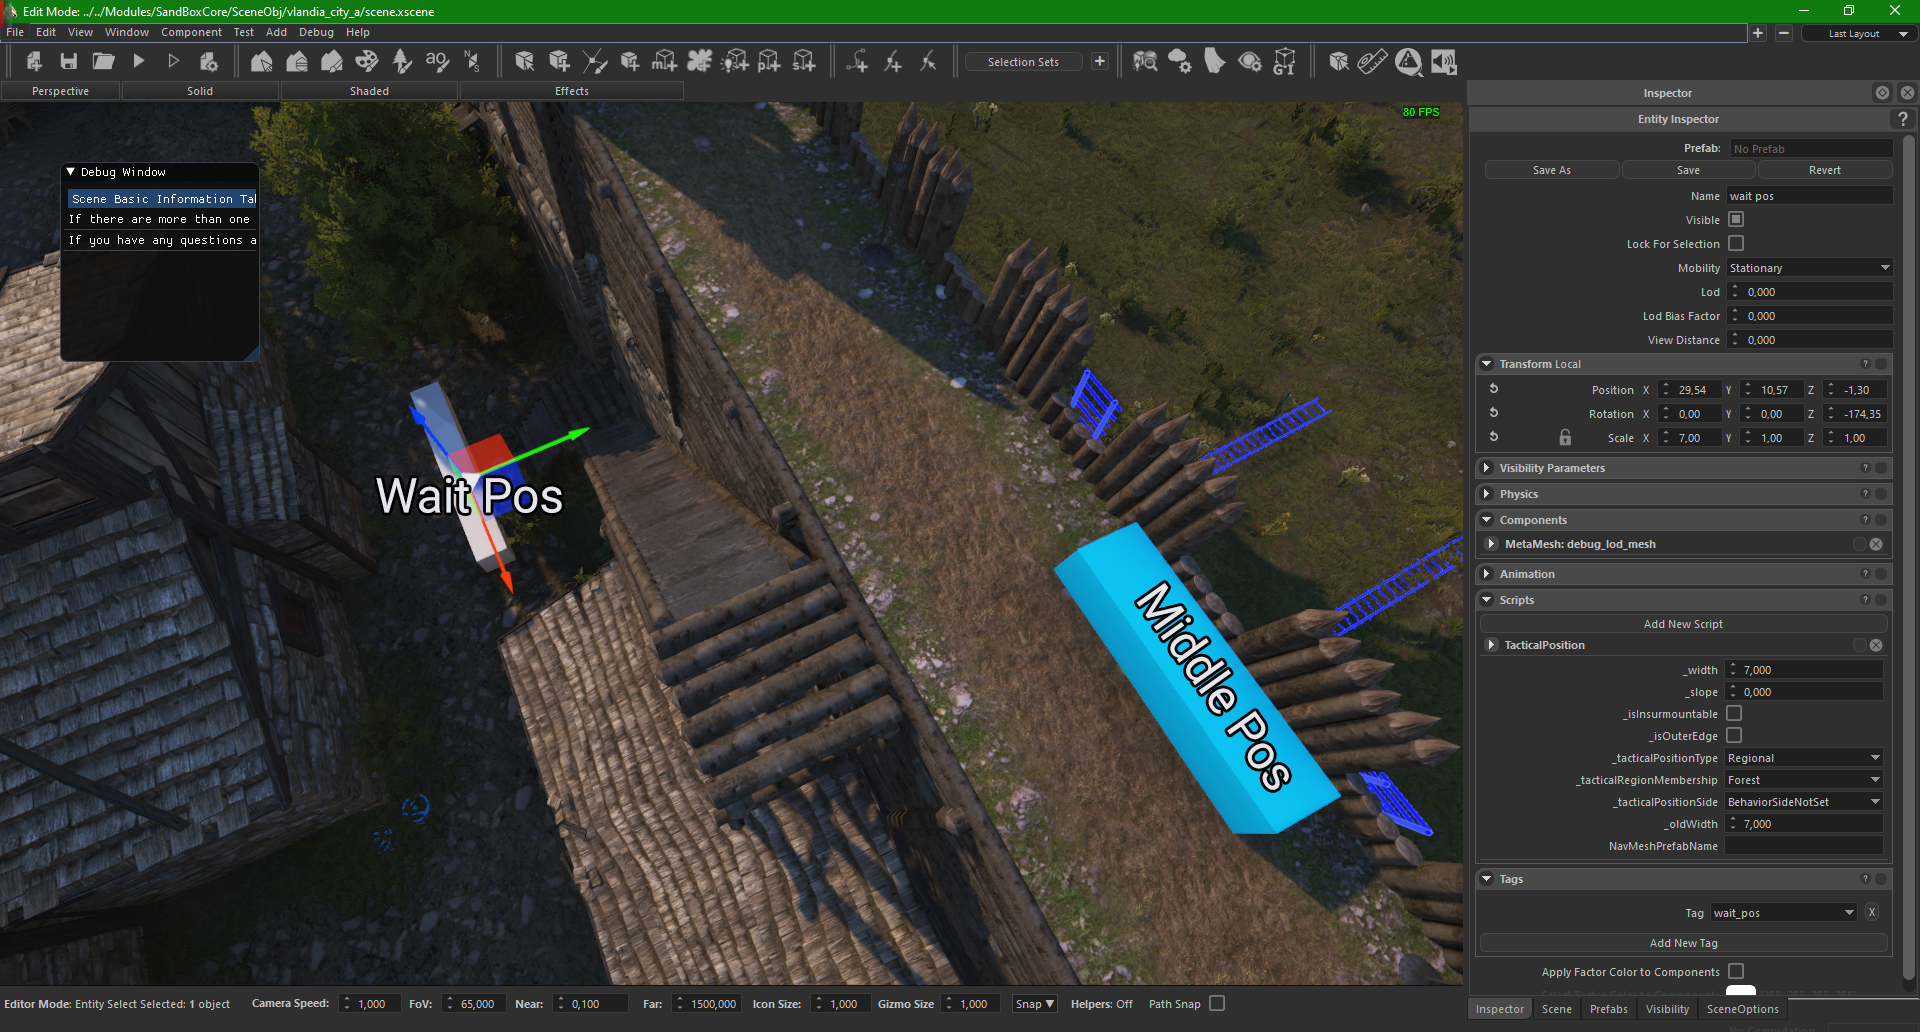
- For the broken wall, add three child entities. They should have the tags “wait_pos”, “middle_pos” and “attacker_wait_pos”. First two are the same as solid wall and attacker wait pos is where Attacker troops will wait (preferably behind covers) while other siege engines get into position.
- Add WallSegment scripts with the default values to the broken wall and the solid wall.
- WallSegment script (parent entity)
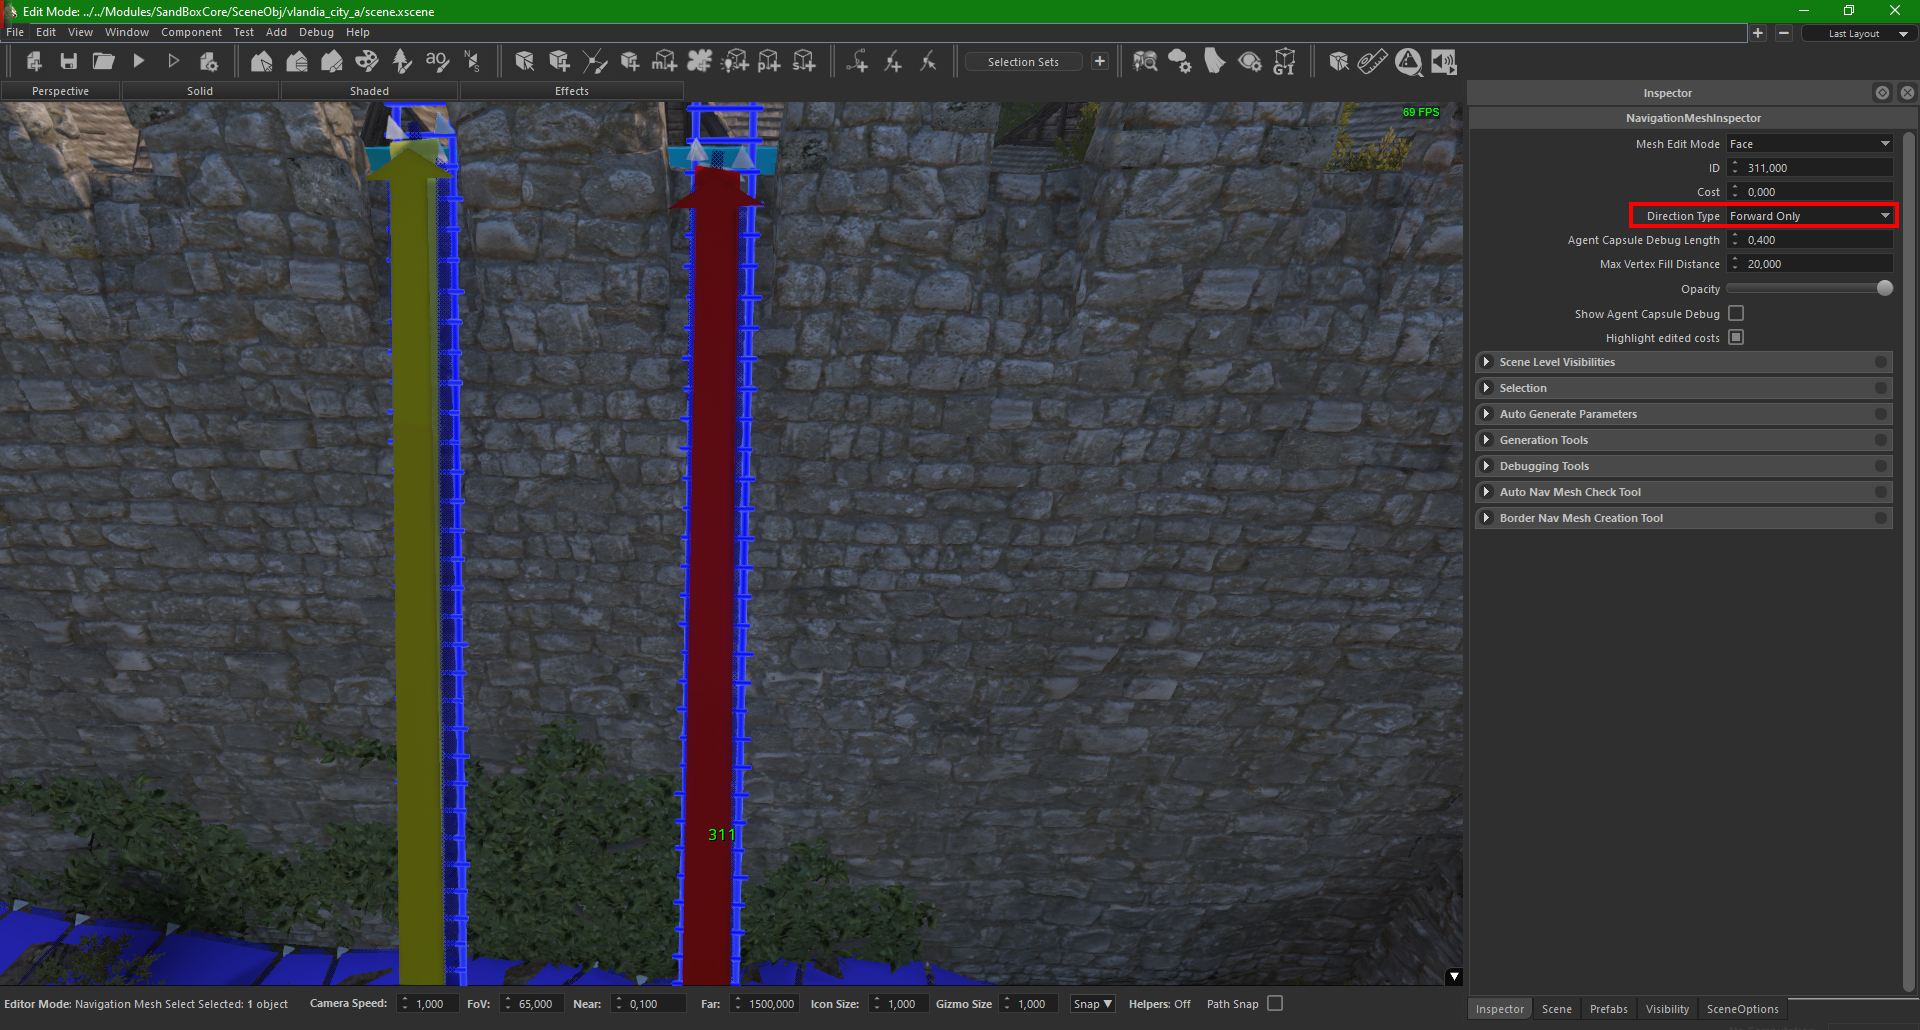
- Enter the side of the siegeable wall (it should be either left or right, middle is reserved for the gatehouse regardless of its position).
- Enter the navigation mesh ids you will use for that siegeable wall.
- Remake and id the navigation mesh accordingly.
- Make sure that new navigation mesh faces have correct levels.
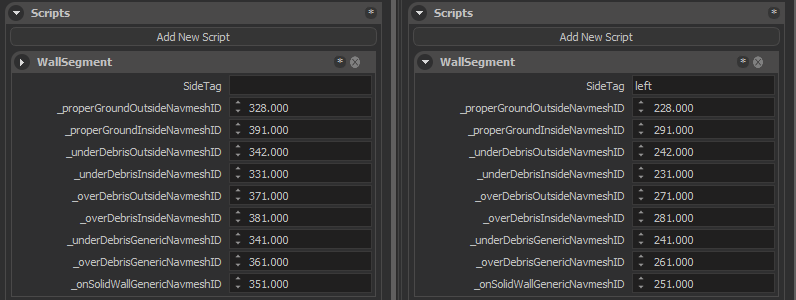
| Solid Wall Navmesh | Broken Wall Navmesh |
|---|---|
 |
 |
- If you are not going to use under debris navmesh ids you can enter “-1” to corresponding ID’s on the wall segment script.
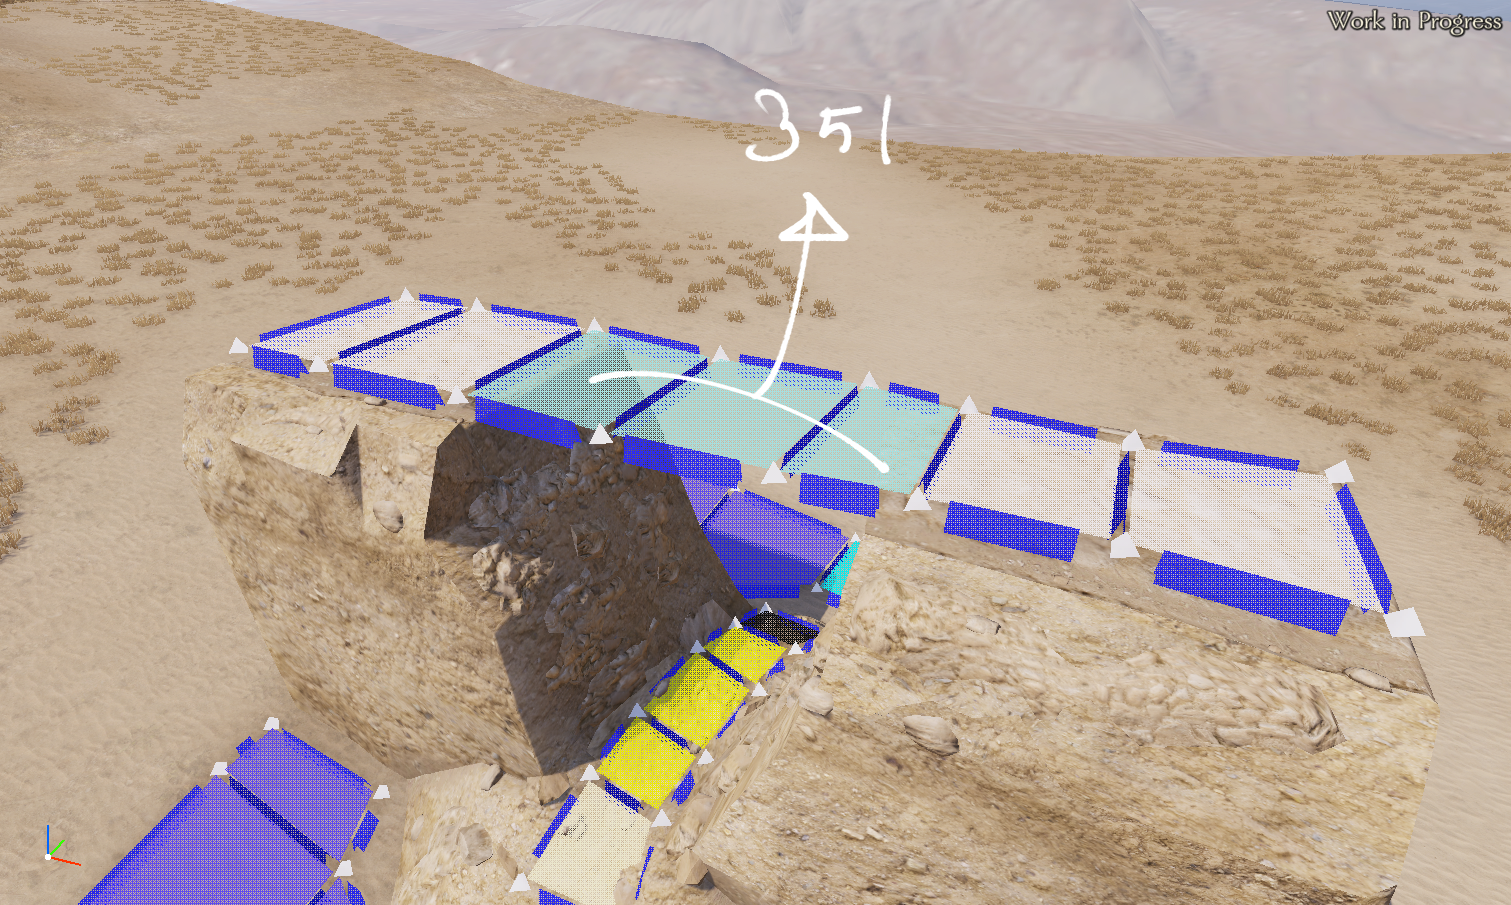
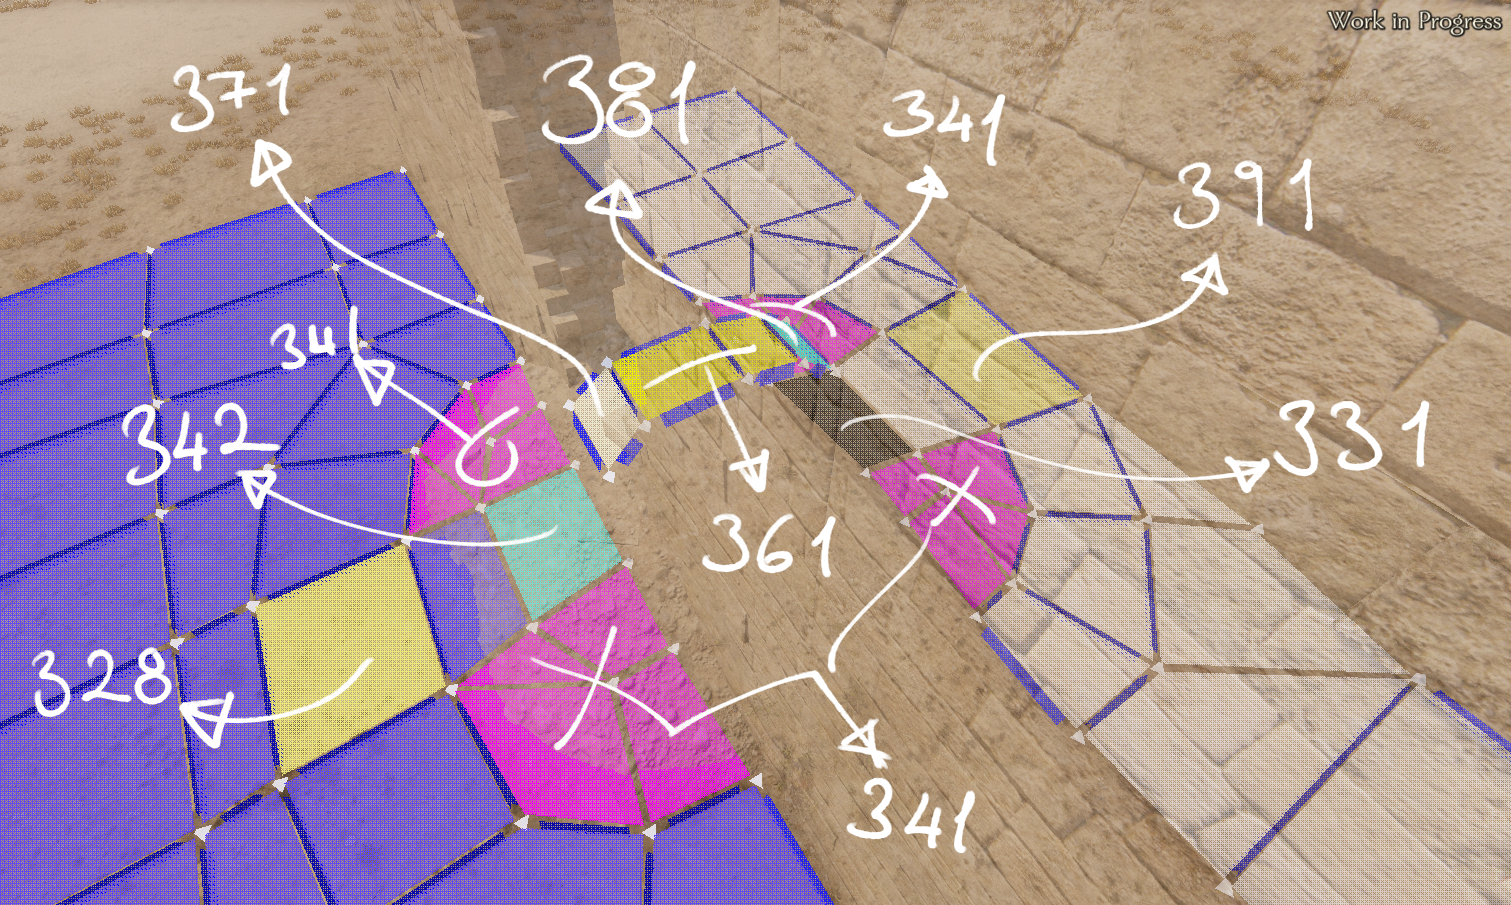
- In this example when the wall is not broken, 328 will connect to 342, 331 will connect to 391, 341 will be active, and 351 will be active.
- When the wall is broken and there is a breach, 328 will connect to 371 and 381 will connect to 391, and 361 will be active.
- This way if we have a lot of debris around the siegeable wall, we will have much fewer agents getting stuck for lack of navigation mesh.
- In this image, empty spaces between navmeshes were exaggerated for sake of clarity.
Castle Gate
The castle gate is the location and prefabs that interact with the battering ram. We will have to use 2 of them, 1 outer gate which will be broken down by the battering ram and an inner one which will be broken down by normal troop attacks.
- Place the outer and inner gates.
- Outer gate should have an “outer_gate” tag, and the inner gate should have an “inner_gate” tag.
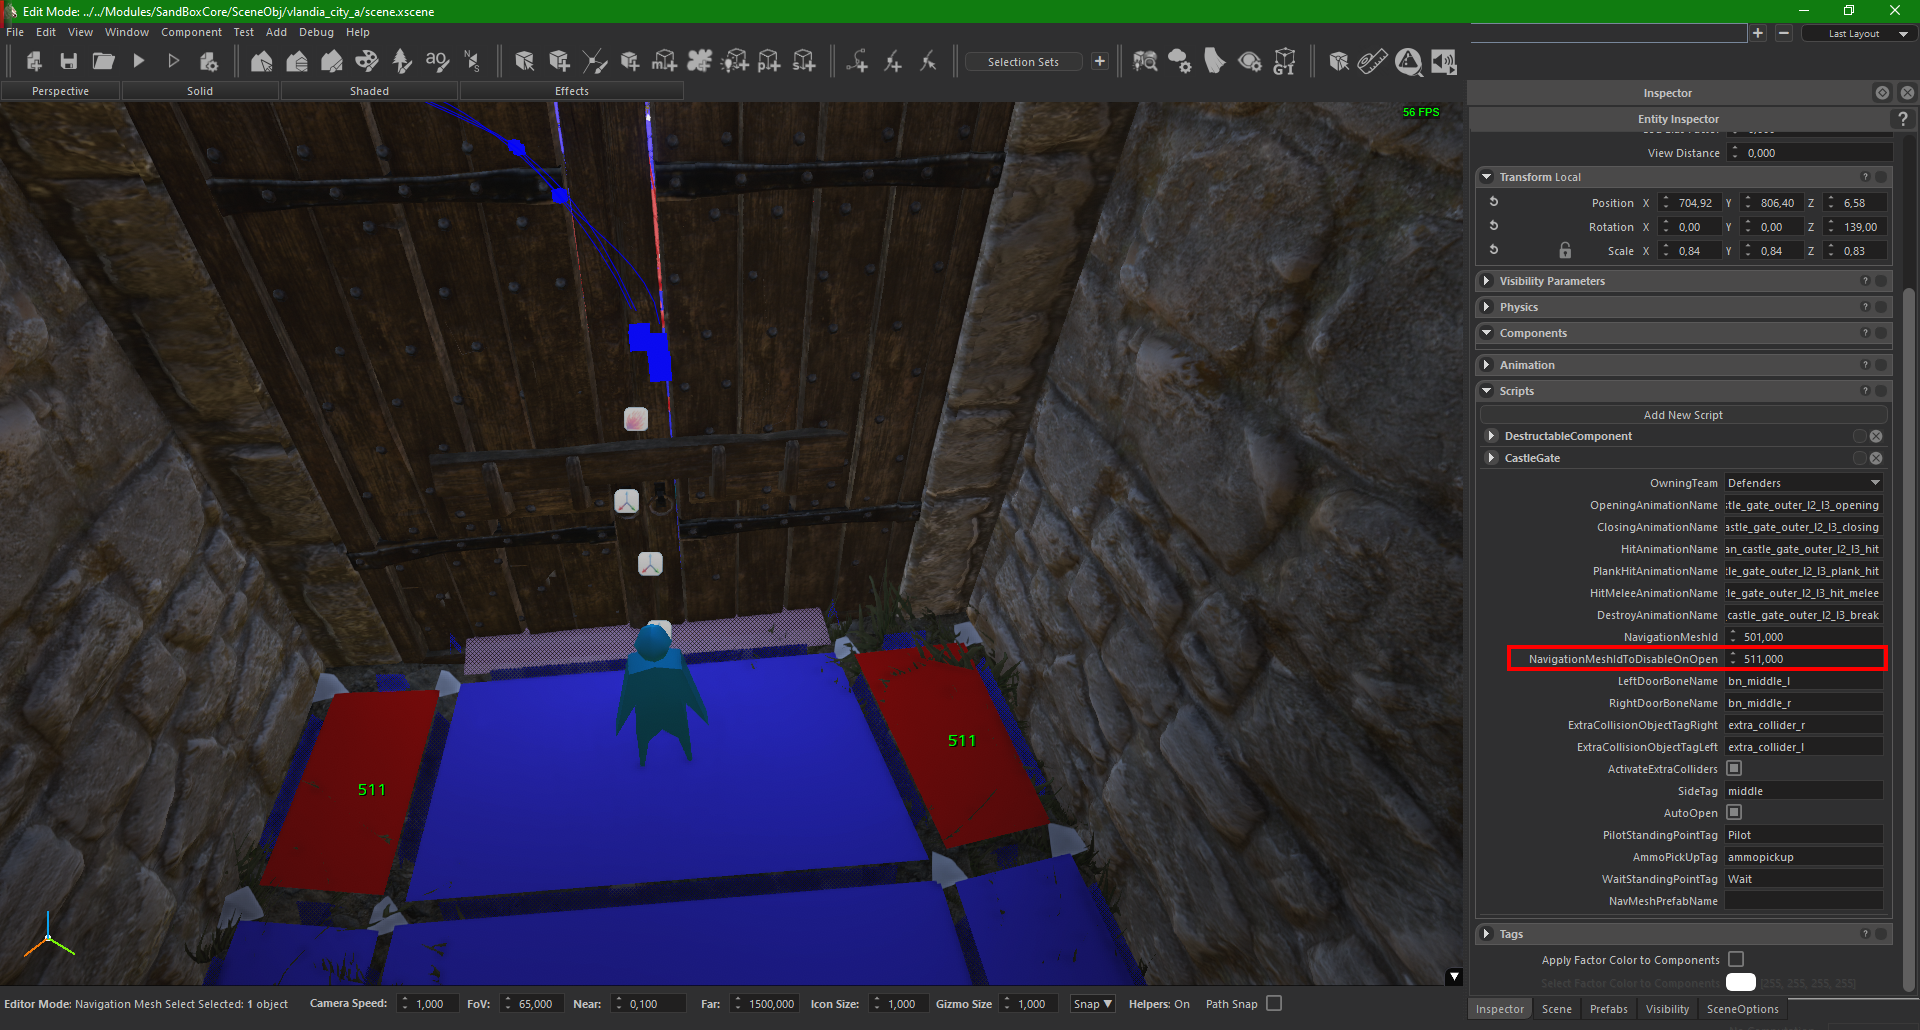
- CastleGate script
- Enter the navigation mesh id you will use for the gate.
- Make the side variable “middle”.
- Change the HP of the gate according to its position and level (For outer gates HP’s should be: 12000 on level 1, 15000 on level 2 and 18000 on level 3. Inner gates HP’s should be 1000 for all levels.)
- Remake and id the navigation mesh accordingly.
- Make sure that new navigation mesh faces have correct levels.
- Adjust the position of “middle_position” of the outer gate. It should be really close to the inner side of the inner gate.
- You can turn off the navmeshes, for open state of the gate using [navigationmeshidtodisableonopen] navmesh id.
- Related prefabs
- Aserai_castle_gate_inner_l1
- Aserai_castle_gate_outer_l1
- Battania_castle_gate_inner_l3
- Battania_castle_gate_outer_l3
- Empire_castle_gate_inner_l2
- Empire_castle_gate_inner_l3
- Empire_castle_gate_outer_l2
- Empire_castle_gate_outer_l3
- European_castle_gate_outer_l1
- European_castle_gate_outer_l2
- Khuzait_castle_gate_outer_l1
- Sturgia_castle_gate_inner_l3
- Sturgia_castle_gate_outer_l3
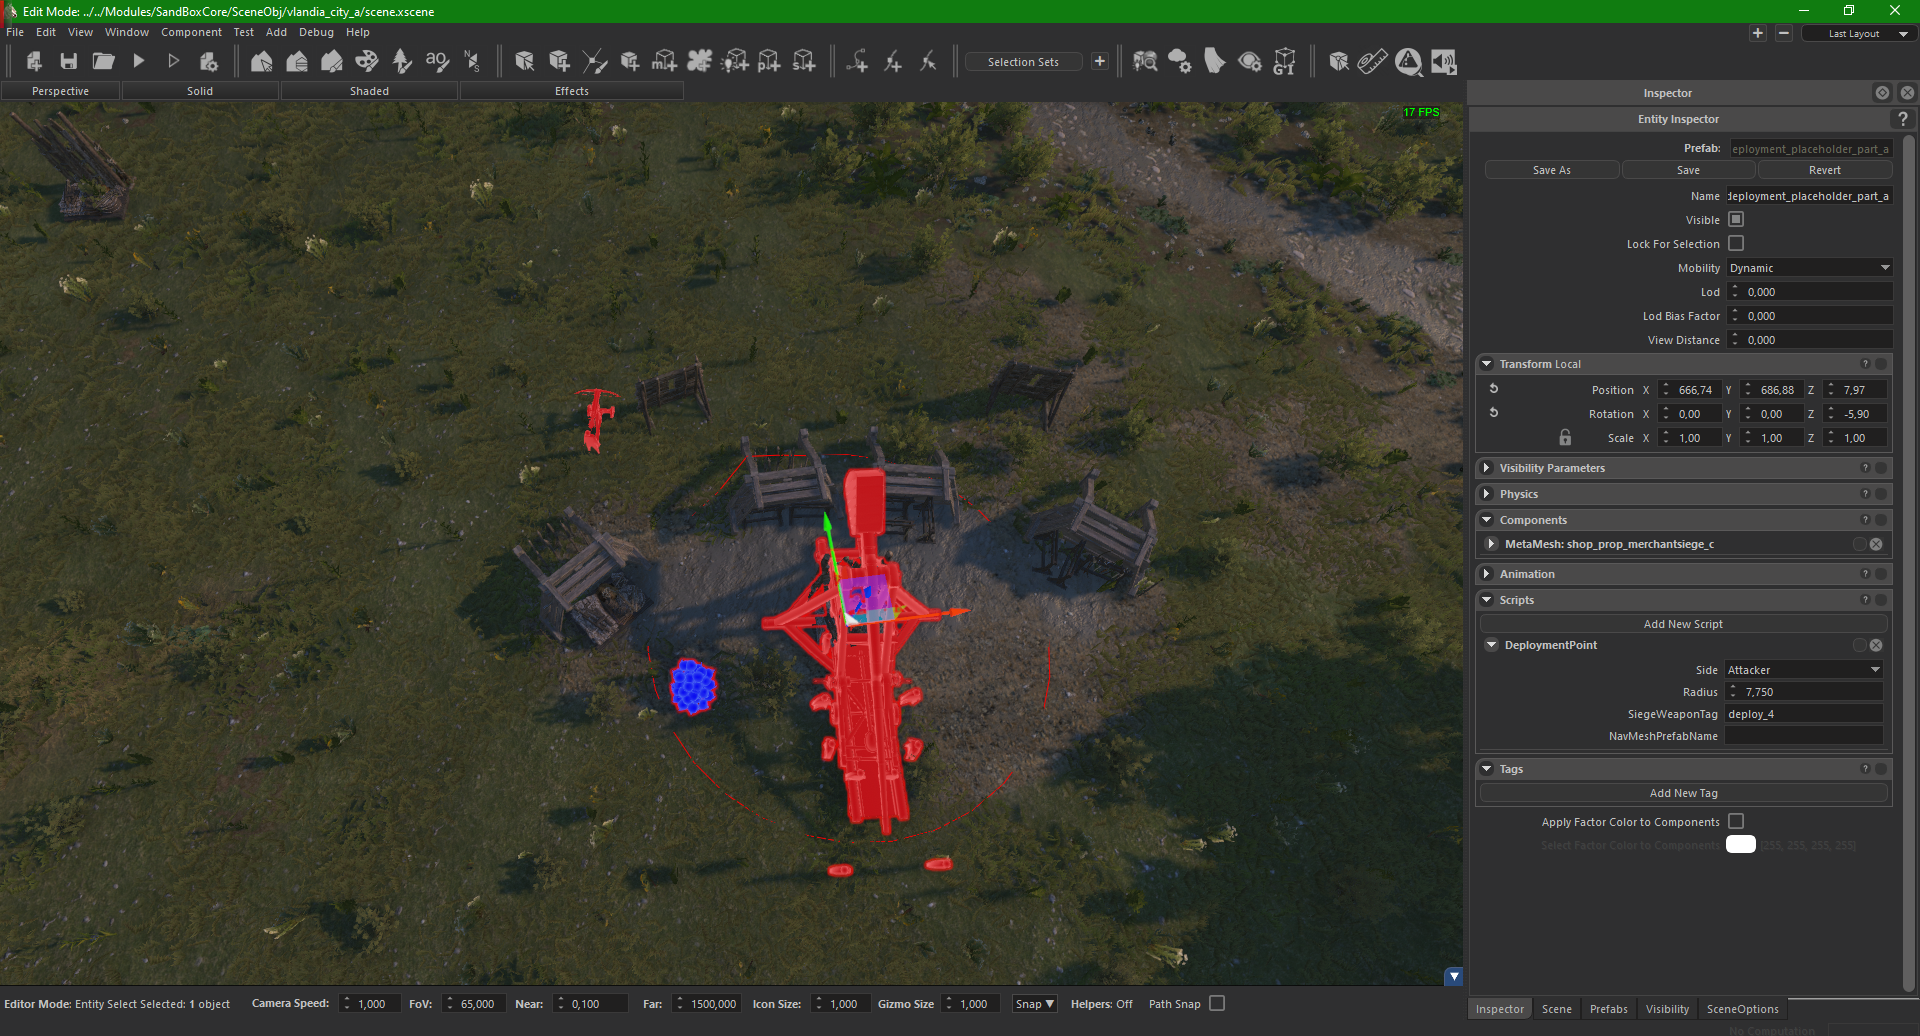
Deployment Points
All siege machines are placed under deployment points. These points later in the mission become the selectable positions, in which players can place their siege equipment, like ballistas, battering ram or the siege towers.
- There needs to be 4 of those for the defender siege machines. 4 for the attacker siege machines. 2 for each siege tower. And one for the battering ram.
- The siege machines can be connected to these deployment points, by either placing them in their radius, or by tags.
- Best practices
- Make sure the radiuses of the Deployment Points don’t overlap.
- You’ll need to have different Deployment Points for each layer, for example:
- Since the walls change with each layer, the defender siege machines naturally have to be in different positions on top of them.
- Since the gate house position changes, the battering ram needs to take a different path. The same goes for siege towers.
Secondary Siege Machines
Secondary siege machines are ranged siege machines that support the assault or try to fend off attackers. They include ballistas and mangonels for both sides and trebuchets for the attacker.
- Mangonel and ballista entities should be included for each defender position, and mangonel ballista and trebuchet prefab should be included for each attacker position.
- There should be 4 “Deployment Point” positions for defenders and 4 for attackers.
- Both siege machines and deployment points have a “side” variable, make sure those variables are correct.
- No siege machine should be under control of more than one deployment point.
- Related prefabs
- Ballista_a_spawner
- Ballista_b_spawner
- Mangonel_a_spawner
- Mangonel_b_spawner
- trebuchet_a_spawner
Siege Tower
Siege towers are the prefabs that support the situation when siegers build a siege tower in the campaign map. They replace one of the wall lanes. If a siege tower is deployed they will override the siege ladder on that “side”. If there is a breach on a lane, the siege tower can not be deployed to that lane.
- Place the suitable siege tower to the scene.
- Adjust the angle of the deployable exit ramp of the either by selecting the ramp and rotating it or using the “RampRotationDegree” parameter within the “SiegeTowerSpawner” script
- If your exit ramp has a large slope angle either upwards or downwards, make sure that the navigation mesh prefab fits the ramp, otherwise make one.
- Build the path for the siege tower, using the path tool.
- SiegeTowerSpawner script
- Enter the path name.
- Enter the target wall segment. This is the tag we added to the wall that has the middle and wait positions. The siege tower will search for that tag and then search for its child entities to direct AI troops accordingly.
- Enter the side tag.
- Once the tower is connected to its path, place the deployment point at the beginning of the path in connection to the siege tower.
- You can mark the merlons on the way of the siege tower with the tag
tower_merlon. These merlons will be removed once a siege tower is deployed to the scene. Make sure that they have a “DestructableComponent” script and “CanBeDestroyedInitially” tag is selected. - Place a “_barrier_ai_04x04m” prefab on the wall where the siege tower will approach. Give the barrier a unique tag like “tower_barrier_lvl3”. Now insert this tag within the “BarrierTagToRemove” parameter under the SiegeTowerSpawner script. The tagged barrier will be removed once the ramp of the siege tower is open.
- Related prefabs
- Siege_tower_5m_spawner
- Siege_tower_9m_spawner
- siege_tower_12m_spawner
Battering Ram
Battering ram is the prefab that supports the situation when siegers build a battering ram in the campaign. The battering ram will be connected to the side tag and will damage the outer gate once it reaches the gates and troops swing the ram.
- Build the path using the path tool. The crash indicator on the ghost entity of the battering ram prefab should make contact with the gate to match animations and visuals.
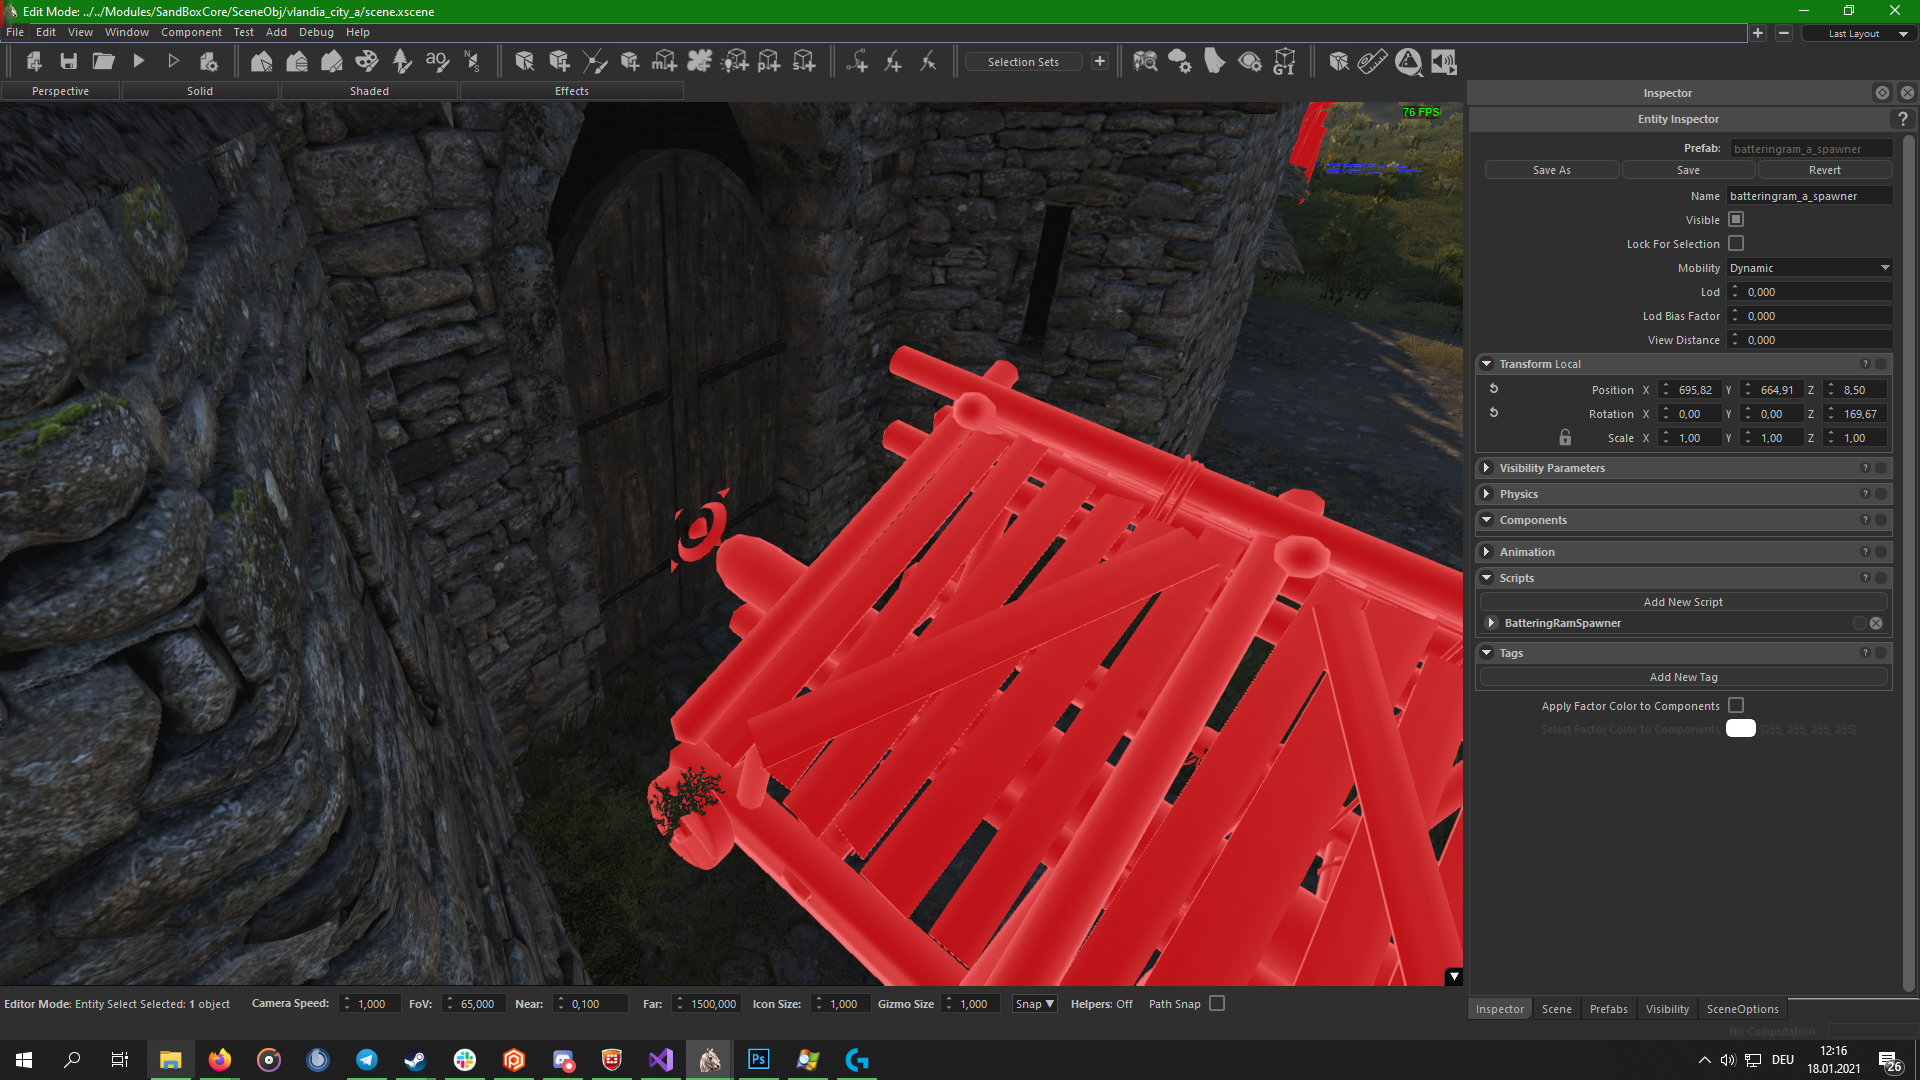
- BatteringRamSpawner script
- Enter Side Tag
- GateTag: outer_gate
- Enter the path name to the script.
- Once the battering ram is connected to its path, place the deployment point at the beginning of the path in connection to the battering ram.
- Related prefabs
- Batteringram_a_spawner
Ditch Fillers
If the scene has ditches and a moat around the castle, we have a ditch filler system which allows the siege towers and battering rams to work properly. Ditch fillers will spawn if the player deploys the connected siege engines. We will have to arrange and ID various navigation mesh faces for AI to use pathfinding properly around the ditch filler.
- After placing the proper entity to fill the moat, collect all of them under a single parent entity.
- Add the tag “ditch_filler” and the appropriate side tag (left, right, or middle) to the connected siege engine.
- Once a siege tower or a battering ram is deployed, the ditch filler will be deployed with it too.
- We manipulate the navigation mesh in a similar manner to the wall breaches.
- The navmesh ids are on the siege tower and battering ram scripts.
- Enter the navigation mesh ids you will use for that ditch filler.
- Remake and id the navigation mesh accordingly.
- Make sure new navigation mesh faces have correct levels.
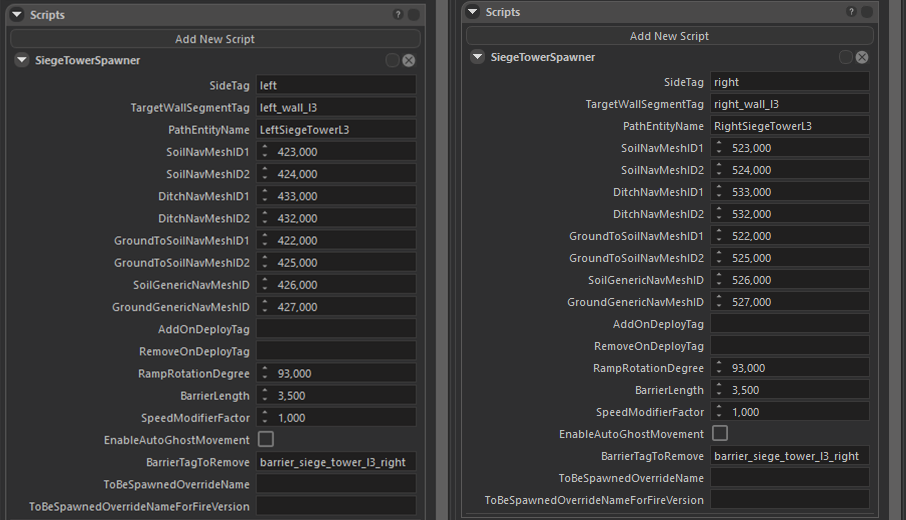
| SiegeTowerSpawner Script | Ditch Filler |
|---|---|
 |
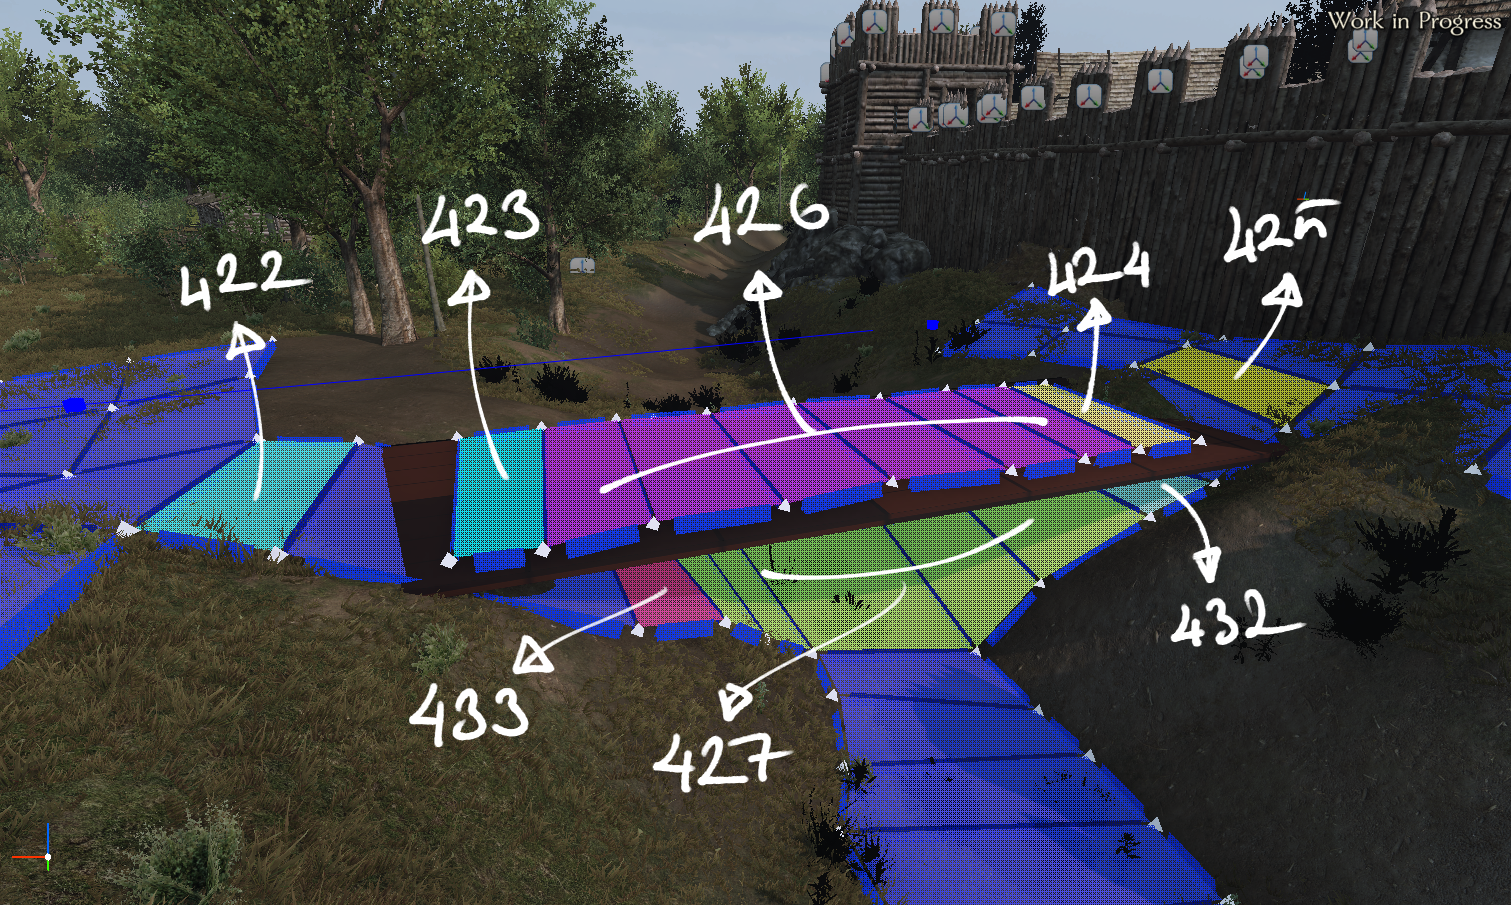 |
- In this example, when there is no ditch filler, 423, 426, and 424 will be deactivated. 422 and 433 will stay connected 427 will be active, 432 and 425 will be connected.
- When there is a ditch filler, 422 will disconnect from 433 and connect to 423, 426 will be active, 425 will be disconnected from 432 and connect to 424, and 427 will be deactivated.
Siege Ladders
Siege ladders are deployed by default to both siegeable walls unless there is a siege tower or a breach.
- Choose the correct size of the ladder spawner, never resize the ladder spawners height.
- SiegeLadderSpawner script
- Enter the target wall segment. This is the tag we added to the wall that has the middle and wait positions. The ladder will search for that tag and then search for its child entities to direct AI troops accordingly.
- Enter the id of the navigation mesh you will use.
- Enter the SideTag.
- “merlon_solid_left” or “merlon_solid_right” tag have to add both ladder merlons according to walls right or left position. These tags are added to make sure tagged merlons do not break and cause physics problems with AI troops movements.
- Remake and id the navmesh accordingly.
- Nav mesh face on the siege ladder should be one directional towards the wall.
- Adjust the standing and fork holder positions using the “UpperStateRotationDegree” and “DownStateRotationDegree” to match the terrain and the walls.
- Place a “_barrier_ai_04x04m” prefab on the wall where the ladder will land. Give the barrier a unique tag like “left_ladder_barrier_a”. Now insert this tag to the ladder’s “BarrierTagToRemove” parameter. The tagged barrier will be removed once the siege ladder is lifted up to the walls.
- Related prefabs
- Siege_ladder_6m_spawner
- Siege_ladder_7m_spawner
- Siege_ladder_8m_spawner
- Siege_ladder_11m_spawner
- Siege_ladder_14m_spawner
Archer Positions
Archer positions are AI direction locations with which scene designers can define locations where archers can shoot from. There are 2 types of archer positions.
- Big archer positions
- Positions used by archer formations.
- With prefab names “defender_archer_position” and “attacker_archer_position”.
- They have the tags “archer_position” and “archer_position_attacker”.
- Small archer positions
- Positions used by archer agents.
- With prefab names “strategic_archer_point” and “strategic_attacker_archer_position”.
- They have the script “strategicarea”. The script has variables for:
- Attacker or defender side.
- Range (an archer position should be in their range for them to be used). There must be a big archer position inside this range for the small archer position to be active. The default range is 40m for defender and 60m for attacker.
- Depth and width: Both represent the size of the area usable by troops. 1x1 is suitable for one troop in a 1m x 1m area. 4x2 is suitable for 8 troops in a 4m x 2m area.
- Related prefabs
- Defender_archer_position
- Attacker_archer_position
- Strategic_archer_point
- strategic_attacker_archer_position
Deployment Boundaries
We place boundary entities to the scene to specify where attackers and defenders can deploy their troops. They work pretty much like soft borders.
- All boundary entities should have these 3 tags:
- walk_area_vertex
- defender or attacker
- deployment_castleboundary[insert number]
- deployment_castleboundary[insert number] tag with the same number in [insert number] are connected to each other to create a convex area. For example 5 entities with deployment_castle_boundary_3 tag will create a pentagon, defining a border area.
- You can use prefabs “attacker_boundry“, “defender_boundry“ and edit them to your needs.
- If you add an “out” tag to one of those boundary sets it acts like a negative space, subtracting from the deployment zone instead of adding to it. With this method you can create concave deployment zones.
- Related prefabs
- Attacker_boundry
- Defender_boundry
Camera
The camera position and angle specify the viewpoint that will be used during the deployment phase.
- Create an empty entity.
- Camera for the attacker should have the tag “strategycameraattacker”.
- Camera for the defender should have the tag “strategycameradefender”.
- Make sure that the camera positions are inside the deployment boundaries.
Spawn Points
Spawn points are the locations where NPC troops and the player will spawn in the scene at the start of the battle.
- Use the standard “sp_battle_set” prefab for troop spawning and reinforcements. The prefab includes 16 entities, for each type of troops, attacker and defender, starting or reinforcement. Normal spawn designates the spawn location at the start of the battle, while reinforcements define where the reinforcements will spawn.
- Make sure to set the proper level visibility, since another “sp_battle_set” prefab is used within the civilian level for common area fight missions.
Flee Lines
There are flee lines both for attackers and defenders. If placed in siege scenes, the AI should prefer to run away using the flee lines rather then to the closest soft border edge.
- Defenders should run to the keep.
- To be active, the Flee lines must be covered by navigation mesh.
- Related prefabs
- Flee_line_attacker
- Flee_line_defender
Tactical Position Script
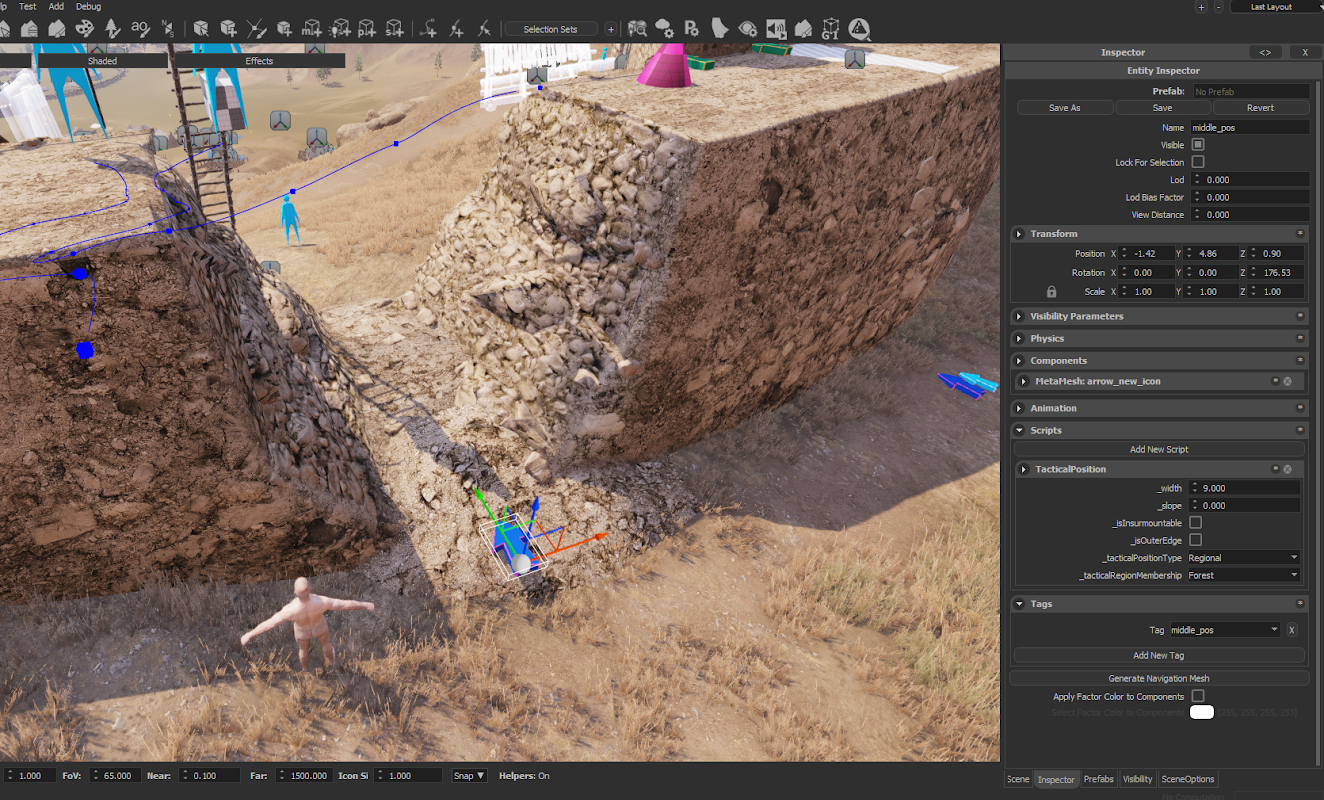
The script [tacticalposition] enables us to modify the width of various AI positions.
- Once added to an entity you can change many parameters within it. For siege purposes, the only important one is _width. Value entered here is equal to the width of the formation in meters.
- You can use this script in [wait_pos], [middle_pos], [attacker_wait_pos], archer positions and siege ladder wait positions.
| Tactical Position | Deployment |
|---|---|
 |
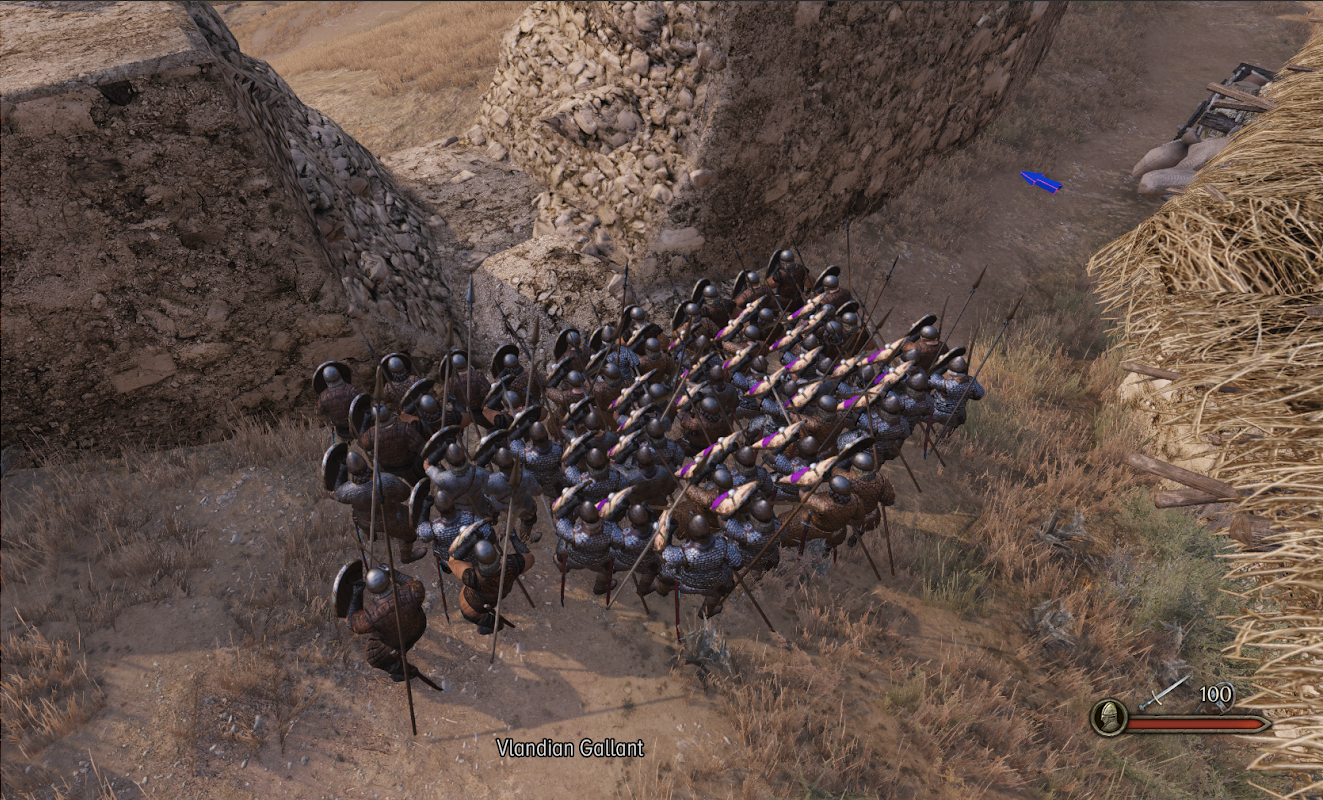 |
AI Barrier
The AI barrier should be added to all locations where the AI troops might fall from unacceptable heights.
- With the path tool, first draw the path line then check the “Enable Barrier Build” checkbox. After the barrier is built, click “Go to entity” and check the scripts of the prefab. The following “barrier_builder” script parameters should be checked:
- AI Limiter
- Agent Only
- If necessary, Flip can be checked according to the side of the wall.
Throwable Rock Pile
We can place usable rock piles to siege scenes.
- The prefab [throwable_rock_pile] has three components:
- Stone pile: With 8 interactable points for AI to pick up the rocks.
- throw_pos: Where the agent will move to throw the rock.
- volume_box: Designates the area to which the AI can throw the rock.
- When an enemy AI moves into the volume_box the prefab will call an agent, that agent will pick up a rock and try to throw it to an enemy in the volume_box that it can target.
- You can have multiple throw_pos per volume_box. Just duplicate the throw_pos entity.
- You connect throw_pos entities to a volume_box by adding a tag to the volume_box and entering that tag name to the script of throw_pos.

Using Throwable rock piles and Archer position (and pretty much everything else) under Broken and Solid walls
- throwable_rock_pile’s and archer positions do work when they are child entities.
- So you can separately place these entities as well as any other entity you want under solid or broken walls as child entities. This way you can create archer positions covering a breach, or utilize the solid wall when there is no breach.
| Example of Solid Walls | Example of Broken Walls |
|---|---|
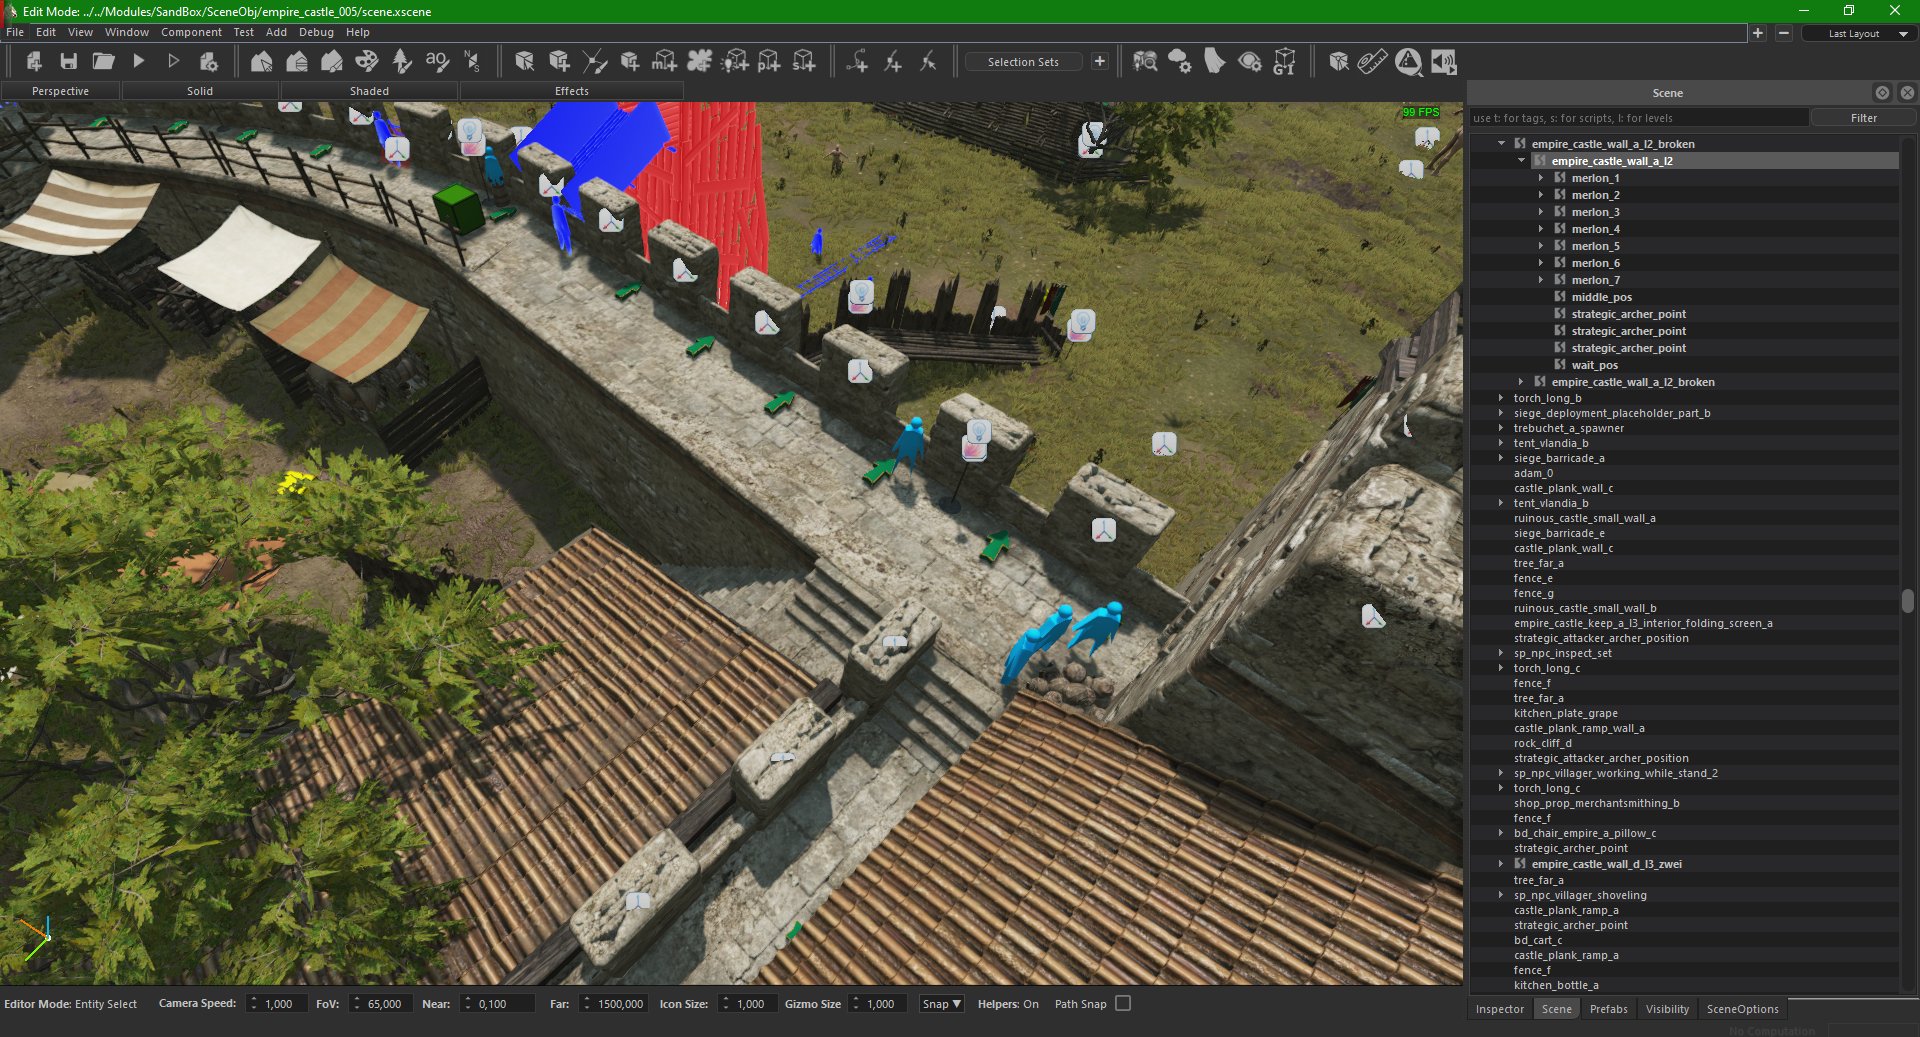 |
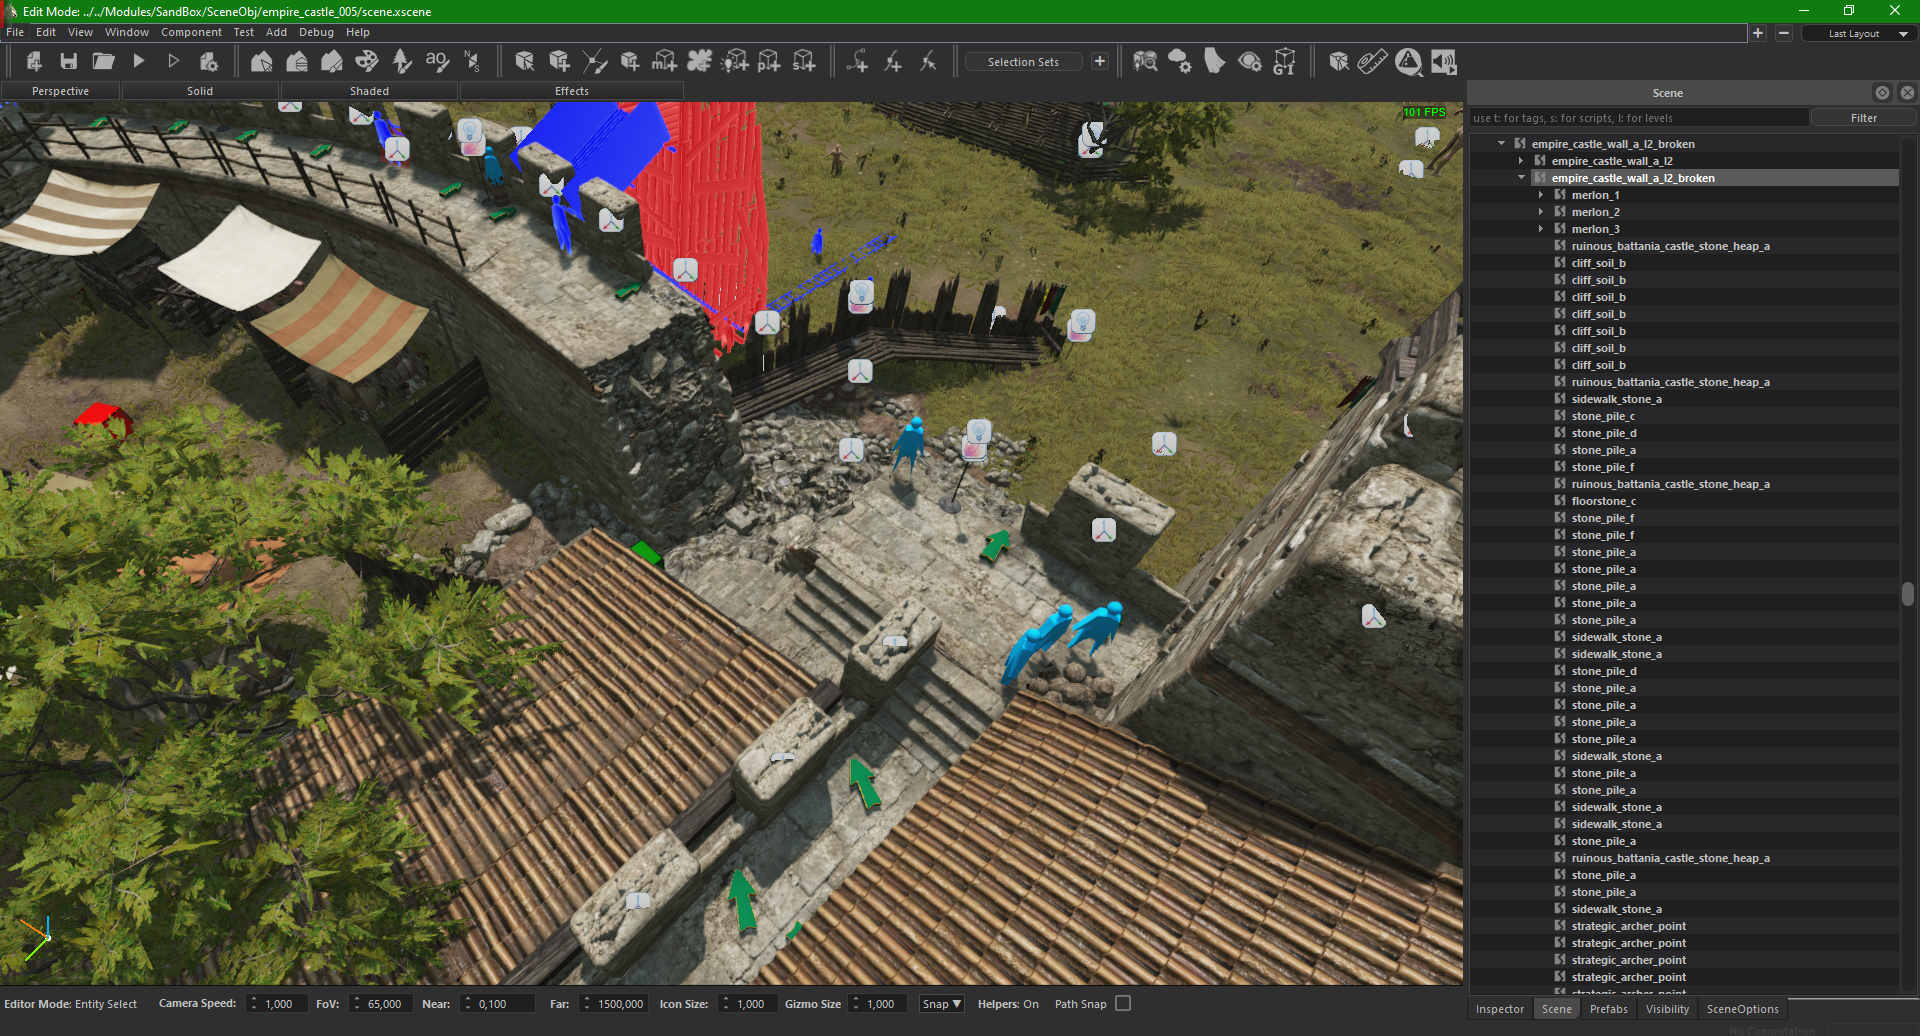 |
Merlons and other Destructible components
According to the wall HP of the settlement we create wall breaches but we also destroy some the entities containing the destructable_component script. This feature was intended for merlons but it does not specifically check for merlons but rather for the script itself.
- A parameter called “CanBeDestroyedInnıtially” is present in the “destructable_component” script. If it is checked, that entity has a chance to be destroyed on mission start, depending on the castle hit points (that are brought down during the siege progression on the campaign map).
- By default it is on for merlons and off for pretty much everything else. If you make any scene specific destructible entities, make sure to set the aforementioned parameter properly.